Posts filed under Recipes!

Maple, Candy Cap Chanterelle Mushroom Recipe

This is my original recipe and probably my favorite way to eat these orange chanterelles.  It uses maple syrup and candy cap mushrooms to overdrive the already present, subtle maple flavor of saut'eed chanterelles.

Clean the mushrooms, but try not to saturate them with water.  Slice to consistent thickness, under 1/4 inch.  Saute in butter slowly enough not to burn the butter badly until the water cooks out and evaporates, and they brown lightly on both sides.  They should be cooked enough to be lightly browned on both sides and have lost enough moisture to be somewhat firmed up.  If you have candy cap mushrooms, add a small amount of crushed dried candy cap during the saute to infuse the mushrooms with maple flavor.

Remove the mushrooms from the pan, add maple syrup to the hot pan and cook until the sugar in the syrup caramelizes very lightly.  Add more butter and syrup to make enough glaze or syrup.  You can add water back after caramelizing to make it more syrupy if desired. Add the mushrooms back and toss to coat them with the glaze.

Toasted walnuts are a nice addition. I'm sure pecans would be even better.  Good with traditional American breakfast stuff, bacon, ham, breakfast sausage, pancakes and waffles.  I just eat it the way it is most of the time.

Hot Sauce, the Real Deal, Fermented, Delicious and Beautiful

DSC03166 (1).jpg

I recently wrote up a thing on the instructables site on how to make lacto-fermented hot sauce.  As of now, I’ve made the instructables home page as a featured post and have over 5000 views and 172 likes (edit, this morning this instructable also made the instructable daily email.  Likes and views are pouring in!  That's awesome.  I don't write this stuff for my mother to read ;).  It’s also entered into a contest.  I believe voting is open for another day here http://www.instructables.com/contest/preserveit/   I got my submission in kind of late, so there hasn’t been a lot of time to accumulate votes.


I’ve been looking forward to making this video because I get all fired up about fermented peppers and am prone to going on and slinging strong opinions about.  Many years ago, before fermentation was cool, I started trying to pickle some pepperoncini that I grew.  I love those wrinkly little things!  I looked up recipes for pickled peppers and they were all pickled in vinegar.  The results were basically inedible and certainly nothing like the pepperoncini you can buy in the store.  I was studying and experimenting with fermenting olives at the time and finally put two and two together, they had to be fermented of course!  I extrapolated off of a recipe for traditional fermented dill pickles and kaching!  Success!  I had figured out how to make pepperoncini that handily stomped the best brands you can buy (more on that and testing pepperoncini varieties some other time... and other pepper related stuff.  I basically can't grow enough of the things to supply all of my numerous pepper habits).  From there I started making pimentos and hot sauce and have done so ever since, gallons upon gallons of all of them.  I published my rather detailed and long article on fermenting peppers on the paleotechnics site 8 years ago, when there was very little on the web about fermenting much of anything.  It is worth reading if you want to know more and stuff like the rationale behind fermenting anaerobically in mason jars, though I think it could use some updating.  I haven't read it in a while. 

Cupboard stuffed full of lacto-fermented pepperoncini, pimentos, hot sauce peppers and olives.  None are heat canned.  They are live ferments sealed up with a protective layer of carbon dioxide from the fermentation process.  Damn, th…

Cupboard stuffed full of lacto-fermented pepperoncini, pimentos, hot sauce peppers and olives.  None are heat canned.  They are live ferments sealed up with a protective layer of carbon dioxide from the fermentation process.  Damn, this picture is making my mouth water.  I usually store my hot sauce peppers like this and just make up one jar at a time into sauce as needed.


This is the real way to make hot sauce.  Peppers ground up in vinegar will never be the real deal.  It is really easy too, no magic hoo-doo or lab coats required.  Read the instructable here, or you can just watch the video below, which is visually appealing and under 5 minutes long.  So here you go, full screen, HD recommended.


Making Sicilian Style Fermented Green Olives

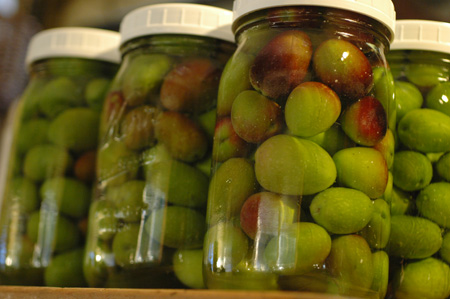
big, lively, acidic, rich tasting olives, oh yeah!

I'm going to tell you how to make delicious fermented green olives by the easiest curing method I know of.  One of my many long term projects has been curing olives.  I started because I love them and because they were too expensive for me to eat in the quantities I wanted to.  I figured I could turn those olives growing all over California into something tasty.  Some 20 plus years later, I have a pretty good grasp on the subject.  I'm headed to an olive tasting event this weekend, the Olive Odyssey organized by olive curing champion Don Landis.  I was going to print up recipe cards for sicilian style olives, but thought I'd just save paper and send people here instead.  Besides, now people can bump into this awesome recipe on the web!

What's so cool about this recipe?  Lotsa stuff.  It is perhaps the easiest curing recipe I know for olives.  There is no maintenance to speak of.  There is no leaching with lye, or water, nor anything else.  You stick 'em in a jar with brine, seal it up, leave it for months and open one when you are ready to eat them.  And of course they taste hella good homeslice!  Big fat juicy, lively, acidic, rich tasting olives... oh yeah.

The downside?  You have to be patient!  Wait, that's good for you, so get over it!  Oh, and I only know one olive common in California that is really good for this process.  If you're lucky enough to have access to this olive though, you've got a gold mine of potential hanging on those trees in the fall.

That olive is the Sevillano.  It is also known as Queen olive in California, but Sevillano it is and should be.  The Sevillano has been a very popular commercial cultivar, so it is pretty common.  It is also easy to identify.  If you find a tree with many sizes of olives on it, but some of them very large, it is very likely a Sevillano.  If it also has some bunches of very tiny olives, like BB's, known as shot fruit, it is almost surely a a Sevillano.  The olives are generally oval, but become rounder and plumper as they ripen, turning from a brighter grassier green to a more rich yellow tending toward straw color.  It is okay to use them when they are just beginning to blush red too as in the picture below.    The reason that these work well are several, but the key is the fact that they have a low degree of bitterness.  The finished olives will have some bitterness for sure, but if made with most other varieties of olives, they would be inedible.  The texture and flavor are also outstanding and they seem to have plenty of fermentable sugars.  They also make very good lye cured olives in brine, kind of like the black olives in cans, but many times better.  Yummy like sweet candy is to the unfortunate child of a staunch health food slingin', kale juicing mother.  Seriously, and that lye ain't gonna kill ya, I promise.  If I remember right they are ripe in mid November around here, probably earlier at lower elevations with warmer nights.

Sevillano olives are huge!

You want to harvest the fruits when they reach what is called the milk stage.  When the olives are unripe, they are hard and green.  The unripe olives just scream unripe.  The light green color, the slightly bumpy, hard surface texture, the shape and the bony look they have.  When they enter the straw/milk stage before turning black, the olives really plump up and become voluptuous with oil.  The skin glows and smooths out and the color softens.  The best test though is to pick one, stab into it with your thumbnail, and squish out some juice.  if the olive is ripe enough, it will exude a milky liquor.

Pick the olives carefully to avoid bruising.

Wash the olives and sort over to remove those with olive fly damage.  The olive fly lays it's eggs in the olive and the larvae eat it from the inside.  Look for small holes and "pricks" in the skin.  If in doubt, sacrifice some by cutting them open to see if there are larvae inside.

If you have a lot of olives, sort them by size and process the various sizes separately.  The smallest ones should finish curing a little sooner than the large ones.  Otherwise, it's okay to mix sizes.

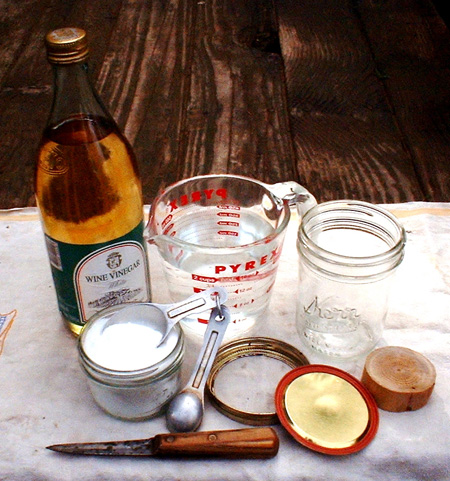
Wash the olives and pack into scalded mason jars within one inch of the top.  By scalded I mean pour in boiling water, put the lid on the shake it up a bit.  Turn the jar upside down for a minute to cook the lid real good too.  The jars can be any size.  I think you could ferment a single olive in a tiny jar if you could find a suitable jar that small!  Fill jars to the rim with brine made of 1 quart water, to 1/4 cup salt, with 1/4 cup of white wine vinegar, rice vinegar or distilled vinegar. (The vinegar is optional, but it helps shift the ph well into the acid zone, which is safer and seems to kick off fermentation.)   I don't think I've ever added any starter cultures to my olives.  The proper bacteria and yeast seem to be prevalent enough on, or in, the olives.  If you want to though, a splash of whey from the top of a newly opened container of yogurt, or a little juice from a lactofermented batch of vegetables shouldn't hurt, as long as the quality of the fermented food you get the culture from is high and the culture seems clean.

olive supplies

You can use a new jar seal, or a used one, but used seals should be in very good condition with absolutely no scratches.  You can use a canning ring to seal the jar if that's what you have, but I much prefer to use a plastic lid and you should too if you have one.  I  buy these white plastic mason jar lids just for fermenting food in jars.  They are fairly useless for most purposes, are not air tight and won't hold liquids, but they don't rust, so with a seal underneath, they are a better choice than a ring when it comes to fermentation.  I use this system of: mason jar/seal/plastic lid for almost all of my fermenting now.  It is simple, accessible and it just works for various reasons, which I'm sure I'll be writing about more sooner or later.  If all you have is canning jar rings, just use them, but the salt and acids will eat them up.  When you put the seal and lid on, the liquid should spill over a bit.  You want to leave very little or no air in the jar.  Screw the lid on firmly, but not super hard.  It is possible to tighten the jar so much that pressure cannot escape, which is not good.  I've been doing this for many years now and have never once had a jar break from built up pressure.  It has to be tight enough to keep air from entering back in, but the pressure created by fermentation must be able to escape.  Fortunately, there is a lot of leeway in how tight you make the lid.

s

Ok, now you're going to put that jar of pretty olives drowning in brine on a dish, because it's going to ferment and spill over.  Leave it at room temperature for a month or so.  Don't open it!  The carbon dioxide formed during the ferment will push any remaining oxygen out of the jar leaving a blanket of  inert carbon dioxide over the olives.  The liquid level will diminish somewhat and the olives at the top will be left above the liquid.  They are not sitting in air though, but in carbon dioxide.  If you open the jar, you let in air, and most importantly oxygen.  Organisms requiring oxygen will begin to grow in the jar and form a colony on the surface of the brine and on the olives.  If you see that happening, usually as a white scum or film, you have air in the jar and you'll have to toss the olives.  There is no really good reason to open the jar until the olives are done and you want to eat them, and plenty reason not to.

After about a month or so, the most active fermentation should be done with.  Check the jars for any kind of scum growing on the surface of the olives/brine, rinse the jars clean, tighten the lids pretty hard, and put them away in a dark cool cupboard for another 2 months or more.

I think these olives really develop pretty quality pretty well by 6 months, but I have some that must be around three years old now and they are still excellent!  They are not sterilized, they are not treated with preservatives, they are alive and kicking and full of beneficial bacteria.  The reason the whole thing works is that they have been maintained in an anaerobic (oxygen free) environment with good bacteria and yeasts dominating the acidic salty culture.  Pretty awesome if you ask me.  Certainly don't open them sooner than 3 months after putting them in the jar.

a

I'm sure there is a lifespan to these tasty morsels, but I haven't encountered it yet.  Eventually the lids will rust through, so that is something to think about.  When you open the jar, be extremely careful not to get any bits of rust from the lid into the olives.  Remove the lid carefully and then gently wipe the rim off well with a damp cloth.

The surface of the brine should not be covered in scum or white film, which would indicate air infiltration and potential spoilage.  The olives and brine should smell, look and taste, bright and appetizing.  The olives floating above the brine might be somewhat darker, but that's okay as long there is nothing else wrong with them.  After passing the visual and smell tests, the olives should taste sharp, lively, and clean.  The feel and the bite can be tender, but should not be mushy or soft or slimy.  Trust your senses.  If the olives failed to ferment at all, they will not taste acidic and probably will not look very good either.  The fermentation is essential to out compete spoilage bacteria and create preservative acids, so if they aren't acidic, they should be thrown out, period.

Refrigerate uneaten olives, but use within a few weeks to a month or so.  You don't want them sitting around long enough that you start seeing white scum forming on the brine surface.  Adding some vinegar, or just replacing half the brine with a light colored vinegar, like distilled, white wine or rice vinegar will allow them to keep much longer because vinegar is just much more preservative than the lactic acid which dominates the brine.  But I dont' think you'll need to, because they'll be so good, you'll eat them all.  If you must save them for special guests or because they are just too damn good and special to eat, add some vinegar before storing int the fridge for a long time.

That's it.  That seems like a lot of words for the simplest olive process I know, but I hope you learned a little more about fermentation options too.  Fermenting in jars has the advantage of long storage in those jars, and means that you can put food up in small amounts that you can finish before the stuff goes bad.  That is always my main message to people about fermentation, mason jars are the cat's knees.

I wrote this post in a hurry, so please let me know if I forgot anything important, or if you have any questions leave them in the comments below.

These olives are richly flavored, zesty and alive.  Someone get me a loaf of chiabatta and some olive oil quick!

Canning Tomatoes: How I do it and why it works for me.

canned tomato header Tomato season is finally on here at 1800 feet in coastal Northern California.  Having just mentioned canning tomatoes in the Mega Canner post, as well as also having recently been enjoying my few remaining jars of them, it occurred to me that my method of canning tomatoes might be of some use to other people.  Over the years, I gradually devolved toward a very simple tomato canning system that is not too much work and leaves me with a very versatile product.

My mom made tomato sauces and such, but what I really remember was the whole canned tomatoes.  I would sometimes beg a jar of them, open it, and just eat them out of the jar with a fork.  Yum, they were so good!  Home canned tomatoes are so much better than store bought!!!  I don’t care what brand you buy, there is just no comparison, because the commercial tomatoes are always bred for processing rather than flavor, and are harvested too early... just what we should expect from an industrial model.  One day I was thinking about what I wanted to eat.  I thought spaghetti sounded good.  I got the pasta water going, got the pasta cooking, saute’ed some onions and ground meat, then rummaged in the cupboard.  NOOOOO!!!! I was out of home canned tomatoes!  I was already salivating and could taste those yummy sweet tomatoes as they oozed into the spaces between the noodles, topped with slowly melting shreds of Asiago cheese.  But wait, there was a can of storebought tomatoes, that would have to do.  Nope, they were soooooo lame!  Total buzzkill :-/

Since horking down cans of my moms tomatoes at 12, I have sometimes made sauces and paste, but anymore I only can whole peeled tomatoes.  Aside from fond memories, the main reason I do so is versatility.  I don’t have to figure how many cans of sauce I’ll use, or what kind of sauce I want to make, or anything like that.  My whole canned tomatoes can be reduced to small pieces in the jar with a butter knife in a matter of seconds, or tossed in the blender to make pizza sauce, dropped whole into a casserole, or dumped straight into a pot of minestrone.  I can use them in Asian food, Mexican, Italian etc and so on.  There are no skins to get in the way, and the extra juice in the jar tastes amazing with a splash of hot sauce, perfect to sip on as an appetite stimulant while cooking, or as a treat to share with someone.

c'mon, this is the sexiest tomato you've ever seen.

I’m not against other forms of canned tomatoes, but I’m an adventurous cook.  I can’t put Italian spaghetti sauce in my chili, but I can make spaghetti sauce with my whole canned tomatoes when I need to.  Using whole canned tomatoes is more like cooking with fresh ingredients.  They are on the watery side, but I can put them in a pan on high heat and have them reduced to a sauce by the time the rest of the meal is cooked, if not before.  Diced tomatoes, as a reader recently pointed out, are similarly versatile.  I have made diced canned tomatoes, but it just seems like more work than is necessary since whole canned tomatoes are so easily reduced in the jar with a butter knife.  And I do occasionally want the whole tomatoes, though admittedly not often.  The basic method I use could be adapted to make diced canned tomatoes just as well if one wanted to.

There are times when a long cooked thicker sauce is where it’s at.  Long cooking can develop deep rich flavors.  But most of the time I’m after a less tortured, less concentrated flavor from my tomato dishes, and I can get that with whole canned tomatoes.  I’ll admit that it’s less instant and convenient than sauce that is already cooked down and flavored and ready to go out of the jar, but I’ll also wager that sauce made with the same ingredients, cooked down with fresh herbs just before dinner from whole canned tomatoes, will be a cut above a precooked and pre-flavored canned sauce.

So here’s how I do it.  Maybe you can put up a couple of jars this season and see how you like them.

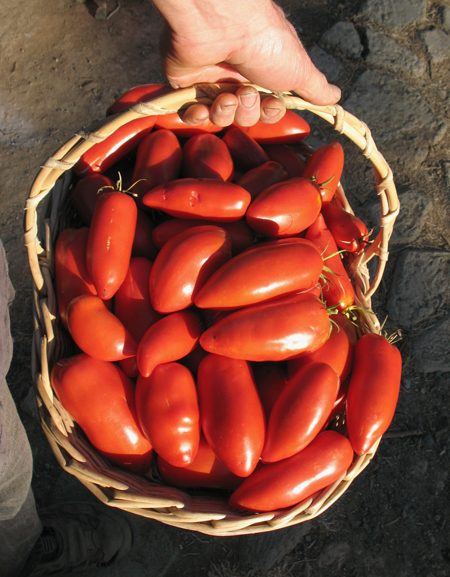
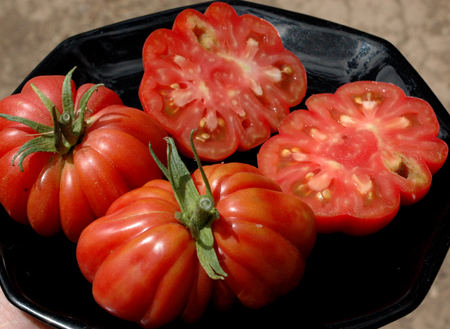
Good sized, dense fleshed, sparsely seeded tomatoes like these are best for canning.  I grow them on purpose, but I'll generally use whatever I have extra of as well.

What tomatoes to use:  First, USE RIPE TOMATOES!  Ripeness makes all the difference, and is your main weapon in superiority over commercially canned tomatoes.  I prefer to use canning tomatoes, but will can any excess slicing types too.  My favorite is probably Orange Banana (available from Fedco), a small yellow canning tomato with a very sweet fruity flavor.  It is not suited to every dish because it has less of a classic tomato flavor, so I grow reds as well.  I haven’t really settled on a red canning tomato yet, but there are lots to choose from out there.  I think Blue Beech is in the lead for flavor so far (also available from Fedco... I'm a big Fedco fan if you can't tell).  It is a large tomato, few seeds, dense, tasty and reasonably productive.  Polish Linguisa produced like mad giving over 50 pounds off one plant in one picking, but the flavor lagged behind blue beech and others.  I’m planning to can some Zapotec this year.  It is a deeply pleated tomato with amazing flavor and seems fairly dense, though it’s a great slicing tomato.  One red canning tomato that is popular is San Marzano.  San Marzano gets a lot of press, but the year I grew it, this popular tomato seemed like a just above average commercial processing type, bred for holding in the field and to withstand lots of handling.  My guess is that it is basically a gourmet industrial processing tomato, but that’s kind of like saying "gourmet non-dairy whipped topping".  I also did not like Speckled Roman as it has too much stringy fibrous stuff in it.  Early Girl makes a pretty decent canned tomato, though it is more watery and less dense than some canning types.   Basically, I’ll can whatever I’ve got at the time, but it’s really worth it to grow one each of a bunch of different processing types and then taste test them after canning.  Large tomatoes process much faster.  Processing 20 pounds of small orange bananas is a lot of work (though it’s worth it!).  (Edit:  I forgot to mention that some tomatoes, notably canning/processing types, have a small stem end so they don't require coring out of the tops like most slicing tomatoes and heirlooms do.  It really is a lot less work to prepare canning tomatoes which peel easily and have those small ends.  Heirlooms, especially the big slicers, often have folds and pleats, cracks and scabby areas that have to be dealt with.  Early Girl has a pretty small stem end, much like a processing type tomato.)

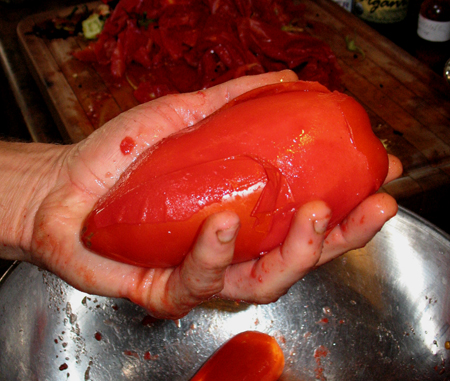
Bigger is better as long as flavor isn't suffering.  This tomato will probably filled an entire pint jar.  Note the huge pile of skins in the background.

Zapotec.  This outstanding tomato is quite meaty.  It's not as meaty as some processing types, like Blue Beech (which has so few seeds that one of Fedco's seed growers calls it Blue Bitch) but it's pretty darn meaty.  It tastes fabulous with a very rich tomatoey flavor.  If it peels Ok, with it's pleatedness, I'm thinking it will make a pretty great dual purpose tomato for market, fresh eating and canning.

I add two other ingredients to almost all of my canned tomatoes- ripe roasted peppers and basil.  It might seem like basil is limiting in that it is not suited to all cuisines, but I have not found that to be the case.  I use only a small amount of fresh leaves stuffed in the top of the jar, and it seems to go fine with everything.  Since I use a small amount, I don’t even really miss it when it’s not there and it should definitely be considered totally optional.  I don’t even have a single basil plant this year, so I won’t be using any.

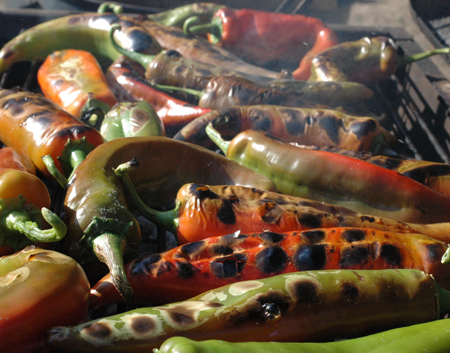
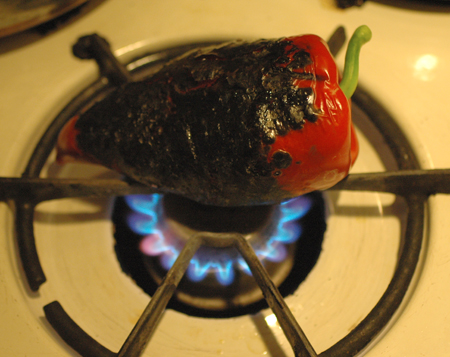
The pepper is roasted over an open flame, or better yet over hot coals, until blistered and a little charred.  Drop the blistered hot peppers into a paper bag, or wrap them in a towel for a few minutes to sweat and loosen the skins.  Slice them open, de-seed, scrape off most of the skin (a few remnants won’t hurt anyone) and cut into pieces.  I probably put the equivalent of a roughly 2x2 inch square in each jar.

Peppers roasting over charcoal.  These will definitely taste better than gas roasted peppers.

roasting on a gas stovetop works well enough but usually leads to excessive charring as here.  A gas grill would be an improvement.

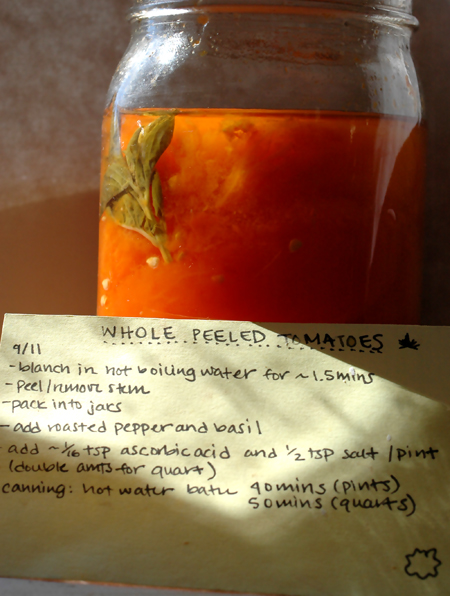
To prep the tomatoes, bring water to a boil and blanch them for just a minute or two.  All you want to do is loosen the skin.  If over cooked, some of the tomato will come off with the skin, and if under cooked, they will not peel easily.  Ease of peeling varies from variety to variety.  At their best, the tomatoes will just about slip right out of the skin.  I use a large stock pot with a colander insert.  When they are done, the colander is plunged into cold water briefly to halt cooking and cool the tomatoes off enough to peel easily.  Bring the water to a boil between each scalding.

Throw the peeled tomatoes into a big bowl until you have a bunch of them.  I like to line up a dozen or more jars at a time so I can add ingredients systematically without missing any.  Clean your jars, or whatever you do.  I just make sure they are washed clean.  If they are clean off the shelf, I don’t even wash them.  That’s what the sterilizing process is for. I use a lot of pints and some quarts, but it bears keeping in mind that quarts do save on buying lids, which are rather expensive when you add up the season's canning.  Stuff the tomatoes into the jars leaving just a little space at the top since they will sink quite a bit in the canning water bath.   Add the roasted pepper and basil, and for each pint use 1/2 tsp of salt and about 1/16 teaspoon of ascorbic acid.

About the ascorbic acid.  I started using it because some sources claim that tomatoes are not always acidic enough to prevent the formation of botulinum toxins in the jars after canning.  I actually don’t think that’s a problem, but my partner at the time always insisted on it and I didn’t think it hurt anything.  Eventually I decided it tastes better though, and a taste test of commercially canned tomatoes done by COOKS Magazine came to the conclusion that those brands with added acidity (usually citric acid I think) were just better.   It’s good stuff to have around anyway.  You can add it to juice when your sick, and use a wash of ascorbic acid and water for rinsing fruit to keep it from oxidizing, useful for drying and canning.

After the jars are packed, wipe the rims clean and screw on the lids.  I screw my lids on pretty firmly, but not super tight.  Put into warm or cold water, just not so hot as to crack the jars.  The jars should be resting on a grate to keep them off the bottom of the pan, and should be completely covered with water.  Bring the pot to a boil with a lid on it.  As soon as it begins boiling, you can set the timer.  Boil hard for 40 minutes for pints and 50 minutes for quarts.  I don’t remember where I got those numbers, but that’s how I do it.  Allow the kettle to stop boiling and wait about a minute before removing the jars.  If you remove them while too hot, they will boil over.  You may or may not need to snug the lids down as soon as they come out, I usually do.  Allow to air cool, check the seals, remove the rings, rinse the jars, label with the year, and with the variety for future taste testing if applicable, and stow away.  If you have a ton of them to process, check out the Mega Canner post.

Orange Banana, yum.

I’m not convinced that this is the very best way to do tomatoes, but I do know that it is a system that has served very well here with almost limitless versatility and I see little reason to tweak it in any way.  These canned tomatoes have contributed to countless delicious meals here at Turkeysong.  The rough number of canned tomatoes I try to shoot for in a year, assuming two people and occasional guests, is 100 pints.  There are usually some jars left over when the canning season rolls around, but that is good since no one knows what the next year will bring.  I am thinking of putting up some tomato juice this year if I have enough tomatoes because I like drinking the juice off the tomatoes so much.  I can any left over juice that accumulates in the bowl of peeled tomatoes with a little salt and ascorbic acid added, but that only amounts to a quart or two a year.  Probably the easiest way to preserve tomatoes is by freezing them whole.  The skins slip off easily when the frozen tomatoes are run under the tap for a few seconds.  But I usually prefer my canned tomatoes for most uses.  Please tell us about how you preserve tomatoes, in the comments.

Drying tomatoes is pretty easy.  I just find that I don't use that many.  I'd like to, but I haven't caught the dried tomato bug.