I'm going to tell you how to make delicious fermented green olives by the easiest curing method I know of. One of my many long term projects has been curing olives. I started because I love them and because they were too expensive for me to eat in the quantities I wanted to. I figured I could turn those olives growing all over California into something tasty. Some 20 plus years later, I have a pretty good grasp on the subject. I'm headed to an olive tasting event this weekend, the Olive Odyssey organized by olive curing champion Don Landis. I was going to print up recipe cards for sicilian style olives, but thought I'd just save paper and send people here instead. Besides, now people can bump into this awesome recipe on the web!
What's so cool about this recipe? Lotsa stuff. It is perhaps the easiest curing recipe I know for olives. There is no maintenance to speak of. There is no leaching with lye, or water, nor anything else. You stick 'em in a jar with brine, seal it up, leave it for months and open one when you are ready to eat them. And of course they taste hella good homeslice! Big fat juicy, lively, acidic, rich tasting olives... oh yeah.
The downside? You have to be patient! Wait, that's good for you, so get over it! Oh, and I only know one olive common in California that is really good for this process. If you're lucky enough to have access to this olive though, you've got a gold mine of potential hanging on those trees in the fall.
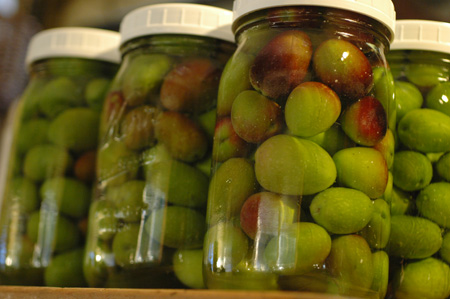
That olive is the Sevillano. It is also known as Queen olive in California, but Sevillano it is and should be. The Sevillano has been a very popular commercial cultivar, so it is pretty common. It is also easy to identify. If you find a tree with many sizes of olives on it, but some of them very large, it is very likely a Sevillano. If it also has some bunches of very tiny olives, like BB's, known as shot fruit, it is almost surely a a Sevillano. The olives are generally oval, but become rounder and plumper as they ripen, turning from a brighter grassier green to a more rich yellow tending toward straw color. It is okay to use them when they are just beginning to blush red too as in the picture below. The reason that these work well are several, but the key is the fact that they have a low degree of bitterness. The finished olives will have some bitterness for sure, but if made with most other varieties of olives, they would be inedible. The texture and flavor are also outstanding and they seem to have plenty of fermentable sugars. They also make very good lye cured olives in brine, kind of like the black olives in cans, but many times better. Yummy like sweet candy is to the unfortunate child of a staunch health food slingin', kale juicing mother. Seriously, and that lye ain't gonna kill ya, I promise. If I remember right they are ripe in mid November around here, probably earlier at lower elevations with warmer nights.
You want to harvest the fruits when they reach what is called the milk stage. When the olives are unripe, they are hard and green. The unripe olives just scream unripe. The light green color, the slightly bumpy, hard surface texture, the shape and the bony look they have. When they enter the straw/milk stage before turning black, the olives really plump up and become voluptuous with oil. The skin glows and smooths out and the color softens. The best test though is to pick one, stab into it with your thumbnail, and squish out some juice. if the olive is ripe enough, it will exude a milky liquor.
Pick the olives carefully to avoid bruising.
Wash the olives and sort over to remove those with olive fly damage. The olive fly lays it's eggs in the olive and the larvae eat it from the inside. Look for small holes and "pricks" in the skin. If in doubt, sacrifice some by cutting them open to see if there are larvae inside.
If you have a lot of olives, sort them by size and process the various sizes separately. The smallest ones should finish curing a little sooner than the large ones. Otherwise, it's okay to mix sizes.
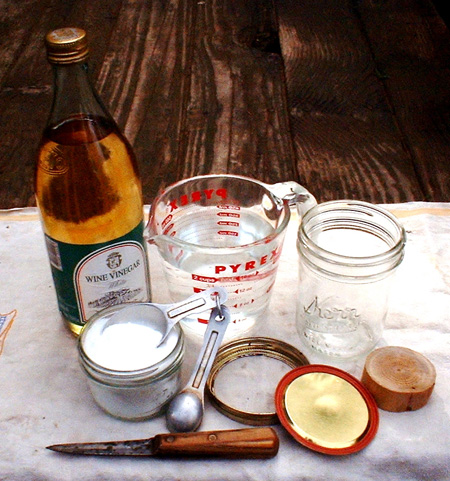
Wash the olives and pack into scalded mason jars within one inch of the top. By scalded I mean pour in boiling water, put the lid on the shake it up a bit. Turn the jar upside down for a minute to cook the lid real good too. The jars can be any size. I think you could ferment a single olive in a tiny jar if you could find a suitable jar that small! Fill jars to the rim with brine made of 1 quart water, to 1/4 cup salt, with 1/4 cup of white wine vinegar, rice vinegar or distilled vinegar. (The vinegar is optional, but it helps shift the ph well into the acid zone, which is safer and seems to kick off fermentation.) I don't think I've ever added any starter cultures to my olives. The proper bacteria and yeast seem to be prevalent enough on, or in, the olives. If you want to though, a splash of whey from the top of a newly opened container of yogurt, or a little juice from a lactofermented batch of vegetables shouldn't hurt, as long as the quality of the fermented food you get the culture from is high and the culture seems clean.
You can use a new jar seal, or a used one, but used seals should be in very good condition with absolutely no scratches. You can use a canning ring to seal the jar if that's what you have, but I much prefer to use a plastic lid and you should too if you have one. I buy these white plastic mason jar lids just for fermenting food in jars. They are fairly useless for most purposes, are not air tight and won't hold liquids, but they don't rust, so with a seal underneath, they are a better choice than a ring when it comes to fermentation. I use this system of: mason jar/seal/plastic lid for almost all of my fermenting now. It is simple, accessible and it just works for various reasons, which I'm sure I'll be writing about more sooner or later. If all you have is canning jar rings, just use them, but the salt and acids will eat them up. When you put the seal and lid on, the liquid should spill over a bit. You want to leave very little or no air in the jar. Screw the lid on firmly, but not super hard. It is possible to tighten the jar so much that pressure cannot escape, which is not good. I've been doing this for many years now and have never once had a jar break from built up pressure. It has to be tight enough to keep air from entering back in, but the pressure created by fermentation must be able to escape. Fortunately, there is a lot of leeway in how tight you make the lid.
Ok, now you're going to put that jar of pretty olives drowning in brine on a dish, because it's going to ferment and spill over. Leave it at room temperature for a month or so. Don't open it! The carbon dioxide formed during the ferment will push any remaining oxygen out of the jar leaving a blanket of inert carbon dioxide over the olives. The liquid level will diminish somewhat and the olives at the top will be left above the liquid. They are not sitting in air though, but in carbon dioxide. If you open the jar, you let in air, and most importantly oxygen. Organisms requiring oxygen will begin to grow in the jar and form a colony on the surface of the brine and on the olives. If you see that happening, usually as a white scum or film, you have air in the jar and you'll have to toss the olives. There is no really good reason to open the jar until the olives are done and you want to eat them, and plenty reason not to.
After about a month or so, the most active fermentation should be done with. Check the jars for any kind of scum growing on the surface of the olives/brine, rinse the jars clean, tighten the lids pretty hard, and put them away in a dark cool cupboard for another 2 months or more.
I think these olives really develop pretty quality pretty well by 6 months, but I have some that must be around three years old now and they are still excellent! They are not sterilized, they are not treated with preservatives, they are alive and kicking and full of beneficial bacteria. The reason the whole thing works is that they have been maintained in an anaerobic (oxygen free) environment with good bacteria and yeasts dominating the acidic salty culture. Pretty awesome if you ask me. Certainly don't open them sooner than 3 months after putting them in the jar.
I'm sure there is a lifespan to these tasty morsels, but I haven't encountered it yet. Eventually the lids will rust through, so that is something to think about. When you open the jar, be extremely careful not to get any bits of rust from the lid into the olives. Remove the lid carefully and then gently wipe the rim off well with a damp cloth.
The surface of the brine should not be covered in scum or white film, which would indicate air infiltration and potential spoilage. The olives and brine should smell, look and taste, bright and appetizing. The olives floating above the brine might be somewhat darker, but that's okay as long there is nothing else wrong with them. After passing the visual and smell tests, the olives should taste sharp, lively, and clean. The feel and the bite can be tender, but should not be mushy or soft or slimy. Trust your senses. If the olives failed to ferment at all, they will not taste acidic and probably will not look very good either. The fermentation is essential to out compete spoilage bacteria and create preservative acids, so if they aren't acidic, they should be thrown out, period.
Refrigerate uneaten olives, but use within a few weeks to a month or so. You don't want them sitting around long enough that you start seeing white scum forming on the brine surface. Adding some vinegar, or just replacing half the brine with a light colored vinegar, like distilled, white wine or rice vinegar will allow them to keep much longer because vinegar is just much more preservative than the lactic acid which dominates the brine. But I dont' think you'll need to, because they'll be so good, you'll eat them all. If you must save them for special guests or because they are just too damn good and special to eat, add some vinegar before storing int the fridge for a long time.
That's it. That seems like a lot of words for the simplest olive process I know, but I hope you learned a little more about fermentation options too. Fermenting in jars has the advantage of long storage in those jars, and means that you can put food up in small amounts that you can finish before the stuff goes bad. That is always my main message to people about fermentation, mason jars are the cat's knees.
I wrote this post in a hurry, so please let me know if I forgot anything important, or if you have any questions leave them in the comments below.


