Posts filed under Homesteading

Charcoal vs Ashes In the Garden, Very Useful, but Very Different

Burning wood creates some incredibly useful things. This video and blog post are about two of those products used in agriculture, charcoal and Ashes. They are both very useful, but very different, and have very different uses. I’ve perceived some confusion about these substances and their place in agriculture, so I hope I can clarify some of that.


If you apply enough heat to wood, it begins to break down and release gasses. If those gasses flare off, you get flames. If not, you get smoke. In the presence of oxygen, you are eventually left with a pile of white or grey stuff, which is the mineral content of the wood. If you stop the process, you have a chunk of light weight, easily broken, porous jet black carbon with no brown areas and no parts recognizable as wood. So charcoal is a shell of carbon left over once much of the substance and components of wood are destroyed by heat. Of course the charcoal still contains the minerals that are in ashes, but they are locked in this carbon matrix and not readily available.

Charcoal is stable and durable. It is capable of persisting in the soil for a very long time. Of course how long may depend on the type of charcoal, conditions, soil etc. but it is no doubt capable at times of persisting for millennia. While some of the minerals in ashes may be persistent, ash is essentially a very short term fertilizer.

CHARCOAL

First off, there is some debate about whether it is appropriate to call black cinders from the fire charcoal, or “biochar”. In video comments I’ve had people argue forcefully that any char produced in the presence of oxygen, the way I usually make it in open piles or pits, is not biochar, but just charcoal. Others argue forcefully that it is not charcoal, yet when asked what it is, they have no appropriate simple term. If I handed a chunk of that half burnt shell of carbon to most people, they would say it is charcoal. Words are not things and language is a product of living, changing culture.

If wood is heated under a very low to zero oxygen environment, it undergoes destruction, similar to an open burning fire, but more of the carbon structure is retained. It will be denser, harder and have a higher fuel value than wood that is burned with more available oxygen. At some point, all the gasses will be driven off and it will just stay red hot, without burning up, because there is no oxygen to finish the process. Once I was part of an iron smelting experiment. When we dug the kiln out the next day, I found pieces of charcoal embedded in slag. That slag, which is a collection of melted unwanted minerals melted from the iron ore, had been white hot, molten goo the night before, yet the charcoal survived it. It survived because there was no oxygen in that part of the kiln to finish turning that charcoal to ashes.

If I start a fire, then quench the coals at a certain point before they burn to ash, I end up with a softer and less dense product. This is closer to the way I usually produce char. The difference is quite real. I actually need to burn some of that low oxygen hard charcoal soon for my forge, because it burns longer. I can get away with using the softer stuff I usually produce, and it gets plenty hot, but I have to use more of it. The common argument is that char made by pyrolysis is better for agricultural use as well. That may be. The question that interests me more is whether less carefully prepared open burn char works and is it a viable option in some contexts. In my experience, it is. So grammarists and fundamentalists can argue the finer points or masturdebate over the terminology all they want. I’m going to call it all charcoal or biochar, alternately, because that is what most people will understand. I think if the term biochar persists, it will come to mean all charred plants used for soil improvement and potting mixes. I am not particularly attached to what it’s called, I just use the language that is common. I would prefer to live in a society that has a more sophisticated nomenclature for chars, but I’m not sure I’m interested in trying to bring it about.

Charcoal has some interesting properties that make it potentially very useful in soil improvement. One is that it is a magnet for all kinds of substances. It works by grabbing onto them. This is called aDsorption. So, it can hold soil nutrients strongly, but plants can still use them. I grow a lot of my cactus in char and when you dig one up, the roots are covered with pieces of charcoal firmly attached by root hairs. If I fertilize a potted cactus with a high char content, I’m basically pouring my nutrients through a very effective nutrient filter. One would think that much less nutrient escapes out of the bottom of the pot when watered or fertilized.

Char is also aBsorbent, meaning it can soak up liquid like a sponge. In my experience, it seems to be capable of holding a lot of water, but probably dries out faster than either organic matter or clay. In some soils, at some percentages, it probably helps with water retention or reduces it. My jury is still out on that, but suspect that high percentages can cause some soils and potting mixes to actually dry out faster.

It also acts as an aggregate if you need that. My cactus mix is 50% charcoal, it is ground up to any where from powder to 3/8 inch chunks, so the mix is very well drained. I don’t need to add any other of the usual drainage stuff like red lava, pearlite or sand. For many plants, this might be too much and I would probably go with more like 20% and down. But it’s great for cactus. But there is no soil in potting mix, the rest is mostly peat moss, coconut fiber or shredded bark. In actual soil it can increase friability a great deal. I have loam here, which is not at all bad to work with. But with 10% char, it’s lovely to work with. I have not personally tested it on clay soils, but I definitely would post haste if I had to deal with that unfortunate circumstance.

In sandy and silty soils, char can serve some of the purposes of organic matter, plus some more, but it is persistent. Sandy, airy soils need organic matter badly, but they also lose it super fast as it is oxidized quickly due to the very high porosity of the soil. Sandy or silty soil also sucks at holding nutrients. Clay is quite good at holding nutrients. I you can get it, add some and make loam. But charcoal is a partial substitute in that department and should increase water holding, nutrient retention and probably soil life.

One of the common theories about why char can improve soil performance, is the microbe theory. Charcoal contains all the pore space naturally found in wood from the capillary system that moves liquid around the tree. I imagine it contains even more from the charring process, but either way there is a lot of pore space in a piece of charcoal. The important bit is that lots of pore space also means a whole lot of surface area. There is some statistic floating around out there that references football fields to describe how much surface area a small piece of charcoal may contain. So that means a small piece of char is a huge habitat for microscopic organisms.

I imagine that both the microorganisms and the nutrient grabbing capacity are important, but what we really care about is whether it works. And it seems to work. There is a lot of research you can avail yourself of (cautiously I would advise) and lots of personal accounts. The stuff that got me most excited was research I did on charcoal used for soil amending in Europe and North America in the 19th century.

But the idea that knowledge is transferable is somewhat dubious, and no matter how much information we consume, we know very little for sure and even less about how things will actually work for us in the ground war of farming and gardening. So I always advise people to do their own small, simple science experiments on using char to figure out what percentage to use and how it performs or doesn’t in your soils, and with your gardening style and crops.

So charcoal is awesome, but it’s not fertilizer. In fact, if you bury raw char, it will sap nutrients out of your soil and stunt most plants for about a year. Remember, it’s a nutrient trap, so it has to charge itself up and reach some kind of equilibrium before benefits start. Ashes on the other hand, are definitely fertilizer. In either case neither is necessarily a substitute for adding other things to your soil to make things grow. Don’t expect miracles. My observation of char beds is that the char seems to make better use of the amendments I do add, not that it replaces the need for them.

ASHES

Everyone has heard of slash and burn agriculture. You go to an area of forest, cut and burn everything down, spread the ashes around and plant your crops. People have done it forever in some parts of the world, and not just in the tropics. It works great, but only for a short time. It doesn’t last. Who got the warm fuzzies when I said slash and burn? Probably no one. Even the name sounds bad lol. The reason slash and burn has such negative connotations is that it is very temporary and you have to move in a few years when all the nutrients released from the ashes are used up. So, to an outside observer, it looks horrible. This great video shows how that can be a misinterpretation.

Slash and burn agriculturists that not only are not destroying the forests, but building them in barren grasslands. I’m sure in some situations that slash and burn is a bad idea. One would be in high population densities. The forest needs time to recover, decades sometimes. Or doing it on a very large scale as in the exploitation of the Amazon basin. Anything applied mindlessly or without principal has the potential to go wrong.

A good way to think of wood and other biomass is that plants have done a lot of work to slowly gather all of the stuff that a tree or plant is made of. That is a valuable thing. The bulk is of course carbon gathered from the air as CO2, which you can retain much of as charcoal. However, the minerals, a much smaller portion, are quite valuable and harder to come by. If you compost wood or burn it to ash, the minerals can be reused in other plants. So ash really is a fertilizer. It contains all those many trace minerals that the plant gathers in smaller or greater amounts and some important ones in significant amounts.

Most commonly ashes are thought of as a source of potassium, which is one of the 3 plant macronutrients. They also contain a significant, if lesser, amount of anothe macronutrient, phosphorous. The other thing they contain in abundance is calcium as calcium oxide or hydroxide and if they’re old or get wet, it will be more as calcium carbonate. One source I just read said that wood ash averages about 20% lime, but it can be higher. Most soils benefit from liming, so that portion is very valuable, and being finely divided into powder, is it also very easy to use and very quickly available.

I use ashes in my garden frequently. Garden beds get a sprinkling each time they are prepared, or at least once a year. Occasionally I’ll dump a load on some favored fruit tree as well. But I’ve been doing this for decades and have observed, as slash and burn cultures show us, that it is a very temporary effect. So an important difference between ashes and charcoal is lasting power.

What the world needs now is to move toward more stable, sustainable agriculture. Charcoal seems to have the ability to create lasting fertility. If you have ashes, use them. I make plenty in my woodstoves. The most of my brush gets charred, because it is more compelling and potentially much longer lasting. There are few things we can do to our garden soils that have a truly profound lasting effect. If I had to move to somewhere in the woods to start over, would I make charcoal? or ashes? If I had no external inputs, I would do what people have always done, clear a patch of forest, and burn everything to ash to get good crops the first few years. But then I would start importing more wood from around and gradually start amending that soil with charcoal. All other stuff that makes good soil, bones, kitchen and crop wastes, dead animals, urine and feces would go back into the cycle to charge that char and build lasting fertility to the extent possible.

I hope this is helpful to understand the differences between these two very useful, but very different substances.


BIOCHAR PLAYLIST

Posted on November 15, 2021 and filed under BioChar, Garden Stuff, Homesteading.

Recent Gardening Videos, Vlog Style, FPG, First Person Gardening

Here are a couple of recent videos I did vlogging style, just working on stuff and touring the garden. I want to do more gardening content, since the recent events around COVID 19 virus pandemic should have people thinking about vulnerabilities in our material needs related to the supply stream of industrial goods that keep most of us going. in particular, I think that Self Reliant Gardening (SRG), is an important skill.

It is very different to garden as much as possible with what is free and easily available in your immediate environment than it is to purchase a lot of stuff in. Gardening can not only get expensive when purchasing a lot of fertilizers, starts, seeds, soil mixes and amendments, but if those become expensive, hard to get or just unavailable, it will put a real wrench in the gears of a dependent gardener. Self Reliant Gardeners can take advantage of those resources when needed and available, but we don’t need them.

When I first moved here, I decided to use very little from the outside. I bought oystershell for the acid soil, and the very first year of each bed I used steer manure because it was cheap and I needed something to get beds started right away since I had not even made any compost. After that, for the following 10 years I brought in minimal stuff; just oyster shell and waste coffee grounds from my neighbors and some places in town. For me to switch back now to using no imports is very easy. I have some holes in my game, but mostly related to more advanced seed saving.

Look forward to more gardening content and consider learning to grow some food if you don’t already. You can start small, even a few plants in pots, but the time to learn self reliance skills is definitely not when you suddenly need them. Our communities are ridiculously vulnerable to interruptions in the supply lines. Even in rural areas like mine, the agriculture is not at all geared toward being able to feed the local populace. In case of emergency, we’d have a lot of pot and a lot of wine, but not a lot else! As I’ve said for so long, FOOD NOT BONGS! This is a a very, very bad situation, and we should start living in a direction that begins to remedy it, or it will eventually be a serious problem. It’s not a matter of if, just when. The party is winding down folks. It’s time to invest in our own abilities and resilience, as well as that of our communities.

Stay safe and healthy out there, and plant something in the ground.

Earliest of the Early Summer Apples, 5 Varieties in July

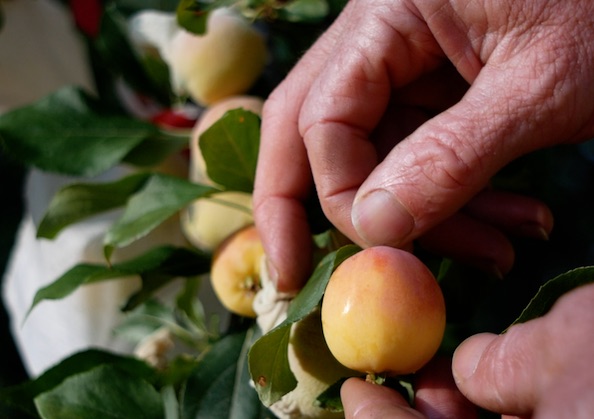
It is the last third of July and I have 5 apple varieties ripe here. Typically early apples are thinly flavored, not overly sweet, decline rapidly once picked and best for cooking. Before grocery stores and regular international shipping, early apples were probably a big deal. By summertime, old apples in storage, if any remain, are pretty sad by comparison. Early summer fruits would mean truly fresh fruit gracing the kitchen again. A couple of these stand out as worth eating out of hand too. Apples will ripen in June in some climates, but not mine. As much as people may think we have a salubrious, warm climate, it cools off at night, which typically stops things from developing as rapidly as they might in uniformly warm summer areas.

July Red: July Red is the first to ripen here, but it also has a very long ripening season, of probably 2 to 3 weeks. The quality has improved as the season progresses. The flavor is very nice. Even in the past few days since shooting the video on tasting these apples, I’ve had some specimens that are the best I’ve tasted, and which I would rate as very good. They have also gotten sweeter. Others are not good at all, so it is highly variable and fragile. The ripeness window is short before it softens and goes off. It is variable in size but ranging to large. The flesh is tender and coarse, without much crunch or crispiness, but in no way offensive. It is pretty juicy too. I suspect the juice would be very good, but the texture would make it hard to squeeze in a press. July Red was developed by a breeding program in New Jersey and released in 1962. It is also in the ancestry of Williams’ Pride, an excellent summer apple. The tree is a tip bearer with some spurs, but should definitely be pruned as a tip bearer.


Early Harvest: Early drop is more like it. This one caught up to July Red and dropped all the fruit at once. It is not flavorful, soft and really just not worth eating out of hand. It is listed commonly as dessert and cooking, but here it is not worth eating. It is always possible that mine is mislabeled, but fruit descriptions and results can sometimes be radically different depending on zone and culture. This is a very scabby apple.

P1220665 2.JPG

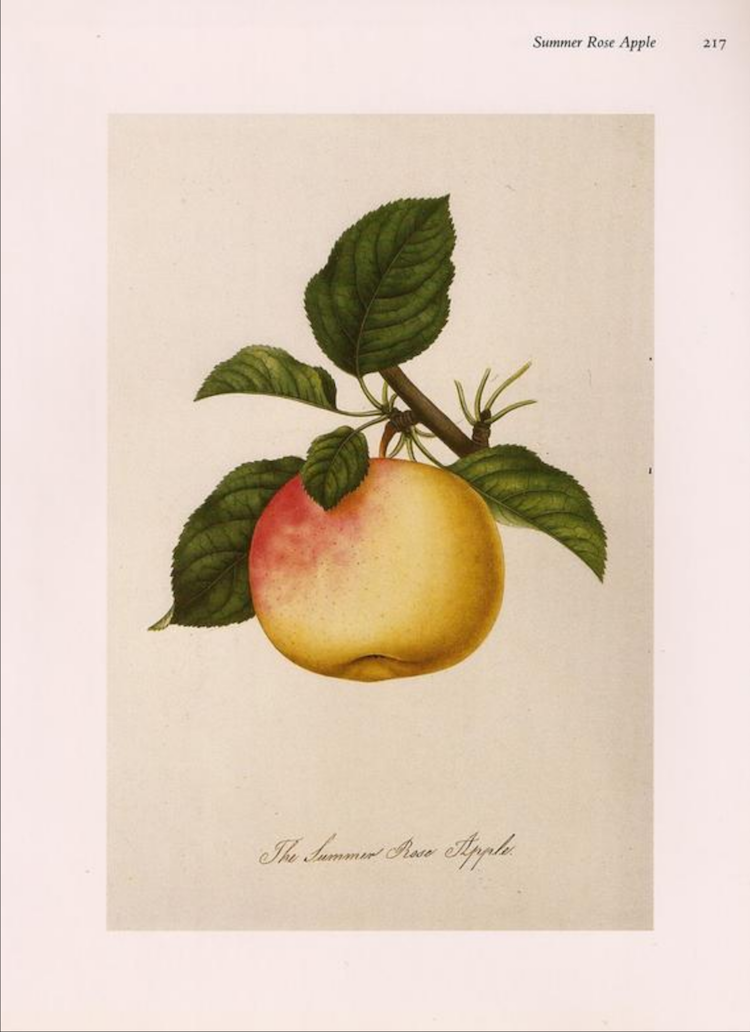
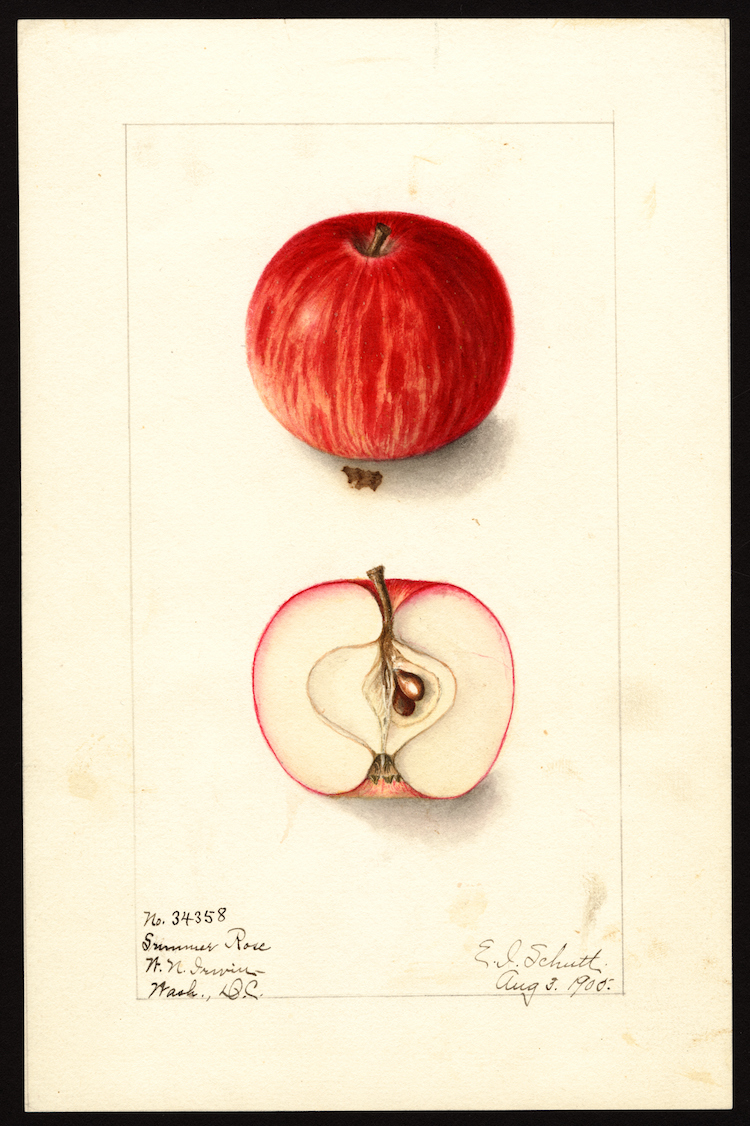
Summer Rose: Very similar in appearance to Early Harvest, to the point that I would suspect they might be related. I found several watercolors, one of which is a dead ringer for my fruits as you can see, and the others are a striped apple that is very different. It seems to ripen a bit later though. Very similar in character to early harvest as well. it also gets scab badly, though maybe not at the very worst level.

This Summer Rose looks remarkably like the one I have.

This Summer Rose looks remarkably like the one I have.

Clearly another apple altogether.

Clearly another apple altogether.

Summer rose. Very scab susceptible.

Summer rose. Very scab susceptible.


Red Astrachan: Does not live up to it’s reputation here and never has in around 10 years of fruiting. It is thinly flavored, soft and unremarkable in every way. Tim Bates of the apple farm says it makes great apple sauce. I made some this week and it’s good for sure, but not the best I’ve had or anything. It is the best thing I’ve found to do with them so far. It is not sweet, so lots of sugar required.

Red Astrachan

Red Astrachan


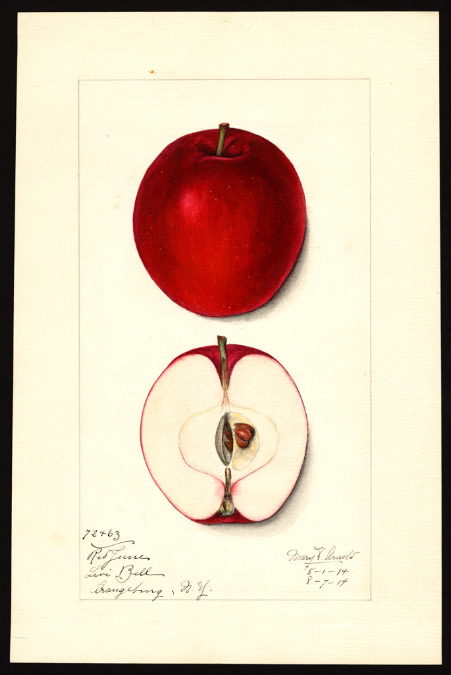
A watercolor painting of this apple from Early August 1914 under the name Red June. It has the same red flesh staining in the same location right around the calyx tube on the bottom end. The shape is very similar to those growing here.

A watercolor painting of this apple from Early August 1914 under the name Red June. It has the same red flesh staining in the same location right around the calyx tube on the bottom end. The shape is very similar to those growing here.

Carolina Red June: An old heirloom from the south alleged to date from before 1800. This apple has some nice flavor going. Again tender fleshed. It is worth eating out of hand and the flavor is pleasant if polite in mine. I’m hoping this year it will improve over the season as it is a gradual ripener with a long season. The apples are quite small and very red. The red pigment extends into the stem and into the flesh a little bit. That could make it a candidate for breeding early red fleshed apples, along with Williams’ Pride. This one is scabby, but not horrible. I don’t have a full sized tree, so it’s hard to tell what it’s nature is, but it seems to tend to bear on the ends of short shoots. It’s like a short tip bearer. Don’t prune off shoots that terminate in fat tips.

Carolina Red June

Carolina Red June

Carolina Red June seems to bear a lot on tips of short twigs, or spur-like structures on the ends of twigs, but also spurs along branches too. Be careful about not pruning off short shoots that terminate in fat tips.

Carolina Red June seems to bear a lot on tips of short twigs, or spur-like structures on the ends of twigs, but also spurs along branches too. Be careful about not pruning off short shoots that terminate in fat tips.


Without cooking all of these apples in various ways to test that aspect, the ones I’m most interested in keeping are July Red and Carolina Red June, because of flavor. I think both perform slightly better in the scab department as well.

The next group of apples to ripen will generally be a significant improvement in richness, flavor and texture. Trailman Crab will probably be next, then Kerry Pippin, Williams’ Pride and Chestnut Crab. Most of these second early summer apples typically ripen in August

Next to ripen will probably be Trailman Crab, which I’ve had in July before, but also in August.

Next to ripen will probably be Trailman Crab, which I’ve had in July before, but also in August.

I should be posting some more photos and historical info about some of these apples to Instagram over the rest of this month.


DIRT ROAD HACKS: Designing for Low Maintenace, Eco Friendly, Cost Effective Graveled Roads

When I moved here, the road was 4 wheel drive only most of the winter. It was an old roadbed that was poorly maintained, rutted, with various slippery and mushy spots. The road was built at some point, maintained a few times, but I would say that it had never been designed.

The previous owner suggested that we look into fish friendly roads; Basically designing roads to reduce sediment load in streams and rivers where it clogs the clean gravel beds that Salmon and Steelhead lay eggs in. If the gravel beds become too sedimented, it smothers the eggs and they die.


Download this book here

Danny Hagans of Pacific Watershed Associates, made a study of this problem and where the sediment was coming from and found that rural ranch and logging roads were a huge contributor. Over time, he put together a philiosophy and a set of design tools and practices to keep the sediment on the road and prevent other related erosion. Well, it just so happens that keeping dirt and gravel from washing off your road surface or out of gullies is pretty much what all of us land owners want too. We have a good example on the property of what happens when poorly designed dirt roads are abandoned. Due to the old road bed, a huge amount of water used to flow down the road to near my garden where it dumped off the side. It carved a huge gully that is probably 15 feet deep and 30 feet wide at the largest point. I don’t think there was even any waterway there before at all! At most, maybe a low spot. This was no doubt prime planting ground and would now be orchard and garden. It also drains ground water out of the adjacent landscape. It’s a huge pain the butt just to get through or around it. That soil never comes back and replacing it is impractical. It’s good to build these things not just for you, but to not fail when you are gone.

The original road was a rough, rutted mess for the most part, 4wd only in the winter with some mushy, slippery areas, like this spring coming up in the road.

The original road was a rough, rutted mess for the most part, 4wd only in the winter with some mushy, slippery areas, like this spring coming up in the road.

For the first couple of years, I learned about roads and made important observations. We went on a tour with Danny Hagans of roads they had re designed and installed, roads in the process of reworking and some examples of poorly designed failing roads. I got the book Handbook for Forest, Ranch and Rural Roads which you can download for free at that link, and read that thoroughly. Another very important thing I did was to observe roads as I drove them and see how they worked and didn’t work. Recognizing clear patterns on other roads and redesigning them in my head gave me a lot of confidence to redesign mine and to contradict what the road builders preferred to do.

Then came clearing preparations, mapping and designing the road. Trees were trimmed and removed, the map was filled in with design features and slopes and the road was flagged at critical design points like pitch changes, profile changes, culverts and rolling dips.

We hired a guy that we knew could build good roads and installed the road in a couple of weeks. It was a bit daunting to stand up to the operators who had their own standard ideas of what to do. They were good builders, but along more traditional lines. I was able to hold my ground though, because I had done so much observation on my road and on other roads. Whereas they would want to put ditches in everywhere, I only put them where I thought they were needed. As a result, I have a wider road with way less ditch to maintain. The problem with ditches is that they collect water. Once water is concentrated, it has the potential to do damage. It also has to be dumped somewhere in quantity. so you usually need a culvert, which is expensive to buy and install. All of that can be avoided where ditches are unnecessary, by sloping the road from one side to the other to drain off one side only. This road profile is called outsloping and it works some places and not others. Where it does work, there are numerous advantages as stated above, including no ditch to clean out. They actually cut a full ditch along a long section and I had them fill it back in. I agonized over that decision, but in the end I knew it was right and time has proven that I was right and I have been very happy with the results.

IMG_2098.jpg

so, eleven winters later I’m super happy with my road. It is in amazing condition except for a few short problem areas. The only serious problems have been caused by work done by the neighbors which messed up what we installed, and a section that was not made how I wanted it due to other reasons. I’m happy with all of my decisions in the context that they were made and I don’t expect to have any maintenance work done on the road for at least another 10 years. If anything gets done, it will be to rework and ditch a section of road that was lightly graded and graveled the first time around because the neighbor didn’t want the road disturbed too much near her house.

Building an armored crossing for a seasonal creek. This solution can be better than a culvert sometimes, and often a lot cheaper.

Building an armored crossing for a seasonal creek. This solution can be better than a culvert sometimes, and often a lot cheaper.

Water can be incredibly destructive if not controlled. This is the spillway for the seasonal creek with an armored crossing after a heavy rainstorm, otherwise a perfect storm for headward erosion. I finished the spillway the night before this was ta…

Water can be incredibly destructive if not controlled. This is the spillway for the seasonal creek with an armored crossing after a heavy rainstorm, otherwise a perfect storm for headward erosion. I finished the spillway the night before this was taken, just in time.

Aside from watching my video, here are some suggestions for those maintaining, driving and designing dirt access roads:

LEARN: about road design and progressive road design principals. Download the book and read it. If you happen to live in NorCal, you might be able to attend a workshop by Pacific Watershed Associates. If they still do them, it’s worthwhile.

OBSERVE: Soil, slope and water behavior. Especially observe the site during and right after heavy rains or snow melt. Equally important is to observe every dirt road you drive on to look at how it fails and how it could be improved to get water off fast while keeping the road surface in place.

MAP: Even if your road is already built, map it out and redesign it. That way if you ever have work done, you can fix problem areas or rework the road to be more stable and lower maintenance. This practice will really get you looking closely at your road and how it works or doesn’t.

Good rock and enough rock are a huge factor, but road design and shape should be priority one.

Good rock and enough rock are a huge factor, but road design and shape should be priority one.

FIND ROCK: Find local rock if you can, so you can use enough to matter. Shape is first priority, rock won’t fix everything, but it sure helps to have enough and the right kind. You can always add more later. A source of 6” & down quarry run rock is especially useful. We were fortunate to get rock from our awesome neighbors, which made a big difference in certain areas.

Rick is a maestro on these machines and knows how to move dirt fast. Some things I saw him do blew my mind.

Rick is a maestro on these machines and knows how to move dirt fast. Some things I saw him do blew my mind.

FIND A GOOD OPERATOR: get a good operator with all the tools they need. They’ll do a better job and do it faster. When machines are costing you over 120.00 an hour to operate (probably a lot more now), you want people that know what they are doing. Selecting someone randomly out of the phone book and cutting them loose on your property to build a road is a worst case scenario. Many guys that will build roads know almost nothing about road design and are just capable of running the machines. I’ve seen terrible installations and “maintenance” that made roads much worse. If possible get personal references and even look at roads they’ve built or worked on. Tell them what you want to do and make sure they are willing to do it the way you want it. Ideally, find someone that understands these modern road building principals. That is not possible most places, but it is in others. Finally, make sure you take advantage of the knowledge and wisdom that your operator does have, especially if cutting an entirely new road. They know things you don’t and they know how to actually move the dirt.

DRIVE BETTER: There are multiple reasons that my road is in great shape, but as important as anything is the way I drive it. I drive the entire road surface to keep it flat. You can maintain your road with your car instead of damaging and deforming it. That is something of a revelation. It helps if the road is wide enough to traverse completely, so your tires can reach all the way to the center of the road. If I didn’t drive my whole road surface, we’d have had a grader in here a while ago and the road would be in much worse shape. Best road hack ever. Get in the habit!

I have notes for a lecture to complement this video and also outlines for a full series that is more planned, complete and concise, but this will have to do for now. It may not be perfect, but it could be very useful to anyone driving, designing or maintaining a dirt road. https://youtu.be/DLG566dod4I

Quite an accomplishment for a couple of new homesteaders, but well worth all the effort, thought, expense and time to have reliable, easy, low maintenance access. Still going strong 11 years on with no foreseeable problems.

Quite an accomplishment for a couple of new homesteaders, but well worth all the effort, thought, expense and time to have reliable, easy, low maintenance access. Still going strong 11 years on with no foreseeable problems.

Lessons from Established Fruit and Nut Trees, Training Mistakes and Remedies

This video is a walk around to look at the lessons that can be learned from some of my fruit and nut trees that have been growing for a while. Between careful and not so careful training, lack of training, regular maintenance or neglect, we can see how things go right or wrong and how important early shaping and training are to avoid future problems. I also taste some Lady Williams Apples off the tree, still good in March! These apples, while especially late this year, demonstrate I think that it will be possible to eventually have apple varieties that routinely hang on through winter and ripen in spring. Two new terms I’ve coined are Winter Hanging Apples and now Spring Hanging Apples, because these are classifications we need, beyond winter apples or storage apples. Next steps in that direction are finding more winter hangers and spring hangers if possible and making intentional crosses between them for new seedlings. Another step is simply promoting the idea and phenomenon in general, which will be easier as more of them are discovered or created. Also important is to test more of these apples in various climates to see how cold they can go, or how other climate factors affect them.

The long reach pruner I’m using in this video is a pretty neat tool. It is not cheap, but it can nearly obviate a ladder if trees are pruned yearly and are under 15 feet tall. That is pretty a major boon, especially if trees are spread out like they are here on myu homestead. I rarely use a ladder to prune anymore. They are also still cheaper than a good orchard ladder, even an 8 foot one. They can cut green wood up to about 3/4 inch if cut at an angle. For older people (or those that will be older soon lol) it could save a lot of clumsy ladder moving and setting up and ultimately could prevent a fall and the complications that often come with broken bones past 70. We got my mom one and I’m going to try to convince my 82 year old friend to get one. He is still climbing rickety old step ladders in the backyard. There is a short review on my amazon store page and full video review coming soon.

When it Rains it Pours, Minor Rain Emergencies, Tree Down, Creek Blockage and Overflowing Ditches, La Vida Homestead

When it rains a lot, stuff goes wrong. I had three issues to deal with at the same time and shot some go pro video. I manage to squeeze in some talking points about road design. Working it the rain is kind of fun, at least for a while. It could have been much worse timing, but having a tree fall in the road over an hour period when I was out was not super convenient.

Posted on March 1, 2019 and filed under Homestead Lifestyle, Homesteading, roads.

Tasting Some Late Hanging Apples and Late Seedlings From Breeding Trials

One of my main interests when it comes to collecting and breeding apple varieties is the very late hanging/ripening types. I’ll be heard to proselytize about them frequently and I am not sure why everyone else is not as excited about them as I am. While most would normally think of winter apples as being eaten out of storage, certain varieties can be ripened and held on the tree through at least all of January assuming the climate is suitable. This video is a walkaround checking out what is still hanging as well as tasting the remaining late ripening seedling apples from the breeding trials. I wrote a whole post about late hangers, but I decided to put off posting it until I can make a video that makes an argument for growing them more, ferreting more of them out, and beginning to test the climatic limits of hanging late fruit. Clearly there is going to be a cold limit and folks in places like Michigan will not be able to grow them. But chances are that they can be taken advantage of in much of Cascadia, the southern belt east to west, and other places that you can’t go ice fishing without falling through. Not doubt too there are going to be varieties that are more durable to the cold than others. Unfortunately, many of these late hanging varieties are quite rare and I usually have very limited scion wood available. I will have some this year, quite a bit of some of them and none of others. Scion sales will begin soon and I’ll post when they are available.

Formula Books, The Treasure Chest of Free DIY, Self Reliance Information You Need to Know About

formula books header.jpg

While I’m inclined to ignore the holidays for the most part, I have a gift for you. Christmas can be downright disturbing in it’s materialism and focus on over consumption. Well, my gift to you is a knife in the corrupted festering heart of that particular Santa of commerce, a downloadable treasure trove of DIY information from a very different time, from a time when DIY was a necessary way of life and not an internet niche. The very fact that we call someone a do-it-yourselfer, indicates that those people are novel in an age where products for almost anything can be bought ready made.

This is about formula books, a phenomenon from the past that would now be a quaint piece of history to most if they even knew about them at all, but which the self reliant minded, and technologically curious, can find immensely helpful and fascinating. I think the reason that these great books are no longer common, is that they were a product of a different time. Cue history fable…

Once upon a time, there were no letters. No, not letters as in I wrote you a letter, I mean the characters that make up words. Ideas spread verbally were slow and limited in range, and culture and community knowledge existed on a smaller scale, with much less homogeneity between geographic groups. Then people invented writing, which gradually grew in scale. At first, few knew how to read and books were only produced as one offs or had to be copied by handwriting and illustrating. Then printing began, followed by more efficient printing, and eventually by more people learning to read. In that era, previous to transmittable media such as radio and television, printed books and periodicals were what allowed ideas and information to be spread broadly. Books were popular enough, but so were periodicals. Periodicals were the way that groups of people with similar interests or professions interacted in their niches with others around a country, or even between continents. It may seem painfully slow in this age of internet forums, instant news and comment threads, but aside from in person meetings, that was what was available. Editorials and reader interaction via letters to the editors were an extremely important mechanism of communication and evolution of understanding among these niche groups. Some of those periodicals were not sent out very often, but it provided a place for readers of similar interest to write in and offer experience or tips and recipes. Being an inveterate researcher of antique information, I have gleaned a lot of knowledge from these periodicals. So there is one piece of our context, and here is the next...

Going back far enough, circumstances determined that people made a lot of stuff from scratch. Not just individuals, but professionals. Most pharmacy items were probably compounded by the pharmacist, not purchased pre-made. Real compounding pharmacies are the exception now, and most just buy finished products and re-package them. Artists mixed most of their own paints, sometimes from the raw minerals, preparing specialty oils, etc. The supermarkets, hardware stores and drug stores with miles of diverse products would drop the jaws of someone in the 19th century. Professionals used books and periodicals for information on how to formulate items for their trades, and average people often compounded raw materials to make what they needed.

I think it’s likely that these two circumstances eventually lead to the phenomenon of formula books. I imagine that at some point, some enterprising individual went through and compiled a bunch of these general formulas and tips from various sources or from their own periodical, and printed them in a book. Many of these collections were compiled and printed well into the 20th century. Some are intended more for the home market, others more for practical “shop dudes”, technical entrepreneurs and inventors. Others were specific to an industry or interest.

books on end.jpg

Imagine in a time where your access to a store might even be limited, and when you did go to a store, the products were also limited and expensive. Even raw materials might need to be special ordered from an in-store catalogue or the Sears and Roebuck catalogue, and waited on for weeks. A book like this could prove extremely valuable to have around the house to compile these and common household materials to useful ends. Now it seems that problems are practically invented to sell products. These books are also full of general tips for daily household, farm and shop life.

Keep in mind when perusing these offerings, that whomever printed the book you are reading didn’t actually try all that stuff out! Many of these would be untested recipes from essentially random sources. Just because K.W. Micklemaus from blington New Jersey wrote into a periodical once and sounded like he knew his business when it comes to lubricating an old watch with rattlesnake oil, doesn’t mean he was right. These recipes should be read with a very critical mindset. Another thing you will notice is that they use a lot of toxic stuff. Lead and Benzine were staples, and many other toxic substances. Some of these can be substituted and some cannot, but the recipe may still give you some ideas on making something of your own devising.

oilskin quip.jpg

There will also be a lot of materials that you have never heard of. Further, you may not know which form of the material is referred to, or which name a material refers to. For instance, it is difficult to determine for sure what is meant by Plumbago, which seems to usually refer to graphite can be confused with Galena, a lead ore which looks similar. The name Plumbago is derived from the word for lead and many recipes will call for “black lead” when they mean powdered graphite. but which one is called for in your stove polish recipe? I’ve had this exact problem when trying to figure out if the recipes for stove blacking I’ve been looking at are referring to lead or graphite. According to Wikipedia, some guy actually invented the term graphite, now the dominant term, in order to avoid confusion caused by the terms black lead and plumbago.

An example of ambiguity regarding the different forms of substances would be lime. Lime is often called for in recipes, but it is rarely specified whether the reference is to lime putty, which was once very common, or dry lime hydrate. They have similar properties, but would be measured out very differently. Usually if quicklime is called for it will be called either quicklime, freshly burned lime, or maybe lime shells. Freshly slaked lime probably refers to lime putty, but it could conceivably refer to dry hydrate. Having been interested in this sort of archaic information, I have a glossary in my brain of quite a few of these terms, but like learning botany and all it’s specific terminology, newcomers will spend a fair amount of time looking up unfamiliar terms and trying to sleuth out what is actually meant by them. I used to have to do that secondary research in other old books in my collection, but now we have the internet which makes it much easier.

upright cyclopedia.jpg

It’s worth keeping an eye out for these in print. I was introduced to them a long time back when some practical artist friends Scott McGrath, Todd Barriclow and Spring Maxfield busted out a copy as if they were showing me some holy book. It was a big enough deal that I still remember the event lol. More like they were unlocking the door to a technical candy store. You can read most of the old formula books online for free and I’ve set up a file where you can download them. You can also always find the links by going to www.skillcult.com/freestuff With modern search functions, it is easy to find what you are looking for in them... well, sometimes. These books are in PDF form, which is imperfect. When converting a very old book from scans and PDF’s to plain text like kindle’s mobi or to epub, the print character recognition software often misinterprets many letters or runs the characters together into compound words. So, the search functions may or may not find what you are looking for regardless of the digital format. Sometimes (possibly even often, although I’m loathe to admit it :) I find myself looking for the search function while reading an actual book or piece of paper! Search is absolutely awesome as a tool. Most books, especially older ones, have terrible indexes if they have any at all. But, in spite of the lack of a search function, sitting down with an old, yellowed copy of The Scientific American Encyclopedia of Receipts, Notes and Queries is an entirely different experience than skimming through photos of it on an ipad. Unless you go out and search for these books though, you won’t just run into many of them. I just did some quick searching and it looks like ebay is probably the best place to look for them and maybe check out Etsy too. Some were printed later in the century, but they gradually fell out of popularity. There is still a niche of weirdos like me (and I hazard to guess you too :) that will find them fascinating and useful. I own physical copies of Henleys, The Scientific American Cylopedia of etc, etc…, Standard Book of Formulas, Techno-Chemical Receipt book and The Materials of the Artist. Those were collected randomly at bookstores and flea markets over the past 25 years. All but the last are in this digital collection I put together. I’m sure there are more, but these are the ones I could find, some of which I’ve barely looked at. Also, keep in mind that there are many, many more niche books of this sort for specific trades. For instance, there are a boatload of old pharmacy compounding books and many painters books.

Yesterday was the shortest day of the year, so we are on the right side of that equation now, yay! Last night was the coldest night so far, and here the teeth of winter are really just starting to bite. A couple of days ago I ran through all the formula books looking for stove blacking recipes as I make moves to restore a rusty woodstove I’m trying to get installed. Now I just have to figure out if they mean graphite or lead when they say plumbago! Best wishes to you and yours in this new year and heartfelt thanks to all the people that have supported me from sharing content, to comments, to the thank you notes I receive from complete strangers almost every week, and for the much needed financial support. Things have been very difficult lately to put it mildly, and my ability to produce good content is at a low ebb. I’d like to report that I expect that to improve, but my hope for resolving the chronic health issues that I’m severely hobbled by is also at a low ebb, and unfortunately, I think justifiably so. My plan remains the same though, to continue at whatever pace I can, the work I set out to do from early in my life, which is essentially the pursuit and dissemination of practical knowledge and practical philosophy with a focus on self reliance and archaic skills that I believe still have relevance. Formula books have been exceedingly useful in that pursuit and I hope they are to you as well. <3

And here is a plug for www.archive.org Wow, what a fantastic resource this is. I’ve used google books for a lot of my research of this type in the past, but archive.org has become my go to resource for digging up old books and information. They are a non-profit with the goal of creating universal access to information, including books and periodicals, photos, film and audio. They are in a fund raising drive right now and have a 2 x matching grant. Try it out for a subject you are interested in. The books and periodicals available have generally run out their copyright protection, which I believe is defined by the life of the author, plus 50 years, so the great majority of it is from long ago, which is just what I’m usually looking for. I recently used it to do research on the medicinal uses of turpentine and found a huge number of references going as far back as the 1600’s. So cool!

Here is an example a text search of the entire archive for the term blacksmithing this is using the search text function. The search titles field will turn up fewer results.

By using the lower search field, you can search within a book or periodical.

Well, I either just enabled you to go down endless impractical rabbit holes full of endless wheel spinning information, or offered you the most amazing tool to further your personal development. Which one it will be is probably largely up to you :) Just remember that book learning is only really very useful as part of a trinity composed of INFORMATION, EXPERIENCE and CONTEMPLATION. I might add communication in there as #4, but that is sort of covered by both contemplation and information. In a very real way, information is not knowledge.

DOWNLOAD THE FORMULA BOOKS HERE

boiled linseed page.jpg
Posted on December 24, 2018 and filed under Books, Homesteading, Self Reliance.

Some August Apple Tasting

In this video I taste some usual suspects, Kerry Pippin, Chestnut Crab and Williams' Pride, and a couple of newer ones, Viking (very interesting) and Salem June (meh...)

How to Find Fruit Wood Scions for Grafting, Scion Exchanges and People to Trade Varieties With

DSC05929.jpg

I commonly get requests for scion wood or questions about where to find scions in general, or of a particular variety.  Below are my best recommendations.


Scion Exchanges and Swaps

These are usually free, sometimes with a small entrance fee, but I've never heard of one where the scions are not free.  There are more and more of them, though large areas of the U.S. still don't have any.  Search the web for terms like scion exchange, scion swap, grafting class or grafting workshop along with your large city, state or region.  If there are none nearby, maybe you can find some like minded people and eventually start one.  To my way of thinking, there should be one within easy driving distance of everywhere :)


Online Trading, Fruit Communities and Fruit and Nut Organizations

  Below are listed some online forums, destinations and organizations where people trade cuttings and seeds. They generally are also places to meet like minded people in your region.  The best information and collaborations are often local.

!GROWING FRUIT’S SCION SOURCE PAGE! http://growingfruit.org/t/scionwood-s...   I like this forum a lot.  Friendly with a lot of knowledgeable people.

NORTH AMERICAN SCION EXCHANGE Facebook page: https://www.facebook.com/groups/scion...  Started by my Friends Andy and Little John because they had no nearby scion exchanges.  There is a website too, but the facebook group is most active

NAFEX, North American Fruit Explorers: http://www.nafex.org/  A long standing organization of fruit variety enthusiasts.

MidFEX, Midwest Fruit Explorers: http://www.midfex.org/

CRFG, California Rare Fruit Growers: https://crfg.org/  Membership organization with multiple chapters up and down the state.  CRFG scion swaps happen up and down the state over the winter.

Home Orchard Society (Pacific Northwest): http://www.homeorchardsociety.org/  An excellent organization for NorthWesterners.  From what I hear, their scion swap is one of the largest and best in the country.

Temperate Orchard Society: Apparently cloned the enormous Nick Botner apple collection, so they should have over 2000 apple varieties. (scion sales) http://www.temperateorchardconservancy.org/contact-us/

DBG Scion Exchange, EDMONTON CANADA: https://dbgfruitgrowers.weebly.com/sc...

MOGFA, Maine Organic Farmers Association, Scion Exchange: http://www.mofga.org/Events/SeedSwapS...

SEEDS Durham North Carolina: http://www.seedsnc.org/2018/01/upcoming-grafting-workshop-scion-exchange/

WCFS, Western Cascade Fruit Society, Scion and Grafting Fair in March:  http://wcfs.org/

Michigan Home Orchard group:  https://groups.google.com/forum/#!forum/mi-home-orchard  Group by YouTube user Prof Kent for michigan folks.

For Europe, Fruitiers.net scion trading:  www.fruitiers.net


Buying Scions

Finally, you can buy scions.  They have become more expensive, but if you really want a variety and you can't find it anywhere else, it might be worthwhile.  Also, once you get interesting varieties, it gives you trading leverage.  I sell scions sometimes, but I rarely trade, because I'm not collecting much anymore.  Also, the apples that remain on my wants list are very rare, some probably even extinct or at least lost.  If you want a specific variety, just search the net for the variety name and the work scion.  You might be surprised to find some for sale, or to find at least someone that grows that variety or has it for trade.  If I have scions for trade, they will be in the webstore around January and February.  Unless you have some amazing rare stuff to trade, don't contact me about trading.  I like to help people and will go out of my way to help serious collectors and breeders, but I get way too many requests.  If you can find it anywhere else, please do.

If were to make a list of scion wood sources, they would all be on this page on the GrowingFruit.org site anyway, so I'll just refer you there....   http://growingfruit.org/t/scionwood-sources/3346

Grafting, the collecting fruit varieties and scion trading are fast growing in popularity, and for good reason.  It's always an adventure finding out about new varieties, tracking them down and fruiting them out.  I hope it grows enormously in the future.  It is important to the preservation of food plant diversity that everyday citizens grow, share, eat, talk about and even create many different varieties.  Even at it's most diverse, the larger industrial food model will always lack true diversity and soul.  When there are quite possibly tens of thousands of apple varieties, even 20 varieties in markets looks pretty weak.

Feel free to contact me or leave a comment if you know of other good online communities, organizations or annual scion exchanges.  Happy hunting

IMG_0338.jpg

Cherry Cox Apple Variety and a Few Others, Tasting and Review

DSC09983.jpg

When I moved here 12 years ago, one of the first things I did was start to plan my fruit orchards.  I well knew then that the time to plant a fruit tree is ten years ago, now I might extend that to 15.  I began doing research on apple varieties, which I was very unfamiliar with.  I figured there must be hundreds of them, but the best resource I had available was a thick book called Cornucopia, a source book of edible plants which only listed a few of what I later found out were probably tens of thousands of named varieties.  I also talked to friend and fruit explorer Freddy Menge, who made his best recommendations at the time.  I had helped Mark Dupont of Sandy Bar nursery graft his first batch of fruit trees many years before, and had an outstanding favor owed for fruit trees whenever I finally got my own place.  I called in that favor.  Looking through their catalogue, they said they had a variety called cherry cox that had become a homestead favorite.  I was intrigued.   They had no trees to sell that year, but Mark sent me a scion, one of the first scions I grafted onto frankentree.  I've since sent out lots of scions to other people all over the country.

Cherry Cox has not disappointed.  It really does taste like cherries, among other flavors.  Few descriptions mention that it has a cherry flavor, suggesting even that the name is for the redder color it has.  There is no doubt though that the name is from the flavor, though I don't doubt that it does not always develop and some say they can't detect it at all.  It was also precocious, being one of the first apples to ever fruit on frankentree and one of the most consistent since.  If anything, it sets too much fruit, though it has taken years off as almost any apple will do when poorly managed.  It seems healthy enough so far, but I can't say too much about that as apple diseases are just getting a real foothold here.  It does get scab, and I think it could be called moderately susceptible.  Don't quote me on that, it's just a vague impression.

Cherry Cox is a sport of the very famous Cox's Orange Pippin.  A sport is a bud mutation.  One bud on a tree mutates into something new and thus begins a new variety, no tree sex required.  While many sports are very minor variations on the parent tree, Cherry Cox seems to be considerably different than it's parent.  It tastes different, performs different, allegedly keeps longer, and I'd just about bet that if you planted rows of each side by side there would be some obvious differences.  I was at my friend Tim Bray's orchard and his Cox's Orange Pippins were notably small and the trunks and branches completely covered in lichens, unlike the other trees.  They are known for their poor growability and have no doubt only survived by the virtue of exceptional flavor.  Cox's Orange Pippin is widely used in apple breeding because of it's eating quality, and is probably the apple most commonly said to be the best out of hand eating apple in the world.  Cox's Orange Pippin is indeed one of the few apples I've ever eaten worthy of the classification "best".  Even at it's best, Cherry cox is still not in that category.  It's a good lesson though that Cox's Orange Pippin seems to do poorly under my conditions and cherry cox is consistently good to very good.

Flavor wise, Cherry Cox has a lot going on, like it's parent Cox's Orange Pippin it is complex.  Obvious flavors are cherry, something almost like cherry cough drops, but in a good way, Anise is also present and I've detected some flavor of spice.  There is certainly more going on, other fruit flavors, but I'm not good at picking them out.  If I were to change things about Cherry Cox, I would.  It could use more sugar, which would bring the flavors out more.  Have you ever noticed how much better fruit tastes when you sprinkle sugar on it?  It's not just that it's sweeter, sugar is to fruit what salt is to meat and savory foods.  Cook a fantastic soup with no salt and you will barely taste the potential of it's flavor.  Add salt to it and boom, flavor city.  The cherry flavor develops early in cherry cox, but the sugar develops late.  It is a fairly acidic apple, and maybe even tart before it gets really ripe.  I would not reduce the acidity, I would just balance it with more sugar.  More sugar would also make it a richer flavored apple.  It can be a little thin tasting at times.  More scab resistance wouldn't hurt.  In the Beauty department it lacks nothing. It's is a beautiful apple.  it can grow plenty large under good cultural conditions, though it is not generally a very large apple.  Cherry Cox is a little known and little grown apple.  I doubt it has great potential as a broader market apple, but it has huge potential as a small scale specialty orchard and farmer's market apple.  And then there is the breeding potential.

DSC09983.jpg

Looking toward improvement, I think cherry cox is very promising breeding material.  If nothing else for the cherry flavor, but it also must carry most of the exceptional flavor gene pool of Cox's Orange Pippin.  My own breeding efforts include Cherry Cox crossed with various other apples.  If my efforts don't breed anything exceptional, maybe they will produce something that is worth using in further breeding.  I've crossed it with several red fleshed apples in the hopes that I might be lucky enough to co-mingle the berry flavors of blood apples with C.C.'s complexity and cherry flavor.  I've also crossed it with Sweet Sixteen, which has sometimes a cherry candy component, while also being a good grower and carrying some disease resistance.  I've crossed it with Wickson for higher sugar content and unique flavor and probably others I'm forgetting about.  I think Golden Russet might be a good candidate since it is one of the best apples I've ever tasted, and it also has an extremely high sugar content.  I'd like to see more crosses made along these lines.  I would like to see Cherry Cox crossed with sweet 16 and Sweet 16 also crossed with the generally scab susceptible red fleshed apples, and the offspring of both back crossed in an attempt to keep Sweet Sixteen's scab resistance, while reinforcing the cherry component and hoping for a red fleshed offspring.... or something along those lines.  I don't know anything about breeding for scab resistance, but the information on dominance of traits is available out there somewhere if one cared to look for it.  I've got all of those genetic crosses made, and then some, so fingers crossed.

Cherry Cox crossed with Rubaiyat in 2013 and with Pink Parfait this past spring, both red fleshed apples.

Cherry Cox crossed with Rubaiyat in 2013 and with Pink Parfait this past spring, both red fleshed apples.

For various reasons, I'll have few Cherry Cox scions to offer for grafting, if any.  Being uncommon, it may be hard to find scions, but I think with a little effort they can be found.  The more that people grow it, the more scions will be available.  If you have a scion exchange in your area, that is a good place to look.  Online scion trading and fruit discussions can be found at GrowingFruit.org and The North American Scion Exchange.  Information on grafting can now by found on my Youtube channel and on this website.

Cherry Cox trees are listed for sale at Raintree Nursery and Maple Valley lists scions and benchgrafts.


Other apples in my cherry cox tasting video that are worth mentioning are:

Egremont Russet:  A nice russet.  Not up to the best russets as it is grown here, but a good performer and very good at it's best.  Stephen Hayes in the UK is a big fan.  Here is his video review.

 Sam Young is an Irish apple that is rare in the US.  My small branch is just starting to fruit, but seems promising. It's somewhat russeted and is also known as Irish Russet.  I'll be keeping an eye on this one.  It is hard and very sweet.  Below are some old descriptions.

Old Sam Young

Old Sam Young

Sam Young:  Fruit small, flattish, about an inch and half from the eye to the stalk, and two inches in its transverse diameter; eye remarkably large, having some of the calyx attached to it; colour yellowish clouded with russet, reddish to the sun; very apt to crack; flesh yellowish, firm, crisp, sweet and well flavoured. In use from the beginning of November to January. Tree flat headed, shoots declining, of a light brown colour ; leaves sub-rotund, acuminate, coarsely serrated, upper surface shining, under slightly pubescent. An abundant bearer, and healthy on all soils.

Transactions of the Horticultural Society of London, 1820
___________________________

Sam Young, aka Irish Russet:

Fruit of a smallish size, somewhat globular, flattened, about one inch and three quarters deep, and two inches and a half in diameter. Eye remarkably wide and open, in a broad depression. Stalk short. Skin bright yellow, with minute brown spots, and a considerable quantity of russet, especially round the stalk; in some specimens red on the sunny side, usually cracking. Flesh inclining to yellow, mixed with green; tender, and melting. Juice plentiful, sweet, with a delicious flavour, scarcely inferior to that of the Golden Pippin.
An Irish dessert apple, of high reputation, ripe in November, and will keep good for two months.
The merits of this very valuable apple were made known in 1818 by Mr. Robertson, of Kilkenny. It is certainly one of the best of our modern apples, and cannot have too general a cultivation.

A Guide to the Orchard and Fruit Garden: Or, An Account of the Most Valuable Fruits Cultivated in Great Britain, 1833


You can support this blog and my projects by bookmarking this link in your web browser, and using it if you shop on Amazon.com.  No cost to you and a big help to me.  http://amzn.to/2yv0FSw

Deer Leg Skins, Sinews, Hooves, Hide Fleshing and Processing Videos

I shot some footage to possibly use as support videos for my book, Buckskin, The Ancient Art of Braintannning which is in process for reprinting.  These are some videos I put together from that footage recently.  More for the archives.

Finishing the Oak Bark Tanned Deer Leather

Cute and practical, just how I like 'em!

Cute and practical, just how I like 'em!

Last winter I started a project oak bark tanning a deer skin to make leather for the axe strop project.  The project follows the collecting and processing of materials to build pocket sized sharpening strops as prizes for people who completed the Axe Cordwood Challenge.  I'm making everything I need for the strops and decided to show the whole tanning process and everything else in a series of videos.  Almost 6 months ago, I laid the prepared skin away to tan in oak bark.  It sat in there about 4 months longer than it needed to, but I took it out and finished it this week, and it looks like it turned out pretty decent.

The leather is perhaps a little light and spongy, "Empty", as they say in the tanning trade.  Emptiness results from the loss of structural proteins in the skin by chemical or bacterial action.  It isn't much of a surprise considering that I over-limed it to start with, and that it sat in a weak vegetable tanning (plant based) solution for 4 months longer than it needed to.  Those are actually the type of things that a tanner might do on purpose to a hide in order to make the finished leather soft and pliable.  That's not what I was planning though.  I would prefer a rather firm and weighty leather for this project, but that is not even the nature of deer to start with.  Deer skin, at least our deer skin here in the Western U.S. has an open, coarse-fibered, low density character that lends itself well to softened leathers.  It would have been better to move it through the process faster with shorter liming time.  But, a process that uses somewhat preservative solutions like lime and tannin, begs for procrastination.  Add that I have to make videos of it all and it's a perfect storm for not getting things done in a timely manner.  It will probably work fine for the project, but I haven't assessed it closely yet.  If it doesn't work out, I have plenty of other skins I've tanned over the years that are suitable and I got to show the process start to finish, with some of the warts and mistakes that any home tanner is likely to experience.

The next steps will be making the wooden paddles, making glue and putting it all together into the finished product.  I only need a small amount of leather for the project.  Seven brave and industrious individuals chopped one cord or more of firewood for the cordwood challenge using axes only and will receive a finished strop and a leather patch when they are made.  The balance of the leather will be stowed away with the rest of my leather cache, to wait for a suitable project.

My Hand Watering Tool of Choice, the Fan Sprayer, and Cheap Hoses Just Got Cheaper

My watering nozzle of choice is the fan sprayer.  Unfortunately it's hard to find a good one these days.  Read more below, or watch the video. 

Also, the hoses I just recommended in another video and blog post, Craftsman 50 foot, 5/8 inch rubber hose, just went down in price further for the next day.  They go off sale TODAY.  Someone commented that Sears is in financial crisis and may go under, so it might be a good time to buy some.  They're like "WE'RE GOING DOWN, QUICK, SELL ALL THE HOSES!"  They are 17.99 with free shipping on orders above 50.00,  or free in store pick up even if they aren't actually on sale in the store.  The 100 foot are about twice that much, so same per foot price.  http://www.sears.com/lawn-garden-watering-hoses-sprinklers-garden-hoses/b-1024024

The package says the hose contains lead and chemicals known to cause cancer as everything must in California.  I did a brief search and found this hose to actually score very well against most tested for toxic compounds including lead, of which none was found.  http://www.ecocenter.org/healthy-stuff/samples/50-ft-craftsman-premium-heavy-duty-rubber-garden-hose

Quite a few people commented on the video with positive reviews of this hose, including people that have used them for over 10 years.

I like fan sprayer nozzles because they deliver a lot of water and deliver it gently if designed well.  The other major reason I like them is that the spray pattern and water delivery can be adjusted by tilting the head side to side.  I can cover a 3 to 4 foot wide swath 8 feet away by holding it horizontally, or concentrate most of that water in a one foot circle at the same distance by simply tilting the head vertically.  In between those extremes, you can adjust the width by adjusting the tilt.  This versatility and the wide horizontal coverage make them especially good for watering wide beds as well as for variable conditions.  nothing else I know of delivers this amount of water in that sort of versatile pattern.  Unfortunately good ones are hard to find and I can't recommend a new one, though I can recommend some old ones.

Hole size is a major design issue with these.  If sprayers with small holes are available new at all, they will be the exception.  Small holes mean finer streams of water, which equals less trauma to seedlings and seedbeds as well as the fragile soil surface.  High volume and gentle delivery are hard to find in one package.  The older fan sprayers seem to have small holes for the most part.  THE ROSS is the brand I've used most and they are not that uncommon to run into.  THE ROSS #10 shown in this video was patented in 1924.  There are at least two models I can recommend, the #10 and #11. Both have similar holes, but different construction.  Examine old ones for leaks at any soldered or folded seams.  The cast metal body of the #11 can corrode through in some cases, so examine them closely as well.

Three good fan sprayers.&nbsp; THE ROSSes #'s 10 and 11 and a no name short brass one that is every bit as functional, if a little less durable.

Three good fan sprayers.  THE ROSSes #'s 10 and 11 and a no name short brass one that is every bit as functional, if a little less durable.


A common design feature in new models is a valve in the handle of the sprayer.  I think that is a mistake.  The valve will fail eventually and can't be replaced.  From my experience with hose shut off valves, it will probably fail rather sooner than later.  Most people will want a hose shut off valve on the end of a hose anyway for switching appliances and such without going back to shut off the valve at the spigot.  I have one on the end of every hose, which makes a valve in the sprayer body not only an unnecessary failure waiting to happen, but it's also an unneeded restriction in the line.

Most hoses should have a shut off valve already.&nbsp; Putting a valve on the sprayer is usually going to be a disadvantage, let a lone redundant.

Most hoses should have a shut off valve already.  Putting a valve on the sprayer is usually going to be a disadvantage, let a lone redundant.

The vintage ones can be found on ebay or etsy.  Etsy seems to have quite a few, but I had to search "garden sprinkler" and sort through a bunch of results to find them.  They are not super cheap, but given what is usually available on the market now, it might be worth spending 10.00 to 15.00 on a vintage one.  I've found quite a few of them over the years at flea markets and such, but most of mine came from one single estate sale where I found a pile of them.  Lucky me :)  I have excellent thrift store/yardsale/flea market juju though.  Just ask my mom, or my pile of all clad cookware.

My second hand juju is strong.&nbsp; Pray to the flea market gods all you want, some of us are just born with it.

My second hand juju is strong.  Pray to the flea market gods all you want, some of us are just born with it.


A Tale of Three Watering Cans and a Hose Recommendation

I got two videos on watering for ya today.  One is about three quality built watering cans and watering can design.  The other one is recommending the Sears Craftsman rubber hoses on sale now and seemingly every spring at 20.00 for 50 feet.  My friend Mark Albert recommended them saying they are good for 30 years (also confirmed by a youtube viewer).  I've been using them for a few years and plan to keep buying them.   I haven't met a plastic hose that will last yet and If there is one I'll bet it's not this cheap.  If they aren't on sale in the actual store, you can ask for the online price with free delivery and they'll let you walk out with them for 19.99 each.  That's all you really need to know, so you don't even have to watch the video!

What to Do With Those Axe Cut Woodchips? The Burning Question

One of the most common questions, if not the most common question on my axe related content is some combination of what do you do with the chips, aren't they wasteful compared to a saw and wouldn't it be better to just use a saw.  The video below is about that and what we can do with the chips which are quite useful for anyone with a garden or who burns wood.  Below that are some further thoughts not really covered in this video.

What I covered in that video was, in short, yes there are a lot of wood chips produced when processing wood with an axe.  This tree was probably 9 inches in diameter and I estimated about two good firewood logs worth of chips were produced.  It takes under 5 minutes to pick up 80% or more, in this case 3.5 minutes.  I talked about what you can use them for, like biochar, mushroom growing and fuel, and how whether it is viewed as wasteful or not is a matter of context.  What I didn't really talk about is why some of us use axes and not saws for hand processing firewood. 

I didn't talk about that, because I more or less just forgot to!  I think that in my head it would be self evident that not I, nor anyone else, is using an axe because it is the quickest and most efficient method of firewood production.  I like saws.  I like my chainsaw.  I'll be using my chainsaw a lot for processing wood this year, not because I need the wood, but because I need to deal with a lot of sick trees that will soon be a fire hazard and which represent a short term opportunity to gather some resources that will soon be unavailable.

But, when I set out to do the cordwood challenge myself the previous season, challenging myself to cut a cord of wood in 3 months, I was slightly wary.  Before committing I think I went and cut up a small tree or two just to be sure I should be announcing to the entire internet that I was going to go for it.  Aside from potential personal limitations though, I knew I could do it, because people used to do it.  Dudley cook said in The Axe Book, that a good axeman could put up 2 cords a day!  I knew the cord he was talking about had to be in at least 24 inch lengths, and not the 16 inch stove lengths I was cutting.  More probably it was cut into between 32 and 48 inch lengths for industrial use, transportation in bulk and most probably very wide fireplaces.  Charcoal makers would cut wood even longer to make large stacks of wood.  Still, do the math.  I'm cutting about 3 times as much to get my 16 inch logs as a guy cutting 32 inchers, but even the slowish guy could probably put that up in just 3 days of average work!

Well, that is interesting to think about, but it doesn't prove anything to me for real or gain me a lot of real insight.  To gain knowledge it is required of us to take information and do more than absorb it, more than mull over it and make assumptions and inferences.  For me that process looks more like taking in information, contemplating it, putting it into practice, maybe getting more information, more experience, more contemplation etc.  At some point, something resembling truths begin to gel out of that process.  In short, I knew that to gain real insight into the problem of axe work and what it's potentials and limitations really were, I had to put it into practice for reals.  Not only that, but I actually had to improve my own skills to a certain level before I could really understand what that potential was and where an axe may be more or less useful than a saw.  Give an unskilled person an axe and a hand saw and tell them to limb this same tree and they are likely to conclude that the saw is easier and faster.  But no matter how good they get with that saw, I'll have the same tree limbed up more quickly, with much less physical effort and many of by knots will be trimmed more closely than theirs.

I'll also have way more fun doing it!  Axe work is engaging, exciting, focusing, cultivates coordination and provides a diverse form of exercise.  Sawing by comparison is dull and tedious work and the best you can do is trade off one side for the other.  I like sawing up to a point.  It is good honest contemplative work.  It is also skilled work and a good hand with a saw will out saw a newb every time.  But it is only so skilled and lacks the special combination of things that makes axe work really engaging and fun.  Saws have their place as do axes.  But the place an axe has in any one particular persons hands is informed by that persons skill level and understanding of it's efficient use, and that requisite skill is only gained by extended use, and not by dabbling at the thing.

All of which is to point out that, while my use of an axe on that fir tree in these last couple of videos did result in two fewer logs worth of large firewood, rather than smaller chips, such is simply part of the cost of admission into that understanding of what is and is not possible with an axe and what place it does or doesn't have in our tree work.  It's a rather small price it is to pay when they are easy to pick up and decidedly very useful as fuel or for other purposes.

And repeat thousands of times :)

And repeat thousands of times :)

Axe Only Firewood Processing, Felling, Limbing, Lopping, Bucking for a Splitting Video

I released a video a couple days ago on processing my last tree for the cordwood challenge.  This was a tree I chose as not particular easy to split for a splitting video I'm still waiting to record.  The question of how you split wood with an axe if it's cut with an axe instead of a saw vies with "what do you do with the chips" as the most common question regarding processing wood with an axe.  The footage I shot for the front of that video seemed like a good stand alone video, so I edited it and posted it with some commentary.

Be aware that there is a lot going on when I'm processing this tree that is invisible to the uninitiated.  If I were watching someone else do it, I could spot some of that "invisible" technique and safety stuff, but not all of it as it is very subtle and personal.  The lopping operation is especially dangerous, but I'm using several things to stay as safe as possible.  The most important might be the direction of cut, which means in what direction the force is pointed, the obvious reference point being the cutting edge.  A close second is probably body positioning to decrease the likelihood of a stray edge contacting my body.  Moderation of the force used is also extremely important.  Axe work requires constant adaptation and a certain level of humility where you have to say to yourself "I can hit this really hard, but I'm not going to!"  Finally, you really have to be able to hit what you're aiming at.  Anyway, it's mostly a lot of chopping, but some people really seem to like that.  There are some really good pointers though too.  You can count on some very detailed tutorials in the future.

How to Graft onto Existing Fruit Trees, Frameworking and Topworking Explained

I've reached #10 in the grafting video series.  I'm looking forward to finishing the last 2 or 3 segments and moving on to something else.  It's quite an investment to watch it all, and I know it is not needed just now by a lot of people, but it will be there when it is needed.  It will be really great to finally have a grafting resource to refer people to in my writings and videos and it is long overdue.  So here is #10.  I've talked about a lot of the material covered in this video in a blog post about frankentreeing some time back, which can be read here  And here is the video playlist for this series.  The summary below is an outline of what's in this video, mostly for search engines.  The information is covered better in this video and in the blog post linked above.

A distillation of this video:

Grafting onto exsisting trees is approached in one of two basic ways, either by topworking or by frameworking.  Topworking cuts most of the tree off and regrows it, while frameworking retains the main tree structural wood and replaces the fruiting wood with the new variety.  Framework grafting has the advantage of producing fruit more quickly and is less damaging to the tree.  A well frameworked tree may suffer no permanent injury, while a top worked tree is much more likely to have ensuing problems with decay due to the large open wounds created in cutting off large branches or trunks.  Also, it is possible in one year to add many varieties to a frameworked tree.  On a good sized tree you might add 50 to 90 varieties in one season, whereas you would have to wait for the top of a top worked tree to regrow in order to graft on more than a few varieties in the first year.  I favor frameworking in almost all cases except where damage done has to be remedied by growing a new top, or by some other special circumstance.  It does require more scions and more time, but unless the scale of operation is large it is a no brainer to choose frameworking in most cases.

A frameworked tree can be grafted in one year with very little or none of the old fruiting wood left on.  Some sources will recommend leaving some of the old wood and that is okay if you are concerned, or if you are not sure your grafts will take well.  I would not hesitate to work over an apple tree completely in one year if it is healthy.

A common mistake in frameworking is to graft onto smaller wood near the outside of the tree's canopy.  It is better to go back in to wood nearer a limb or large branch, thereby replacing and regrowing all of the fruiting wood.   Don't worry about grafting into stubs the same size as your scion, just set the scion to one side, and if the stub is large, set to scions, one on each side.

Another common mistake is to add a scion, but leave old fruiting and leafing out wood crowded around it.  There is a good chance that the new graft will not grow well if it is not given some room by removing proximal fruit/leaf wood. 

A spacing of about 18 to 24 inches is pretty good between main offshoots on one side of a tree.  If they are 24 inches apart, each only has to grow 12 inches to the side until they are touching.  Branches on the other side of the tree can be the same spacing, but staggered between the branches on the opposite side when possible.

There are many grafts that can be used, but cleft and whip and tongue are good mainstays to use on smaller stubs and on stubs over an inch you can start to think about using rind (bark) grafts, covered in an earlier video.  It is possible also to add a graft into the side of a bare limb or large branch by either cutting into the side of it and setting in a wedge shaped scion, or by using a rind graft of some kind.  Those operations are less likely to succeed than the familiar grafts already mentioned, but if it doesn't take, it can just be grafted again the following year.

Aftercare is similar to other grafting.  Wrap grafts very tightly and very well to prevent movement of the grafts during a couple months of critical healing time.  Seal the scions to prevent drying out, and check them in mid summer to make sure that rapid growth is not strangling the grafts where they are wrapped.  If the grafts are strangling, either remove the tape, or unwrap it and re-wrap around July sometime.

Scions for framework grafting can be much longer than those used for most other grafting.  I like to use scions with 8 or more buds personally.  Very long scions can be used if they are splinted firmly to immobilize the grafted section, but I'm not sure there is any real advantage to doing so.

Tools required are just a sharp knife, pruning saw, pruning shears, some kind of grafting wax or paint or seal and something to wrap with.   See the Tools Video for more on that stuff.  Don't forget to tag them too!

Axe Cordwood Challenge Almost Over and a 1 Week Extension

The axe cordwood challenge is nearly over.  I'm closing in on my own cord and 3 people have already cut a cord or more.  I'm adding a 1 week extension, just because this is the first year and we got started kind of late.  Actually it's mostly because I want people to have time and not rush too much since that is inherently more dangerous.  I still hope to finish mine by June 1st, because it just takes time to dry wood even in our hot summers and June 1st is a good last date to have green firewood cut.  I'm thinking about how to make it more accessible to people in the Southern Hemisphere in the future.  If you finish the challenge, send me info and pics or links to videos by June 7th through the contact on this website.  Also, leaving comments on the official Axe Cordwood Challenge page is a good idea as well.  I think a lot of people would like to know what axes participants used and what you learned whether you finished or not, and the comments section on that page is a good place to leave those.  I'll probably create a page for the 2017 challenge and post all the various links and experiences there.  I've heard from a lot of people who were maybe going to do it and more that have just been using their axes more and practicing and having fun with that.  No one said this completely sucks and I hate it and didn't learn anything, lol.  It's been pretty much good feedback all around and it's been fun having this thing in common with a group of people.