Posts tagged #steven edholm

Lessons from Established Fruit and Nut Trees, Training Mistakes and Remedies

This video is a walk around to look at the lessons that can be learned from some of my fruit and nut trees that have been growing for a while. Between careful and not so careful training, lack of training, regular maintenance or neglect, we can see how things go right or wrong and how important early shaping and training are to avoid future problems. I also taste some Lady Williams Apples off the tree, still good in March! These apples, while especially late this year, demonstrate I think that it will be possible to eventually have apple varieties that routinely hang on through winter and ripen in spring. Two new terms I’ve coined are Winter Hanging Apples and now Spring Hanging Apples, because these are classifications we need, beyond winter apples or storage apples. Next steps in that direction are finding more winter hangers and spring hangers if possible and making intentional crosses between them for new seedlings. Another step is simply promoting the idea and phenomenon in general, which will be easier as more of them are discovered or created. Also important is to test more of these apples in various climates to see how cold they can go, or how other climate factors affect them.

The long reach pruner I’m using in this video is a pretty neat tool. It is not cheap, but it can nearly obviate a ladder if trees are pruned yearly and are under 15 feet tall. That is pretty a major boon, especially if trees are spread out like they are here on myu homestead. I rarely use a ladder to prune anymore. They are also still cheaper than a good orchard ladder, even an 8 foot one. They can cut green wood up to about 3/4 inch if cut at an angle. For older people (or those that will be older soon lol) it could save a lot of clumsy ladder moving and setting up and ultimately could prevent a fall and the complications that often come with broken bones past 70. We got my mom one and I’m going to try to convince my 82 year old friend to get one. He is still climbing rickety old step ladders in the backyard. There is a short review on my amazon store page and full video review coming soon.

The Tanner's Knife, An Essential Multipurpose Tanning Tool for Fleshing, Dehairing, Scudding and Frizzing

P1160238.jpg

The fleshing knife as it is commonly known, but probably more appropriately known as a tanning or tanner’s knife, is the primary tool of the tanner. This versatile knife can be used for fleshing and re-scraping the flesh side of the skin, de-hairing, removing the grain (frizzing), scudding out liquids to flush unwanted moisture and loose material from inside the skin structure, moving the hide on the beam and trimming the edges of the skin. While there are specialized two handed knives for some of these tasks, they can all be performed with the same tool if it’s within certain design parameters, which is what will serve most home tanners best. In this Blog post and video, I go over some of the different types, both commercial and homemade with some tips on weight, length, styles, making your own, and other such things.

The focus here will be on the home tanner working on beams about 8 to 12 inches wide. Keep in mind that most new models are designed by and for fur trappers, most of whom do not do a lot of general tanning work. The amateur tanner can get by with tools that are much less than ideal, so there is no need to overthink the problem too much, or find the perfect tool just to get started. You can always upgrade later if you want to.

Length: The typical professional tanners knife of the European style is quite long and not really best suited to the home tanner. Samples I have range from 3 to 3-3/8 inch wide. 16 inches is a typical working edge length. These long knives were often used on very wide beams with shallow curves. The strong, experienced men using these tools, combined with the large area of contact formed between the gently curved edge of the tool and the wide beam, would make for very efficient and quick work. I think the ideal length for home tanners working a variety of skins on narrower beams is about 20” long in total with 11” working edge and 4.5” handles. A working edge up to 12 inches and down to 10” with 4.5 inch handles is also fine. With such a length, the tanner can comfortably do all manner of work from very large hides, down to fur skins. Wider beams require wider knives and/or the edge of the tool may need to protrude out in front the handles. I would not recommend working edges much smaller than about 10 inches, and then only out of necessity. It is not just the working edge though, but also the space between the handles, which allows for comfortable work.

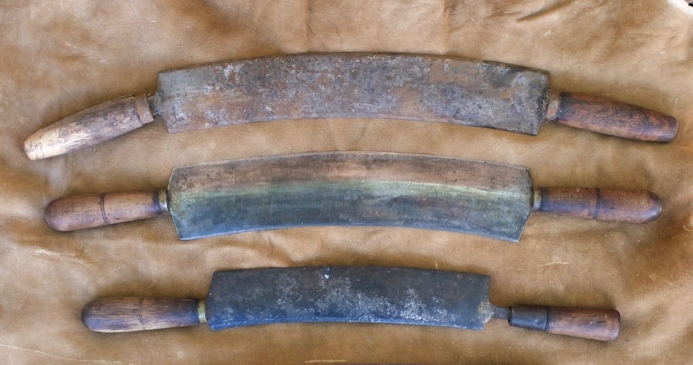
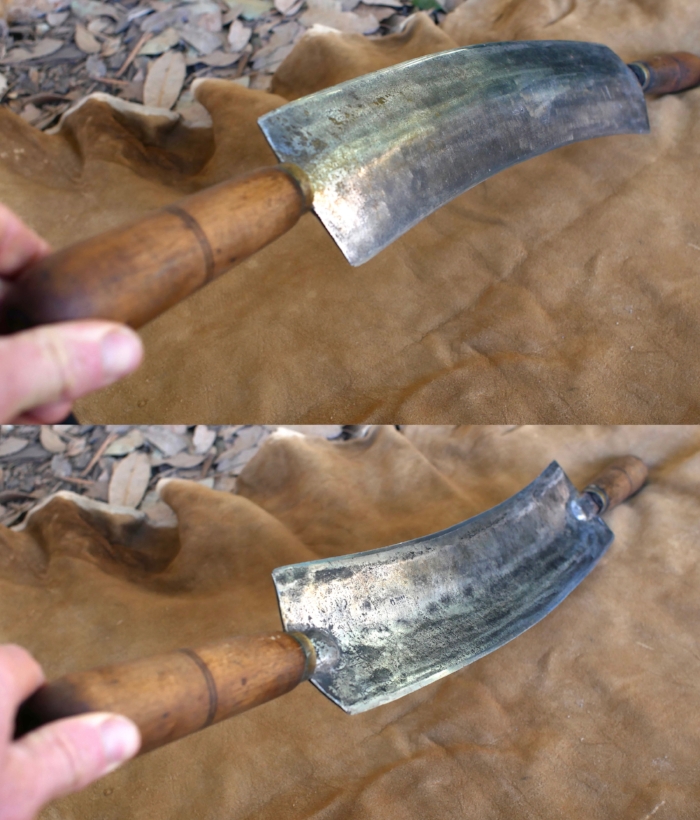
Styles: Nearly all traditional styles seem to be curved. The classic European style of tanning knife that is most common is wide, curved and dished. The compound curves of the cup and the arc combine to strengthen the tool, allowing it to be fairly thin, and yet still very rigid. The concavity of the underside seems to offer some geometric advantage in scraping. The concavity also means that the tool can be used flat on the hide without rubbing on it, which I suspect might be part of the impetus for the design, although I have rarely used them that way. Professional tanners who worked hides day in and day out would probably be able to get away with doing things that the rest of us can’t, such as using sharper tools at lower angles. These traditional, wide, dished knives are very nice to use, though if I were designing one from scratch for home tanners who are doing many different types of skins and tasks, I would probably make it considerably narrower than they usually are and no wider than 3 inches. The back edge is sometimes kept very sharp and can be used for tough spots, gaining access under tough membranes, or as a sharp slicing knife for trimming the skin during fleshing. I have also read of tanners filing teeth into the back of the knife so it can be used to pull skins up the beam to reposition them for scraping without using the hands. You can do this maneuver on small skins without cutting teeth in the back of the tool, and I do, but on large heavy hides, I can see why they would make this modification. The option is to let go of the tool with one or both hands to readjust the skin on the beam as each area is worked over, which is much slower.

Traditional style knives. From the top down, A cheaper modern version @ 16”, W.H.Horn & Bro’s England 15” edge-3-3/8” wide- 27” total length, Horn Brand cut down to a 12 inch blade by someone who probably thought 16 inches was too long. I just saw a…

Traditional style knives. From the top down, A cheaper modern version @ 16”, W.H.Horn & Bro’s England 15” edge-3-3/8” wide- 27” total length, Horn Brand cut down to a 12 inch blade by someone who probably thought 16 inches was too long. I just saw a picture online of one cut down exactly the same way. It even had a similar handle. Just goes to show, those super wide tools are for use by professionals in a professional setting and not suited to everyone and every task.

W.H. Horn fleshing knife from ends.jpg

Other tools are narrower and usually thicker, sometimes with only one working edge. This type is good for home tanners with a surprising number of models and brands available new. Newer ones are often sharpened on the back as well and many are fairly flexible compared to older ones I’ve seen.

Width: A versatile knife for the home tanner would probably be anywhere from 1.5 to 3 inches wide. Though still very usable, extremely wide tools can be less stable when it is required to push very hard as is sometimes necessary when graining (frizzing) un-limed buckskins or fleshing very difficult skins. My two favorite tools currently are a shortened traditional cupped knife that is worn down quite a lot to about 2.5 inches wide. More relevant though, is that the concave curve, which is the main working edge, has been worn back closer to the handles, making it more stable to use when pushing very hard. A full width knife however is fine as well, but if I designed one from scratch it would probably be under 3 inches wide.

Another favorite tool I have was forged out of a wagon leaf spring and is about 3/16 inch thick and 1.5” wide, which makes for a durable, versatile tool of a good weight. Tools as narrow as 1 inch can be fine too depending on material and use. There is a type of knife that is very thin and flexes to conform to the curve of the beam, but I have never had a chance to examine, let alone use one. If the tool is both narrow and short, the handles may get in the way, necessitating the use of a very narrow beam.

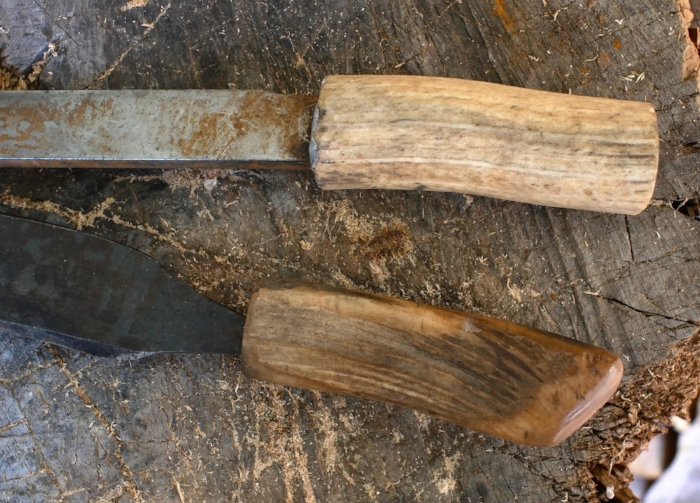
For whatever combination of reasons, these are the tools I’m most likely to grab first. The. traditional wide knife is worn back, making the edge closer in line with the handles, which is more stable when doing hard work. The second is forged from a…

For whatever combination of reasons, these are the tools I’m most likely to grab first. The. traditional wide knife is worn back, making the edge closer in line with the handles, which is more stable when doing hard work. The second is forged from a wagon leaf spring, 3/16” thick, 20” long, 1.5” wide. The working edge is only 9.25”, but there is plenty of working room between the handles. If I made a knife like this again it would have a 10” or 11” working edge. the handles are antler.

If the tool is too short and narrow, you will not be able to use it on wide beams like this one, because the handles will interfere. It also doesn’t give you a lot of real estate to work with on the edge. If the hands are held too close together, it…

If the tool is too short and narrow, you will not be able to use it on wide beams like this one, because the handles will interfere. It also doesn’t give you a lot of real estate to work with on the edge. If the hands are held too close together, it can become less ergonomic to work. The wider your shoulders, the wider the tool could be.

Thickness and weight: Wider tools are generally relatively thin in order to avoid excessive weight. Narrower tools are often a lot thicker, though many of the newer, higher end tools are thinner than the older ones were. A range of weights are usable, but tools can be both too light and too heavy in my opinion. I’d much rather a tool was too light, but some weight offers stability and the advantage of momentum in some scraping processes.

Straight v.s. curved: Straight tools are perfectly serviceable. I do prefer a curve and would never design the perfect tanning knife with straight edges, but if material is available to make a straight tool, I would not hesitate. I’ve used straight planer blade tools for countless hours and endless square feet of hide scraping. Once I started using a curved tool, I was sold instantly, but I could go back easily enough. I think the main advantage of curved tools is that it is easier to incorporate tilt and slide techniques in scraping.

Tilting the knife edge slightly off of perpendicular is an important refinement to scraping technique. Imagine a straight edged fleshing knife held at a slight angle by putting one hand slightly away from you, and one hand slightly back toward you. If the tool is pushed straight forward while tilted askew like this, there is a slight advantage in scraping, something akin to a slicing action, though not quite the same. You can achieve the same effect with any cutting edge in wood, such as a plane, spokeshave, knife or draw knife by tilting it. This subtle difference in technique can have a large effect. Curved tools, when held slightly to the left or right, create this effect automatically without having to hold the tool askew at all, or at least less so.

Sliding the tool side to side very slightly in a slicing motion as the tool is pushed forward is another very important subtle refinement of the hide scrapers art. Combined with tilt, it is even more effective. Since tilt is already built in to a curved knife, it is easier and more ergonomic to achieve this combination of techniques when using a knife with a curved edge.

The radius of the curve should not be too drastic. Shown are some curved tools to give you an idea of what some look like. A factor in degree of curvature, or lack of curvature, is that the radius of the beam combined with the radius of the knife determine how much of the tool contacts the beam. That contact width has everything to do with how much work is done with each stroke and how hard it is to do that work. In one extreme case, you might be scraping off the grain from the tough neck skin of a deer, which is going to require a narrow area of contact. If the width of contact between beam and knife is wide, you will have a very tough time of it. Still, with an 8 inch beam and a very moderately curved knife, you should still be okay. For general work, I prefer a beam around 12 to 14 inches wide with a moderate curve. Coupled with a curved knife, that makes for a reasonably wide area of contact resulting in efficient work for most processes. If I used a 6 inch wide beam with a high crown and a straight tool, I would be at my work much too long when doing most of the relatively easy processes that I engage in most often, such as fleshing and dehairing, simply because the strips I would be scraping off would be so narrow.

If a straight line is drawn from one corner of the edge to the other, the distance from that straight line to the tool edge at the center of the tools are as follows Top to Bottom:9” long, 5/16” to edge,15” long, 3/4”16” long, 3/4”12” long 1/2”Botto…

If a straight line is drawn from one corner of the edge to the other, the distance from that straight line to the tool edge at the center of the tools are as follows Top to Bottom:

9” long, 5/16” to edge,

15” long, 3/4”

16” long, 3/4”

12” long 1/2”

Bottom tool, not measured

The bottom line is that I prefer a moderately curved tool for general work. The curve I would start with as a prototype for testing would arc in an even radius, with a rise of about 3/8” at the center of the tool on an 11” blade.

Material: The cheapest knives are made from cheap mild steel which cannot be tempered to keep an edge. This type of budget tool can work, but they are not preferable and will require more frequent sharpening. Better knives are made of tool steel and tempered to take and hold an edge. If at all possible, I would recommend something that will hold an edge. Stainless tools are nice to have when working around water and salt, but If tools are taken reasonable care of, regular carbon steel is fine. Planer blades, discussed below are rust resistant, but not stainless. For making tools at home, you can use a number of common pieces of steel.

Miscellaneous steel items that could be used to make a tanner’s knife. Left to right, a set of car leaf springs, section of leaf spring, chainsaw bar, lawnmower blade, planer blades

Miscellaneous steel items that could be used to make a tanner’s knife. Left to right, a set of car leaf springs, section of leaf spring, chainsaw bar, lawnmower blade, planer blades

Leaf springs from cars are good. If possible, find a set that is narrow. Almost every junk car has a full set of springs under it waiting to be salvage with the removal of a few bolts. The steel is temperable and already hard enough to work well enough. If you can find a narrow spring, you could grind out a tool and retain the temper if you are careful and patient.

Chainsaw bars seem like a great source of steel of a good thickness. I’ve never used them, but I understand they are carbon steel of some kind, and would already be hardened and tempered to hold their shape under hard use. Once worn, they are of no use on a chainsaw and should not be hard to find in any rural area in the states.

Lawnmower blades: are fairly common and seem like reasonable stock to work with. They have a propeller twist which would have to be removed, necessitating heating, forging and preferably re-hardening and tempering afterward.

Large files are a good source of tool steel,and could be used. I would grind or file out all the teeth though. They are too hard as is, so making a good tool with one would entail at least heating to anneal (soften), grinding to shape and preferably re-tempering. If you’re going to do all that, you might as well forge it out into a better, wider, curved tool.

Misc mild steel bars can be used, but will not hold an edge well. In a pinch, you can even use a square edge, instead of a more knife like beveled edge.

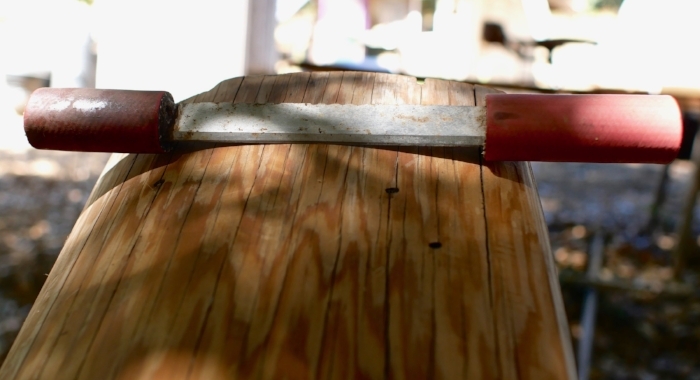
Planer blades of high speed steel make very nice scrapers. They are extremely hard, tough, rust resistant and hold an edge incredibly well. Another advantage is that since they are straight, some will have two usable edges. I use two tools or edges of varying sharpness during the processing of most hides into bark tanned or braintanned leather, so having two edges of different sharpness on one tool is great.

Tools made from planer blades. The top three are made from narrow blades and pretty short. The top two have handles made of wood covered with rubber or vinyl tubing. the third is antler handled and the fourth is a short blade tied into a slotted woo…

Tools made from planer blades. The top three are made from narrow blades and pretty short. The top two have handles made of wood covered with rubber or vinyl tubing. the third is antler handled and the fourth is a short blade tied into a slotted wooden handle, giving a longer working edge on a short blade.

The steel in planer blades is too hard to drill with normal tools, but can be ground easily enough with a 4 inch grinder, belt grinder or bench grinder. [EDIT: Melvin Beattie, one of my tanning teachers, Just wrote me the following: “Yes you can drill planner blades, files, etc.. Here are the drills that work, I have used them many times putting handles on planer blades. If I am using a hand drill start with a 1/8 “ then use 1/4” but you have a drill press just use the 1/4’’ and a good drill lube.” ] Handles for planer blades can be of two pieces of half round wood with rubber or vinyl tubing or epoxied wood (rough up and clean the metal surface before applying epoxy).

Planer blades can’t be drilled or sawn easily. To shorten, grind from both sides until thin, clamp in a vice, then break off.

Planer blades can’t be drilled or sawn easily. To shorten, grind from both sides until thin, clamp in a vice, then break off.

P1160275.jpg
Vinyl tubing with wood. Grind handle section down to 1” wide. Wood 1” wide. Vinyl tubing 1” available by the foot and many hardware stores. total length 4” to 4.5” Some will just pound tubing over the flat wide handle, but it’s very uncomfortable fo…

Vinyl tubing with wood. Grind handle section down to 1” wide. Wood 1” wide. Vinyl tubing 1” available by the foot and many hardware stores. total length 4” to 4.5” Some will just pound tubing over the flat wide handle, but it’s very uncomfortable for protracted use. The wood can be any easily split straight grained wood. There is no reason to use hardwood.

Antler handles are also very nice and may be the best option if the planer blade is only 12 to 14 inches long. You need at least 1.5” stuck into the antler, preferably more. Grind the end of the tool that will go into the handle to fit within the antler pith as shown in the photo below. Smooth and round off all sharp edges and grind the end into a slight wedge. Soak the antler overnight then boil for 15 or 20 minutes. Clamp the blade in a vice if you can and pound the antler handle onto it. Don’t drill the antler, just pound it onto the end of the blade. Allow the antler to dry completely before using it at all or you will loosen the union. Finding comfortable pieces of antler that are not too curved or too small can be a trick, but you can end up with very nice handles. Antlers vary in the amount of pith they have and general density and strength. If the antler is not too pithy, this method can also work for narrow tangs.

Antler handles set while wet and boiling hot at least 1.5” deep, deeper is better.

Antler handles set while wet and boiling hot at least 1.5” deep, deeper is better.

The width of the blade should roughly match the width of the honeycombed pith.

The width of the blade should roughly match the width of the honeycombed pith.

Grind the end of the bar to a slight wedge and round off all sharp edges.

Grind the end of the bar to a slight wedge and round off all sharp edges.

Grinding out tools: If you have a piece of stock that is already tempered, such as a chainsaw blade or car leaf spring, it is possible to grind and or file it to shape without changing the temper. If you overheat a hardened and tempered tool in grinding, it will become soft, a mistake commonly referred to as “burning” the steel. If you see colors appearing on the edge of the tool during grinding, you are flirting with danger. For something the hardness of a tanning tool, avoid letting the steel turn anything darker than bronze color, after that it will turn a purplish color, then light blue. Dark blue is pretty much dead soft, so stay well on the right side of that color. Using a high speed bench grinder, 4 inch angled grinder or belt grinder, it is very easy to overheat steel, especially when thinning the edge. Work in very short spurts, with frequent water cooling and watch for those colors with unfailing vigilance. For a tanning knife, one of two soft spots are not likely to cause you huge problems, but do your best to prevent them.

So, what is the ideal tanning knife for home users? I would definitely be a compromise in some way, but that would also be it’s strength. I have drafted up some plans and I hope to someday experiment with some prototypes. So many projects, so little energy :-/ for a fairly simple tool, I would say a good place to start would be a moderately curved, 3/16” thick, 1.5” to 1.75” wide, 11” working edge and 4-1/2 inch handles for a total of 20” long. Such a tool could be filed or ground out of a chainsaw bar, or forged from leaf spring or a large file. I would put a bevel on the back, to keep sharp for trimming skins during fleshing and other tasks. The bevel on the front concave edge should be at least 45 degrees, but thinner would be better, maybe something like 20 to 30 degrees?

As far as new knives go, there are a lot on the market. On the low end, the Wiebe 12” knife is as cheap as 20.00 before shipping from some dealers. According to Dakota Line Snares, a Wiebe dealer, “The steel on all three of the fleshing knives (8”, 12” and Elite) is 3CR13: Hardness Hrc52-55. The Elites are sharpened in the U.S.”. I think the Wiebe 12” flesher might be a very good budget option for new home tanners. Reviews on Amazon are good, but it’s hard to know what people are doing with them or how many of them are experienced enough to judge. In some pictures I’ve seen, it appears to be bent just in the middle in the classic dog leg formation common in cheap knives instead of forming a long gradual arc. In others it appears to be bent off center, or not much at all. I would not expect too much quality wise. They are produced in China with Chinese steel. A step up from that class of tool, there are the Wiebe elite, Neckers of various models, the caribou and Au Sable are in the 65.00 to 95.00 range and generally get good reviews. Many of them may be more flexible than would be ideal for a home tanner, so shop with caution. I have the Necker 600 and am not crazy about the handle design or the down sloped handle angle, but I actually haven’t used it yet. It is also more flexible than I’d prefer. The wider necker 700 looks interesting but it’s a little more costly at 95.00

Also in the mid range, there are affordable imitations of the European style knives that are sold in the U.S. According to one supplier they are stainless. The 12 inch version (which I would recommend over the 16 inch) is about 45.00 to 50.00 My guess is that the tangs will be the weak link in these English knife copies. There are also new real English Sheffield knives by J. Adams which have separately attached tangs that run all the way through the handles. They are expensive at about 145.00 for the 12” model. This is the high end of new tanning knives, outside of custom made tools. I would hunt ebay for an old european style knife before purchasing the new Sheffield knives. The problem with the antique ones is that they are usually on the long side for a home tanner. Exercise caution in shopping for new English knives as the American made copies are sometimes unscrupulously marketed as being from England or Sheffield.

Typical of old school quality, the two tools at the top have heavier, thicker tangs forge welded onto the blades, while the lower tool has a thin tang that is cut out of the same metal the body is made from. As a result, the thin, sharp edged tang h…

Typical of old school quality, the two tools at the top have heavier, thicker tangs forge welded onto the blades, while the lower tool has a thin tang that is cut out of the same metal the body is made from. As a result, the thin, sharp edged tang has split the handle. The sad thing is, it’s much easier with modern welding to weld separate tangs on.

The older tools have full thick tangs that go through the handle to the end where they are pounded over like a rivet, making for much stronger handles that put less stress on the wood. I don’t think this is one of them, but I suspect that the new pr…

The older tools have full thick tangs that go through the handle to the end where they are pounded over like a rivet, making for much stronger handles that put less stress on the wood. I don’t think this is one of them, but I suspect that the new production Sheffield, English knife copies sold in the U.S. probably have these these type of cheap flat tangs. I may try to modify this tool to make is shorter with thicker tangs and handles that come more nearly straight to the sides instead of arcing downward. I’m thinking some small metal parts and some JB Weld…

For me to buy and test all of these tools would be quite expensive obviously. I also don’t tan enough currently to put them to the kind of test needed to sort them out really well. None are what I would design from scratch, but again keep in mind that most of these are designed by and for fur trappers, whose only job typically is fleshing furs.

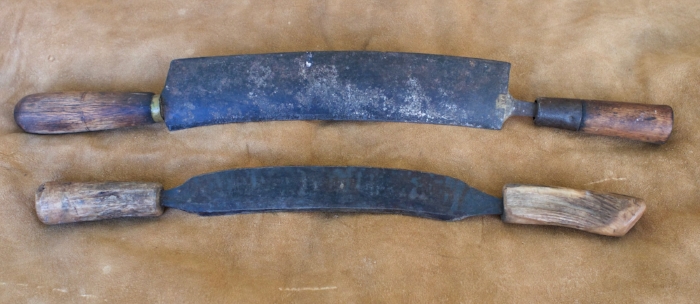
For used tanning knives, ebay is the best market, although they do show up on Etsy now and again. Obviously you can hunt old junk and antique stores, but you will be lucky to find one at all, let alone at a reasonable price in good condition. Avoid the cheapest and very common knives that are bent in the middle instead of in a continuous arc. These cheap tools usually have wire wraps on the handles, but some have solid ferrules. They are made of mild steel. They will work, but get something better if you can afford it. With the Wiebe 12” budget knife being tempered steel, there is hardly an excuse to buy a mild steel tool.

The common very cheap tools of mild steel like these should be avoided if you can afford something better.

The common very cheap tools of mild steel like these should be avoided if you can afford something better.

Quality vintage tools of both the old school thin wide cupped European type and the thicker narrow type tools come up on ebay, but they are often over priced. Patience is key. Look at ended auctions to see what has and hasn’t sold in the past and for how much, as well as what has been re-listed recently or lowered in price. There is a W.H. Horn and Brothers knife, just like mine, in nice condition for 85.00 plus shipping on ebay right now. Last week it was listed for 150.00

Nectarines over Almonds, Grafting Onto Seedling Almonds With Summer Chip Budding

almond roots 2.jpg

No, the title of this blog post, Nectarines over Almonds..., does not refer to some kind of dietary cult belief.  I'm simply trying to take advantage of the qualities of almond rootstock to grow an outstanding nectarine variety.

Grafting has it's detractors, and maybe they are right about some of their arguments.  But there are some decided advantages to grafting.  I'm taking advantage of a few of those advantages in this project.  For one, I can secure a new tree very quickly.   It will also probably come into bearing sooner than a seedling tree.  Most important though, is that I'm choosing the roots of the tree by their special qualities.

Almond trees are almost the same tree as peaches and nectarines, which are in turn even more similar to each other.  Almond trees, however, are known for being drought tolerant and resilient under stress, while peaches and nectarines are decidedly not.  So, the thought of grafting a new Nectarine tree onto Almond rootstock, naturally occurred to me when it was time to plant one of my catch pits.  The tree will grow on an 8 foot by 3 foot pit backfilled with layers of charcoal and whatever soil improving goodies manifested on the homestead over a year or more.  This is a special tree site, so I picked a special tree, one tested for decades by a local fruit explorer and veteran plantsman.

Stribling's White Free Nectarine is a gem of a variety that now languishes in obscurity.  My friend Mark Albert has grown and tested a lot of prunus and it is his best, most reliable stone fruit.  The fruits are delicious and good for drying, while the tree itself outgrows the yearly attacks by peach leaf curl that many varieties are set back badly by.  While not immune to the curl, as some varieties are, it does outgrow it reliably without spraying, and that is good enough.  You are not likely to easily find a grafted Striblings White, so it's only for those that take the time to graft.

From Mark:  “Stribling’s White Free Nectarine, a proven gem for our inland climate for 30 years, ripens in July, and has outperformed all other stone fruit varieties. It dependably grows right through the Spring peach leaf curl and makes luscious, white fleshed, freestone nectarines for fresh eating and easy drying. No longer sold by nurseries, only known by collectors now. Must be grafted.”
Wickson looks a little stodgy, but he had a pretty good sense of humor brewing under that stern countenance.

Wickson looks a little stodgy, but he had a pretty good sense of humor brewing under that stern countenance.

I found very little on the internet about grafting peaches onto almond stocks.  But I did find a reference in California Fruits, by E.J. Wickson, which you can read online by following that link.  Our old friend Edward Wickson, left an inestimable legacy in California Agriculture.  Among many other achievements, he edited the important agricultural journal  Pacific Rural Press. for over two decades, so he had his finger on the pulse of California agriculture.  He reports in the later 1920 edition of California Fruits that I own:

"The Hand Shell and Sweet Almonds have long been used as a stock for the peach.  It is held that they give a stronger, hardier root in dry coarse soils especially, but neither have been largely used."

Well, that was good enough for me to make the experiment.   BUT, this just in!  While looking for that quote just now, I found these references to using almond stock  in an older edition of California Fruits:

“The success of Nectarine worked on Almond stock, as has been demonstrated by the experience of many, has led to the grafting over of a good many unprofitable almonds to nectarine, though this has not been done to the extent to which the french prune and some other plums have been worked on old almond stocks.”
“The almond is successfully grafted over with the peach, and this course has been followed with thousands of unproductive languedoc almonds during the last ten years.”
“Trees are changed from one fruit to another, as with thousands of unproductive almonds, which have been worked over into plums, prunes and peaches.”

Well, there ya go.  Looks like I made a good call.  In starting the stocks this time, I did what I always do.  I shelled and soaked the almonds and planted way too many.  Over-planting allows me to select the best stock in the end.  Planting the seeds directly in the ground where they will grow allows the formation of a deep, natural root system.  I’m after a self sufficient, drought tolerant root network.  I want the trees to go deep to look for water in the dry summers, when I don’t always have a lot of water to spare.

I was more or less planning to graft these stocks to dormant scion wood in the late winter, but I decided that since I had some Striblings White Nectarine branches on a nearby tree, I would go ahead and graft one of them with a small chip of wood.  When I contacted  Mark to ask him something about Striblings, he suggested that I chip bud it now, which I had just done.  But, he also offered to shoot a chip budding video at his place, which we did and that video will be out as soon as it's edited.  I went ahead and grafted the other two stocks as well.  Even if the buds don’t take (though it’s likely that all three will take) I can still revert to dormant grafting this winter.

Chip budding with Mark Albert

Chip budding with Mark Albert


Ironically, this may be one of the few trees that I end up pampering, but the almond roots will be just fine with that.  In the case that I don’t, I’m hoping that having planted the trees on a huge pit back-filled with charcoal and other goodies, combined with the tough almond stock, will give me a reasonably resilient and productive tree.  In general, peach and nectarine do not thrive on neglect.  They are very domesticated trees and prefer regular watering, fertile soils and pruning.  But, as the rolling stones said, you can’t always get what you want.  While I may not get what I want, a productive, drought tolerant nectarine tree that will produce reliably even with low inputs, the potential reward is worth the risk.  Possibly more important is the information the experiment might yield in the long run.

A Few Common Axe Handle Mistakes and What to Do About Them

On a recent snowy morning I answered a YouTube comment on axe handle breakage that led to a one take video shoot with a beautiful snowy background.  Being conceived and shot in one morning, this is just a partial snapshot of the subject.  It revolves around the specific problem of design factors contributing to handle breakage just below the axe eye.   It could easily have snowballed into a multi-part series on axe handle function and design ideas, leading to yet another video or series on user contributions to breakage; but the snow melted and I couldn't throw out that beautiful backdrop, which some people actually thought was done with a green screen!

This is viewed primarily from the perspective of American axes, which are evolved in the direction of high performance with the consequence of increased delicacy.  At least that is my current take on it.  An axe is a system composed of a handle and head which creates some inherent problems.  In America, the European axe systems that migrated here with early colonists eventually evolved toward higher performance creating narrower eyes that are inherently weaker than the wider ones they descended from.  European axe eyes seem to have remained wider for the most part, often even when copying American patterns.  In fact, I think the standard American axes are refined to a point where the handles could not be much thinner at the eye without becoming impractical for use with wooden handles, and some might argue that they already have become too thin.  That is a subject for another time though.  For now we will just look at, common problems that we see from both manufacturers and folks producing handles at home, which are easy enough to fix with some tuning up. 

While there are a lot of people that understand some of this intuitively and practice it, I don't recall seeing it spelled out anywhere.  It is my hope that this information will spread and eventually reach manufacturers, many of whom who are clearly not axe users.  Most axe handles will need work out of the factory and that is fine, but the mistakes that are greater in concept and scale are costing a lot of handle breakages at the eye that are totally unnecessary.  The essential problem is that manufacturers think they can just increase the thickness of the handle body to decrease handle breakage.  When viewed as a dynamic system though, it quickly becomes obvious that doing so puts undue stress on the thin eye portion of the axe, instead of sharing the stress across the length of the handle. At some point, continuing to thin a handle will obviously reverse that problem and create excessive vulnerability in the handle's main body.  That is really another level of this discussion though and one I purposefully avoided in this presentation.  Another issue is that there are other types of stress that are incurred from different types of use or mishap that may be more likely to break the body of the handle.  The grain of the wood and it's character is also at play.  We are dealing with a tool that sees different types of stress at different times, has inherent problems that are not entirely solvable and involves an inconsistent natural material.  Wood of even the best quality has fatal faults.  We continue to use it for the same type of reasons I continue to use vacuum tubes in my stereo and guitar amps, and that is user experience.  I personally also like wood because I can cut down a tree and make a new handle without relying on industrially produced products that I have to buy.

There is a lot of forgiving grey area in this problem and we don't have to engineer a perfect handle.  But, we do need to avoid the largest mistakes being made and if we get a handle that has them, we can tune those problems down until we have something that is more comfortable to use for long periods of time and also reduces stress on the eye.  I don't think I've seen a handle yet where the problem encountered was too little wood to work with!

Enough said here.  While this video is incomplete, it presents some ideas that I think are important and which can go a long way toward practical solutions. 

Penetration, Saturation and Coating, 3 Main Factors in Oiling Wooden Axe and Tool Handles

P1020374.JPG

Over the years I keep evolving and refining my methods and understanding of the process of oiling tool handles.  Although it is painfully simple, the obvious is not always so obvious.  I've been soaking my handles pretty deeply with oil for a long time, but still have had something of a fixation on coating them with a protective coat.  Until, I realized that a well saturated handle is it's own finish, and more.

a Coating ona a handle is a barrier between the wood and the environment.  But does it achieve that goal well, and what is the goal anyway?  The goal is to protect the handle from environmental changes in moisture basically.  Moisture swells the wood, and when it leaves, the wood shrinks.  When wood shrinks, it is stressed and those stressed can lead to cracks.   For some reason cracks seem more likely to form if the wood swells and shrinks repeatedly.  If the wood swells within the eye of a tool, the wood compresses against the hard metal of the eye walls, becoming crushed.  When it shrinks on drying again, it many shrink smaller, than it was before it expanded.  That is why soaking the eye of a tool in water when it is loose will eventually make it even looser.  A good thick coating of cured linseed oil can help prevent the entry of moisture, and anytime oil is used on a handle, some of it soaks into the wood to some depth, bringing in the factor of penetration, which must help some.  A coating is basically still very thin though and will wear off over time.  These are handles remember,  They are essentially rubbed over and over again.  And although some penetration is always occurring, the questions to ask is how much good is penetration when it is shallow and of a low saturation.

Enter Saturation.  Saturation if you look it up, basically means full or at maximum capacity.  But it is commonly used with a quantifier or clarification like partially, mostly, completely.  If I soak a handle numerous times with linseed oil, it will penetrate to a certain depth, but unless it is applied regularly and in quantity, it will have a very low saturation as the oil spreads itself out deep into the wood structure.  Eventually, it either reaches the middle or some unknown depth and starts to increase it's saturation eventually filling the wood to the point that no more will soak in.  This 2 minute video shows the process I pretty much use now.  If you get tired of adding expensive oil to a handle, try stopping for a month to let the oil in the handle cure and penetration should slow down.  Some handles will take a lot of oil.  Fortunately, oil is light.

Now if we think about a handle that is fully saturated with oil, for even 1/8 of an inch deep, let alone more, we now have something like the equivalent of a 1/8 inch coating.  But even more cool, it is actually protecting the wood itself by filling the pores and structures that water would fill.  If you leave such a handle out in the weather, water droplets just bead up on it and sit there.  Not recommended, they aren't necessarily immune to moisture, but it's telling.

droplets on a well saturated knife handle.  Two hours later they were still there, though smaller, but I have little doubt that at least the majority of missing water left be way of evaporation and not penetration.  That is a test better d…

droplets on a well saturated knife handle.  Two hours later they were still there, though smaller, but I have little doubt that at least the majority of missing water left be way of evaporation and not penetration.  That is a test better done in high humidity, not on a warm breezy morning.  This handle has probably not been oiled since it was originally treated 2 or 3 years ago.  After all, the treatment cannot wear off.

Try it on a handle and see what you think.  It is a long process and the oil is not always cheap.  many tools are also not subjected to much in the way of atmospheric changes, so it's not something we have to use everywhere.  I'm pretty sold on it though and any axe that I plan to keep and use gets the full treatment now.  Dudley cook recommends the same basically, but he maintains with an occasional coat, which I think is unnecessary if the wood on the outside of the handle is well saturated.  The wood essentially becomes it's own finish.  If the wood will ever take oil on and soak it up, do it, but it it doesn't, there is no need to keep coating it. 

I use food grade linseed oil (usually labeled as flax oil, which is the same thing) anymore and have found ways to pick it up cheap enough.  Boiled linseed oil is toxic and I think it probably dries too fast.  Prices change on amazon constantly, but this brand is usually about the cheapest, but do your own research.  I've also found flax oil at the local cheap food outlet where they send overstock and expiring stuff.  Other oils can be used as well, walnut, hemp, poppyseed and tung oil should be adequate, but I really haven't used any of them enough to say for sure.

For handles that you don't need to saturate, I recommend a thin coat of oil once or twice a year, or better, just whenever you have an oily linseed rag.  Raw linseed oil will cure, it just takes longer.  So called "boiled linseed oil" contains metallic driers and solvents that speed curing time.

I have more ideas and experiments brewing around this problem, and no doubt you'll hear more about it in the future.

Tasting a Couple of New Seedling Apples with Mark Albert

While at Mark's Albert's house shooting the pineapple guava video, we sat down and tasted a couple of my new seedling apples, one of which has red flesh.  I'm a little more positive about the red fleshed apple now than I was at the time.  It developed a bit more sugar after spending a little more time in the fridge.  It's not going to be an outstanding desert apple, but I would think now there's a chance it will outperform Grenadine.  It looks better I think.  It's a very attractive apple.  The flavor is quite nice.  After that we tasted some varietal grapes and Glenora grape juice and chatted about grapes a bit.

Pineapple Guava Tour with Collector, Breeder Mark Albert

I visited with my good friend Mark Albert a long time collector and unintentional breeder of Feijoa, also known as Pineapple Guava.  Mark is a dyed in the wool fruit explorer and has dedicated his life to the pursuit of knowledge in the realms of home gardening and orcharding. More importantly he's driven to share that information (as well as genetic material) forward through the local group, Mendocino Permaculture which puts on the local scion exchange , writing, teaching and personal correspondence all of which no doubt cost him a great deal let alone not resulting in any personal gain.  We had a discussion while I was there about that drive to share information which we both share.  The idea that someone would earn that kind of hard won knowledge and not share it would probably leave us slack jawed and shaking our heads in bewilderment.  If that kind of thing isn't used to help us all progress then what's the point?   I hope to do some more video visits with him in the future and get some of his wisdom and opinions out to you guys.

After about 40 years of growing and testing Feijoa, he has some new seedling varieties which have risen to the top.  I've confirmed that at his tasting where I unknowingly picked the same favorite he did.  They are smaller fruits, but quality over quantity if it comes down to that.  Down the page you'll find his recommendations for a early, mid and late feijoa.  After this visit I'm planning to put in three to cover the season.  I have a smattering of them already placed here and there, but I think it's time to put in a row of better placed, and better cared for, bushes.  The plant is very tough and drought resistant once established and it looks good.  All around a good one for establishing on the homestead or home landscape if you have the climate for it.

VARIETY RECOMMENDATIONS FROM MARK ALBERT

At the 40 year mark of testing, the list has gotten pretty simple for the north. 

The north means our Mendoterranean climate zone, or anywhere north of the bay, where the cooler climate zone will likely not allow the latest-season southern cultivars to ripen to perfection before our cold temperatures stop the ripening or freeze the hanging fruit. This list has a definite bias toward the home grower, with no commercial goal in mind, and quality of fruit comes before size. 

The proven cultivars at this point are: 

Early season (October): Albert’s Pride or Albert’s Joy
Middle season (November) : Moore
Late Season (December): Albert’s Supreme

Because these cultivars have been selected in the north, they will also work in the southern California when they are not ruined by the Santa Ana winds, the hot, dry wind from the east that can cook the ripening fruit in the fall. It does not work the other way: good southern cultivars may not ripen in the north. 


This is an ongoing experiment, and we are now testing the latest New Zealand cultivars which have recently made their way to the U.S. These are likely to be very good, because they newest cultivars were selected by New Zealand feijoa lovers with a more educated pallet, not by paid academicians, as in the past. 

Also the biological time factor is that feijoa is a very new fruit, only selected out of the wild in the last 130 years or so from South America. When we look back at the old cultivar names, that’s only 5-6 generations of development. So it makes sense that each generation is higher quality because they are crosses of the best of the previous generation of cultivars. This is how all fruit is improved. The previous 2 waves of New Zealand cultivars were commercial selections and were a bust in California. 

So these recommendations may change in the next 5-10 years. 

In Abundance, 

Mark