Posts tagged #prepping

Lessons from Established Fruit and Nut Trees, Training Mistakes and Remedies

This video is a walk around to look at the lessons that can be learned from some of my fruit and nut trees that have been growing for a while. Between careful and not so careful training, lack of training, regular maintenance or neglect, we can see how things go right or wrong and how important early shaping and training are to avoid future problems. I also taste some Lady Williams Apples off the tree, still good in March! These apples, while especially late this year, demonstrate I think that it will be possible to eventually have apple varieties that routinely hang on through winter and ripen in spring. Two new terms I’ve coined are Winter Hanging Apples and now Spring Hanging Apples, because these are classifications we need, beyond winter apples or storage apples. Next steps in that direction are finding more winter hangers and spring hangers if possible and making intentional crosses between them for new seedlings. Another step is simply promoting the idea and phenomenon in general, which will be easier as more of them are discovered or created. Also important is to test more of these apples in various climates to see how cold they can go, or how other climate factors affect them.

The long reach pruner I’m using in this video is a pretty neat tool. It is not cheap, but it can nearly obviate a ladder if trees are pruned yearly and are under 15 feet tall. That is pretty a major boon, especially if trees are spread out like they are here on myu homestead. I rarely use a ladder to prune anymore. They are also still cheaper than a good orchard ladder, even an 8 foot one. They can cut green wood up to about 3/4 inch if cut at an angle. For older people (or those that will be older soon lol) it could save a lot of clumsy ladder moving and setting up and ultimately could prevent a fall and the complications that often come with broken bones past 70. We got my mom one and I’m going to try to convince my 82 year old friend to get one. He is still climbing rickety old step ladders in the backyard. There is a short review on my amazon store page and full video review coming soon.

The BuckStop is Here! Training ProphylAXis For Bucking Firewood Safely

P1180921.jpg

I came up with this simple, but very cool idea for safely learning to buck logs with an axe. Here are the whys and whats and a few options for building one.

Watching people learn to buck in person and on video has been fairly horrifying at times. Most of the injuries we’ve seen during the cordwood challenge over the past two years were cuts made while bucking logs. This simple concept could allow people to train in bucking more safely, and just as important, to progress in that training more rapidly. I just came up with this idea a year or two ago and finally got around to trying it. The device is a simply a low guard wall that can be slapped together with some junk that might be lying around. I put together four different versions in about an hour including running around looking for materials. To make just one out of materials laying around would probably be about a 10 minute job.

This low wall should stop the axe should any cut go over the top of the log or through it, thus protecting the user from injury. This idea comes from the practice of using a backing log to buck, as recommended by Mors Kochanski and others. Using a larger log behind the log you are chopping can be very helpful, especially in preventing the axe from coming all the way through the work and continuing to the other side where we are standing. The Bucking Wall is taller and flatter than a log, so it should be more effective in preventing the axe from coming over the top of the log. It also allows one to stand closer to the work, which to me is preferable with a short handled axe. It is also lighter than a log. Finally, it can be built with a floor of plywood to catch the axe in case of over reaching strikes that would normally cause the toe of the axe blade to end up in the dirt.

P1180931.JPG

Consistent results and physical competence with an axe requires a certain amount of time served swinging one. They also require a certain amount of confidence to use well. The tool needs to be taken in hand and used with enough confidence to keep it under control and it is hard to be accurate and effective when timid and hesitant. It is possible to be so cautious and physically stiff that mistakes are increased or amplified. But how do we have confidence before being habituated to the tool? We don’t, which is why the learning phase is so dangerous. Observe the following quote from The Axe Manual of Peter McLaren published by the Plumb tool company.

“The danger of an axe is largely a mental hazard. The user is fearful; he stands so far from his work that his axe is not under control, forgetting that if he misplaces a stroke, or hits a glancing blow, the axe will always come home to him.

“Safety lies in learning to swing correctly and in placing your strokes accurately. Then stand within easy swinging distance and chop with confidence.

“Of course, there is always a careless man who minimizes any risk and chops more with abandon than with skill. In his hands the axe (or any edge tool) is dangerous. Play safe! But do not fear your axe. Instead--- Master it.”

Celebrity Axeman of old, Peter McLaren’s Manual of axe work put out by the Plumb Tool company. Download for free here…https://scoutmastercg.com/the_axe_manual_/

Celebrity Axeman of old, Peter McLaren’s Manual of axe work put out by the Plumb Tool company. Download for free here…https://scoutmastercg.com/the_axe_manual_/

It is a lot easier to have that confidence once a reasonable degree of physical competence is gained. We don’t want to have false confidence, but ultimately McLaren was right. As a dangerous tool, it needs to be taken charge of and used confidently, with commitment and purposeful intent to do the work at hand.

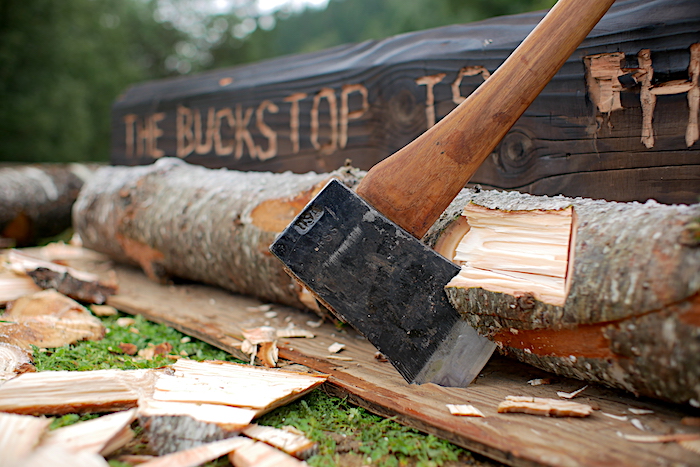
But he recommended that we learn to use the axe, then use it with purpose and confidence. When each swing feels utterly lacking in said confidence as to where it will end up, or whether it will bite or bounce off, and we are not sure how to gauge distance from hands to the blade, how do we learn to use it safely? A certain amount of time must be spent with the tool before it begins to feel natural and go where we want it to. Enter the Buckstop

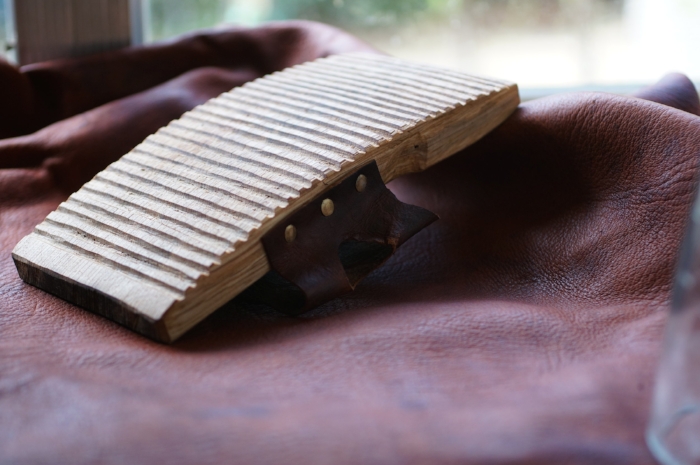
Because it is vertical and not round like a backing log, it is even more likely to prevent the axe from coming over the back board and hitting the user. So, at a certain height, it is almost 100% sure to prevent deflected and follow through cuts to the legs while bucking. So, there is the obvious advantage in terms of just preventing accidents, but I think the benefits will extent further. With the fear of injury essentially gone, now we can chop with some impunity, which means any timidity caused by being uncertain of striking our target is no longer at play. This may be a significant factor in allowing one to relax a little and chop with more confidence while working on physical technique. A new user can experiment with things like wrist torque for increasing speed, without increasing danger. In order to chop at their best, the lighter axes that I would typically recommend people start with need to be used with a little snap to create adequate head speed. But experimenting with that head speed is the last thing I would want to see a very new user doing. Using the bucking wall though, you could experiment with that acceleration and with tweaking style and technique in general, without fear of injury. Finally, when you do screw up, it is pretty obvious and I would hope that every time the axe hit’s the wall or wooden base, it stimulates the question of what would have happened if that wall wasn’t there. Even when making the final severing cut at the end to separate off the round of wood, the axe hitting the wall means the axe would be coming through, and if we look at footing position it should give some idea of whether we were at risk for injury.

I think this simple device is a solid idea, and could fill a very important need in the learning phase until confidence and skill are gained. I also think it could build that confidence and skill faster if used with intent. It’s not forever, it’s just a training aid. Many axe competitors habitually wear chainmail socks in both training and competition. Safety is good. But, I would recommend not using this indefinitely, because it could very easily foster bad habits and a false sense of security, which brings me to the down sides.

The two caveats I would say are, first that the buckstop should not be used as an excuse to be sloppy and complacent. One should still concentrate primarily on technique and aim, with a relaxed style, and not on speed and power. Ultimately speed and power are earned over time and more importantly they are nearly useless without a good level of accuracy. Forcing speed and power under normal conditions is dangerous, but even with a backing wall, they still will tend to cause aim to suffer and should be pursued intelligently with an aim to improvement of overall effectiveness, of which power is not the main ingredient as every experienced axeman will tell you. I do however, as I said above, think that using the bucking wall could allow one to progress more quickly into not just speed and power, but efficient speed and power by liberating the trainee to experiment more without putting limbs at risk. Which leads to caveat number two.

One could easily develop bad habits and a false sense of security if released from the fear of injury. I actually think it will be hard not to do so, and it is probably even inevitable. If I were training someone from scratch, I would probably approach it as two different stages, where in the second stage with no Buckstop, they have to learn new important habits and reboot the brain into danger mode. There is, of course, the opportunity to learn some safety lessons if you are continually watching that back wall and every time you hit it asking whether or not you would have lost a toe or two, but that requires a sort of intent or presence of mind that many of us aren’t going to have. Try to use the barrier consciously with the intent of hitting that backing wall as little as possible and not as an excuse to flail away with impunity. When the wall is gone, certainly more awareness and presence of mind around possible errors is going to be essential. Regardless, I would try to make the switch from buckstop to no buckstop as consciously and soberly as possible.

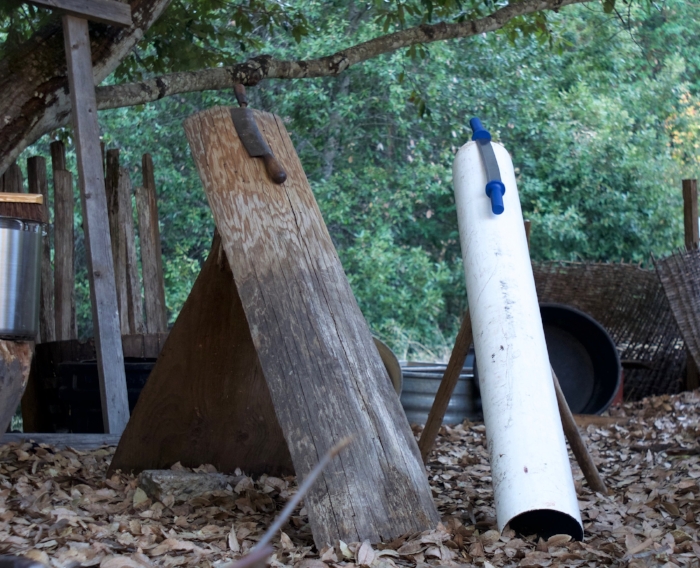
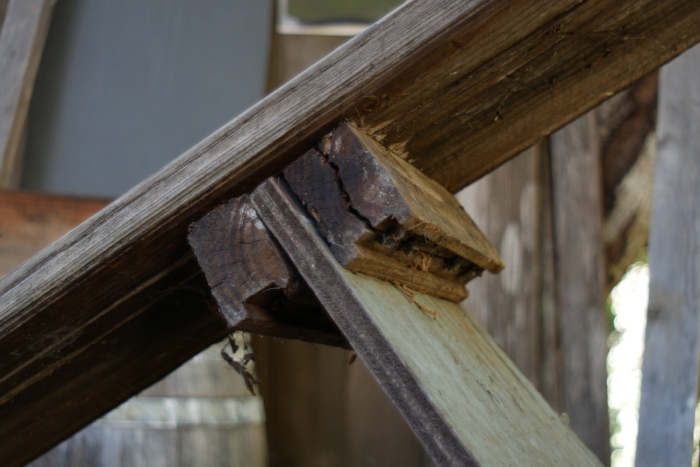
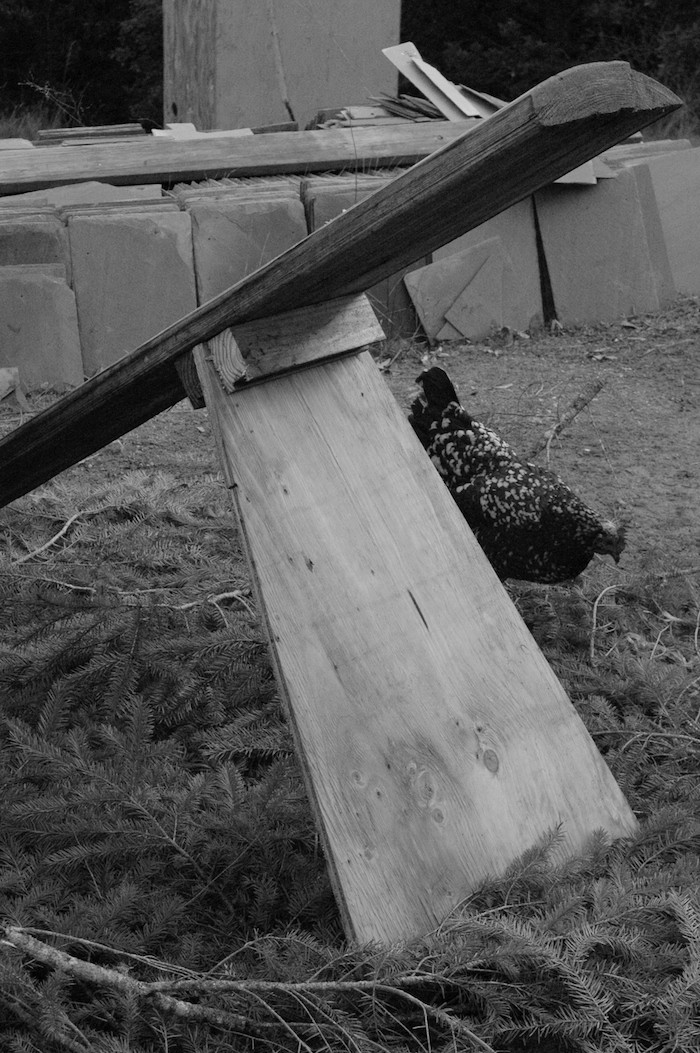
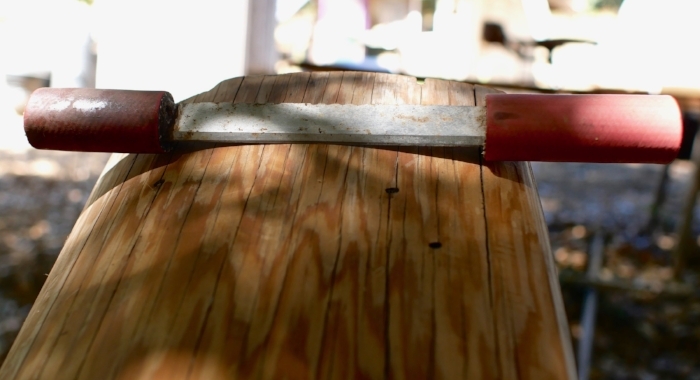
As far as design goes, watch the vide All of them work. You can just use a log that is larger than the piece you are bucking, but the wall should work better than a log in that it easier to move around, often easier to come up with, more transportable and allows one to stand very close, which I tend to do in bucking with the short handled axes I use. It is probably also safer, since it is both taller and flatter. If the device is made with a wooden platform for the log, it will also protect the toe of your axe from sticking into the dirt. @watch.your.follow.through on Instagram pointed out that if there is no base at the front for the log to rest on, it allows the device to be moved easily along the back of the log as chopping progresses. That is true, but it is also probably easier to slide a log along a piece of plywood. In a design with no wooden platform at the front, you can just jam a piece of plywood under the section to be cut to protect the axe, though it may not be as effective. Given that this is a training device and not a long term tool, any minor convenience issues like those only matter so much.

I would encourage making something that is super easy to throw together with common materials or junk that is lying around. I like elegant solutions, which means making and using the simple, easy, cheap thing that works. I am very resistant to keep tweaking the thing and turning it into a design project. Many tweaks could prove useful or clever, but the device that works and is actually built because it is so easy to put together is the best one, because that is the one that will actually be in use. Keep it simple and start using it, worry about tweaks later if they really seem compelling for some reason. If you have a saw and either some nails and a hammer or a screw gun, building one should be very fast. So fast in fact that it shouldn’t be a big deal to build an entirely new one or cannibalize the first to build a new one if it seems worthwhile.

I made them at different heights and it looks like 10 to 11 inches will be best. One I made with a 2 x 12 board had to have the front edge chamferred off as I hit the handle on it a few times. If the back stop is plywood, it probably wouldn’t damage the handle. Unless it needs to be shorter for portability, I think that for cutting 16 inch firewood lengths, 5 feet (150cm), or 6.5 feet (200cm), are going to be the magic numbers, with a 5’ wall, you can safely and comfortably cut 3 notches before moving it along and with a 6.5’ wall, you can make 4. But I would not hesitate to use almost any length if it’s easy or what you happen to have on hand.

As far as using the buckstop to train yourself or anyone else, here are my thoughts. First of all, this is so awesome! I’ve not had the opportunity to train someone from scratch, but I’ve often shuddered at the though of teaching someone to buck for the first time. This tool makes that so much easier. We can both exhale a sigh of relief and work on aim and a relaxed technique without worrying about safety. We can also work on the mechanics of acceleration and other technique stuff that would be much more dangerous to toy with otherwise. If used consciously, we can also get some good feedback on when the axe comes through or over the log and whether it might have hit a body part, trying to form good habits regarding body placement. Footing placement should be conscious as otherwise students might tend to stand right behind the cut with feet together, rather than in a safer wide stance. I think in a long term group or fixed camp such as scouts or a multi-day class it might be good to have one for each student. That way every cut in the board adds to a personal history. The wall could also be painted initially so that cuts show up better. Not every cut to the wall really indicates an accident, but it means something. For a more formal training for kids, I could see having a graduation test at some point where you have to buck so many feet of log with a freshly painted wall and if you make no cuts in the wall or base and meet some other criteria, you get to burn the thing ceremoniously and move on.

It could also be very useful for the student to carry out comparative lessons about such things as chopping styles and angles of cut. Also for trying different grinds and tools, but it can all be done safely. You can not only show people what can go wrong, you can have them do it, which will drive the point home much better, without driving the axe into their leg.

I do think that when it’s time to ditch the thing there should be a hard reboot on safety and awareness. I noticed just testing it briefly that I became very lax about footing placement and edge awareness. If you’re working on your own, you have to be your own bad guy, which is not always easy. If training someone else, be the eyes they need to help them cultivate that constant awareness of the edge and of follow through in relation to their body parts. When it’s time to move on, there really will need to be an emphasis on the fact that the game just changed and there are now real consequences and you can’t just hit NEW GAME after a serious accident.

As I said, I don’t think this should be a long term solution. I think it should be used to the best effect, then gotten rid of or it will cultivate bad habits and dependence. Switching back and forth could prove dangerous, because the two mindsets will be quite different. It is also more work to have it available, to move it to the logs or the logs to it. A skills over gear mindset doesn’t accommodate unnecessary accessories. Make a crappy one out of whatever cheap or free junk is available, don’t fix it unless it’s causing you problems, use it mindfully, then get rid of it and reboot your brain into high safety alert mode.

I think this device is going to prove very useful in certain contexts if it is used with intent. Let me know here or on YouTube if you try it, as I would like to get some feedback. As always stay safe and keep the red stuff inside.

CordWood Challenge 2019, New Leadership and Expansion

This year, I have turned over leadership of the challenge to a young, enthusiastic and very intelligent guy named Ben Scott on the other side of the Atlantic. Though relatively new to the game, he is level headed, confident and truly curious. He posts more to the cordwood challenge facebook page than anyone, including me and has been hammering out axe related YouTube content, much of which shows insight from experience. A lot of that experience and insight comes from doing the cordwood challenge last year where he cut 4 ricks of wood. I think he will not only do a good job, but a much better job than I at facilitating the project, taking it forward into new territory, and being consistently focused and involved. We chatted on skype for quite a long time and have very similar visions and ideas about the cordwood challenge concept and where to potentially go in the future. Pretty early on in the challenge I think I realized the potential and the need to grow or centralize a community and information source around practical axe work. I even took out a domain name, which I’ve offered to Ben if he wants to run with the idea.

I can see clearly the need for such an internet destination that is strictly focused on practical axe work and design and specifically avoids a sort of axe fetishism centered around collecting which tends to take over axe groups and discussions. I think such a project could be run and funded by members, and could house a database of sorts. This might provide a mutually supportive community that learns at an exponential rate and that is instrumental in welcoming novice axe users to facilitate their progress and understanding of the tool and it’s safer use. Ben has also already added some other challenges that could make the project more accessible to people that don’t have access to a forest, or that are doing axe-centric building projects.

I feel like this is really the best case scenario right now. I am also very sure that I know the best place to put what energy and time I can into engaging with the axe community by providing content on axe use, safety and theory. That also has to compete with the many other subjects I want to cover, but I’m quite sure the content I have planned on axe stuff is extremely important, and will do a lot of good and will very likely remain viable into the future. As popular as axes are, my take on them as a practical user who generally buzzkills gearheadism, collecting and fetishism is not very popular, but I feel almost obligated to produce that content, especially in support of the cordwood challenge project.

Any axe head should subscribe to Ben’s YouTube channel. People just interested in the Axe CordWood Challenge in general, or who just want to be supportive of the project are welcome to join the FaceBook page, which Ben is now an administrator of along with myself.

If you want to know more about how my messed up life and health have compelled me to forego this project this year and are limiting my activity, you can watch the video below. My life is pretty messed up lately and I’m having a hard time maintaining anything resembling focus to carry through projects.

As always stay safe choppers.

Tasting Some Late Hanging Apples and Late Seedlings From Breeding Trials

One of my main interests when it comes to collecting and breeding apple varieties is the very late hanging/ripening types. I’ll be heard to proselytize about them frequently and I am not sure why everyone else is not as excited about them as I am. While most would normally think of winter apples as being eaten out of storage, certain varieties can be ripened and held on the tree through at least all of January assuming the climate is suitable. This video is a walkaround checking out what is still hanging as well as tasting the remaining late ripening seedling apples from the breeding trials. I wrote a whole post about late hangers, but I decided to put off posting it until I can make a video that makes an argument for growing them more, ferreting more of them out, and beginning to test the climatic limits of hanging late fruit. Clearly there is going to be a cold limit and folks in places like Michigan will not be able to grow them. But chances are that they can be taken advantage of in much of Cascadia, the southern belt east to west, and other places that you can’t go ice fishing without falling through. Not doubt too there are going to be varieties that are more durable to the cold than others. Unfortunately, many of these late hanging varieties are quite rare and I usually have very limited scion wood available. I will have some this year, quite a bit of some of them and none of others. Scion sales will begin soon and I’ll post when they are available.

Axe Handle Breakage, Designing For Resiliency, Weak Links and Stress Distribution

An axe head with a wooden handle has some inherent problems. The head and handle are made of very different materials that behave differently. Steel has a very high density compared to wood. Wood is much more flexible than steel and will dent and break more easily. When using an axe, these differences can cause problems, such as the wood being damaged by forceful contact with the hard unyielding metal head, or the relatively high density of the steel head behaving differently than the handle, thereby putting stresses on the weaker wood. Breakage just below the eye is a very common occurrence. This article and video are an attempt to explain some common reasons why axes frequently break near the eye, having to do with design, or perhaps lack of design in some cases. Breakage in the main body of the handle can of course also occur, but I’m not really dealing with that here. I’m pretty sure that the greater percentage of axe handle breakages are initiated right where the handle meets the bottom of the eye, or within the first few inches of handle, especially if the breakage is not due to wonky grain or other defects. Shear stresses seem to be particularly high in this part of the handle.

In this article, I will be assuming that we are dealing mostly with American axe head patterns, which tend to have thinner eyes than European and Scandinavian axes. Even though American axe styles migrated back to Europe (many axe patterns on that side of the pond are actually American or modified American patterns) the axe eye sizes largely remained bigger than American axe eyes. This is an important point when we look at overall handle design, because with any given axe head, the eye shape just is what it is, and the size and shape of the wood where it enters the eye is therefore pre-determined. Some of these problems are obviated by the use of tapered axe eyes, in which the handle feeds in from the top and fits by friction, but that is a separate subject also. The assumption here is that we are dealing with American style patterns that are wedged from the top. For whatever mix of cultural and practical reasons, these axes have pushed the limits of strength and resilience of the wood used in handles, by evolving toward a small eye.

Aside from the size of the axe eye being fixed, there are two other things that are pretty much givens as well.

One is that the section of handle just below the eye, lengthwise (poll to blade) is wider than the rest of the handle. If the whole handle was the same front to back dimension as the eye length, it would be unusable, so the body of the haft has to slim down soon after leaving the eye.

Predetermined factor number two is that we need a slight flair in handle thickness just below the eye at the back of the handle, as well as on both sides, so that the head seats firmly around the bottom as it is driven on. The front edge of the handle can come straight out of the eye if desired, with no rise, but the other three sides need at least some flair, though not very much. In my view, it is always unnecessary, and also a detriment, to come out of the front of the eye and then immediately outward, forming a shoulder. I see no reason to do that, and every reason not to. If the handle isn’t completely straight coming out of the front of the eye, the rise is best made as a gentle transition.

WE CAN CONSCIOUSLY WORK AROUND THESE FIXED PARAMETERS. IN OTHER WORDS, DESIGN AROUND THE THINGS WE CAN’T CHANGE.

Tools You Need to Bark Tan Hides & Skins Into Leather at Home; Traditional Vegetable Tanning

DSC01244.jpg

In this blog post and new video, I cover all the essential tools needed to make good bark tanned leather as well as a few non-essentials. Tanning materials will have to be treated separately and I will try to revisit many of these tools and their making in the future.

Real natural vegetable tanned leather is that which is tanned with tannic acid sourced from plant materials. While there are excellent sources of tannin in not just barks, but in roots, leaves, pods, fruits, nuts and wood, tree barks are the most used sources, thus the common term bark tanning. There are only a few tools and materials that could be considered essential to the process and none are complicated. In fact, if you strip it down to the real essentials, you need very little. Adding a few simple tools will improve your experience though, and in some cases your leather.

Some tools of the Tanner and Currier, most of which are discussed in this article. The slate bladed two handled knife B is especially intriguing. I need to make me one of them.

Some tools of the Tanner and Currier, most of which are discussed in this article. The slate bladed two handled knife B is especially intriguing. I need to make me one of them.


FLESHING KNIFE

The tanner’s knife, or fleshing knife, is the most important multi-tasking tool of the tanner. In a typical vegetable tanning process, I will use this tool for fleshing, dehairing, re-fleshing, scudding, removing excess water and stretching open the skin. It is also handy when re-soaking dried hides to work open dry spots so that they rehydrate faster. Many new models are available on the market, but a lot of home tanners get by well with homemade tools. Read my blog post on fleshing knives, and watch the Fleshing Knives 101 video for more than you probably wanted to know about them. I just received the Wiebe 12” Fleshing knife in the Mail so I can review it for you guys. I like the overall form a lot for general use, and was told by a dealer that it is actually tempered tool steel, not mild steel. Aside from the potentially weak, narrow and probably short tangs, it looks promising, but I haven’t had a chance to use it at all yet. Aside from unknown potential steel/tempering issues and iffy tangs, as a general purpose home tanning knife it seems likely to be a good choice for under 30.00 shipped.

A collection of tanner’s knives

A collection of tanner’s knives


BEAMS

Wood and plastic beams. Left is the outside cur from a log mill and the other is cheap ABS, though PVC would be much better, thicker, more durable and heavier. I haven’t used plastic beams much, but I can see why people might need to use them.

Wood and plastic beams. Left is the outside cur from a log mill and the other is cheap ABS, though PVC would be much better, thicker, more durable and heavier. I haven’t used plastic beams much, but I can see why people might need to use them.

The tanners all purpose scrapping knife is of no use without a beam. For most, a beam around 6 to 6.5 feet long will do well. I’m currently using. 6.25 foot beam, which is just about right for me. It can be of wood or plastic pipe. If wood, it is best to have a smooth work area that is free of knots, large cracks, grain tears or other major blemishes extending at least 18 inches down from the top. I would try to stick with 8” diameter and larger, but to get started, or in emergencies, you can use a smaller diameter beam. If the diameter is very small, you can flatten off the working area to a larger radius. A very small radius results in a small area of contact between the tool and the beam surface. For most vegetable tanning related beam tasks, a larger surface contact between beam and tool is preferable. Large logs should be at least split in half, or even hollowed on the underside to thin them. Most of my old beams were hollowed out on the underside with a hatchet to reduce weight and discourage cracking. Taking the center of the log out by splitting it in half will reduce both the incidence and severity of cracking. Reducing the thickness further will reduce that risk even more. It doesn’t have to look pretty, just chop out some of the wood to form a hollow on the underside.

A good source of nearly ready made beam material are the round sided slab cuts from the outsides of logs removed in milling lumber. You may be able to get some from a local mill, or small custom miller. Check the phone book (under lumber, milling?) or ask about local portable mill owners at your chainsaw dealer or repair shop.

If making a beam out of lumber, choose vertical grain like this over plain sawn face grain if possible as it will be less likely to crack. This is never a choice with a round or split log.

If making a beam out of lumber, choose vertical grain like this over plain sawn face grain if possible as it will be less likely to crack. This is never a choice with a round or split log.

I haven’t done it, but I suspect a pretty good beam could be made by radiusing the working area of a 2x12. I don’t seen any good reason it wouldn’t work. If so, try to choose one that has edge grain on the working face and not face grain. that is to say that the rings of the tree run from about 45 degrees or more toward straight through the thickness of the board. This is usually referred to as vertical grain and will be much less prone to cracking than plain sawn wood faces.

Now that I’m thinking about it, an edge grain (if you can find that good of a board these days) 2x12, backed by another 2x12 could make a pretty nice beam. I would leave a slot in the backing board for a plywood stand, augmented by two 4x4’s firmly attached with lagbolts similar to the arrangement pictured below. For a firmer union, wedges could be used to afix the plywood in the slot.

You can do many different things to put legs on the beam. A good option is to drill large holes, about 2 inches in diameter and plug in round wooden staves for supports. My current beam has two closely spaced boards screwed to the bottom on edge, just far enough apart to slide in a piece of plywood as a support. It works well enough.

Simple support that is easily taken down for transport. I would use 4x4’s next time.

Simple support that is easily taken down for transport. I would use 4x4’s next time.

DSC_0235.jpg
Screen Shot 2018-10-15 at 2.52.50 AM.png

DRAW KNIFE AND SPOKE SHAVE

Maintenance tools. The drawknife is probably more versatile and essential than the spokeshave.

Maintenance tools. The drawknife is probably more versatile and essential than the spokeshave.

These tools are used for creating and maintaining, a smooth beam surface. It is ideal to have both. The draw knife is best for major wood removal and repair, and the spoke shave for maintenance and smoothing. You can get away with just one of them though, in which case the draw knife is the more versatile of the two. Draw knives are also handy for peeling tan bark from logs if it is not slipping off easily. If you intentionally shred the bark off of the log in small, thin slices, you may not have to chop it any finer for extracting the tannins.

When shopping for used draw knives watch out for two things, wear on the blade and rounded bevels on the back side. Old draw knives can sometimes suffer severe wear. Look to see that the blade is about the same width it’s whole length. It should also be flat on the back with a bevel on the top side only. Either by long wear, or by mis-sharpening, the back is sometimes not flat. In a very well used knife the back may be subtly dished or rounded off, but if it has an obvious bevel or extreme wear, steer clear.

I would not recommend buying a spoke shave that has only one screw to adjust and no fine adjustment screws. The type shown is common and works well.


WATER AND HOSES

Water is not just a material, it’s a tool for cleaning things off. Skins, tools, boots, hands and tubs need frequent rinsing You will use a lot of water, and the more convenient and available it is the better. I usually use a standard hose end shut off valve to control flow. I like these valves better than most purpose made sprayers, because when opened wide the flow is fairly high, which is nice when you are filling containers with water a lot. If opened only part way, the shut off valve makes a reasonable sprayer for cleaning things off. As far as I have seen, craftsman rubber hoses are the best deal going when they are on sale in the spring, which they usually are.

Better than any sprayer I’ve tried when you want high flow.

Better than any sprayer I’ve tried when you want high flow.

Passable spray pattern and volume if not as good as a purpose made sprayer.

Passable spray pattern and volume if not as good as a purpose made sprayer.


BRUSHES

A stiff cleaning brush will be found almost indispensable for tubs, aprons, beams and tools. You may also need a finer brush to scrub bloom off of the grain side of skins. Bloom is a whitish deposit that forms on the grain surface during tanning. It is more common with certain tanning materials and also when layering or pit tanning is used.

Stiff brushes for cleaning tubs, tools and beams are almost essential

Stiff brushes for cleaning tubs, tools and beams are almost essential

Surface on the right shows bloom deposited in the tanning process. The section on the left has been scrubbed clean with an old hair brush with medium bristles. The dark stain in the center is where the skin floated above the surface of the tan liquo…

Surface on the right shows bloom deposited in the tanning process. The section on the left has been scrubbed clean with an old hair brush with medium bristles. The dark stain in the center is where the skin floated above the surface of the tan liquor :-/


PROTECTIVE CLOTHING

BOOTS: Rubber boots are very nice to have if you do a lot of tanning. If you don’t wear them, the hide will inevitably drip all over your feet as you stand at the beam working.

GLOVES: I tanned without gloves for years, but I love my elbow gloves now. Don’t bother with dishwashing gloves, or any other short gloves. You will inevitably reach into a solution and they will fill with smelly liquid. I use these affordable Atlas gloves, which have held up okay. When they die, I may invest in a more heavy duty glove.

APRON: I would avoid buying very cheap aprons. I am still using the same two heavy duty black, rubberized cloth aprons that I bought used at a yard sale over 20 years ago. You can make one from a sheet of vinyl or plastic of some kind, or tie a trash bag around your waist, but if you tan a lot, the protective gear is really nice to have. Hip waders are great if you already own them.

Non-Essentials, but so nice to have!

Non-Essentials, but so nice to have!


CONTAINERS

Vegetable tanning requires certain kinds of containers. Materials that can be safely used for all the processes are wood, plastic and rubber, ceramic, stainless steel and enamel ware. I use galvanized tubs, but only if there is no rust at all on them, and for liming and rinsing only. Aluminum I’ve used for rinsing only. I know aluminum and ashes don’t mix well but I don’t know about lime. While I have no idea if aluminum is safe for tanning liquors, I’ve avoided it. Anything that rusts is out of the question for all processes related to vegetable tanning except for dyeing the skin black. Any rust or iron will darken the skin permanently.

The common rectangular plastic storage tubs with lids are the most versatile. Choose designs that can be rained on without funneling any water into the tub if possible. Some do not have that kind of overhang on the lids, or have holes of some kind o…

The common rectangular plastic storage tubs with lids are the most versatile. Choose designs that can be rained on without funneling any water into the tub if possible. Some do not have that kind of overhang on the lids, or have holes of some kind on the edges. All of these others also get used, but none are particularly better than rectangular tubs.

The ubiquitous 5 gallon plastic buckets are handy to have around for various uses, but tanning anything over the size fur bearers in buckets is unpreferable. Large rectangular plastic storage tubs of 15 gallons and up are very useful as are other large tubs of various sorts. I have used wooden wine barrels cut in half quite a lot. They look really great, but aesthetics aside, they have their down sides. Wooden barrels need to be kept filled with water, or they dry out and fall apart. Since they need to be full of water, they breed mosquitoes unless you dump them regularly and they are quite heavy when full. You can tan hides up to the size of deer in half wine barrels very easily and sometimes large hides if you get creative. The size of the container should be adequate for the size of skins you are tanning. Without getting into specific details, an 18 to 20 gallon tub is adequate for deer, goat and similar sized animal skins. I’ll usually cut cattle and other large hides into sides and bellies, and those pieces can be tanned in a half wine barrel or large rectangular tub easily enough.

Rectangular tubs are an advantage over round ones, when layering, a technique where you put layers of shredded bark between layers of hide and let it sit for a month or three. I can layer a deer hide well in an 18 or 20 gallon tub, by carefully folding it up with layers of bark between all the folds, but if layering a larger hide, or even a very large deer skin, you’ll need to size the tub up. For liming, rinsing, or tanning the skins in liquors, round containers have the slight advantage in being easy to stir, but that is not important enough to favor buying them over the more versatile rectangular tubs. Use what you have or can get cheap or free if it works, but if you buy something storage tubs with lids are probably the best all around. If you are tanning cattle, elk, moose, horse or buffalo skins, and want to keep them whole (not a very good idea unless you really need it that big), start keeping your eye peeled for larger containers. However, too large is too large. You don’t want to have to use excess amounts of liquid to tan, rinse or lime a hide.


BARK CHOPPING

Primitive and slow, but effective enough. The benefits are that it makes you slow down and chill out, and it’s good hatchet practice.

Primitive and slow, but effective enough. The benefits are that it makes you slow down and chill out, and it’s good hatchet practice.

Some materials, like sumac leaves are easy to use, but you will generally have to cut up barks, roots and woods. I have almost always used a hatchet on a block of wood. I lay out a tarp to catch the chips and start hacking away. You could use a small axe, but for most people, an average sized hatchet is a good weight to start with. A heavy hatchet or axe can lead to repetitive strain injuries like carpal tunnel much faster. Just ask my tendons about that.

Hatchets can also be used to “raze” off the outer dead portion of the bark, which was sometimes so removed in traditional tanning as it was considered unnecessary or even injurious to the leather.

Chipper/shredder machines can be very effective. Garden chippers are often under-powered for thick heavy bark, but they are nice when they work. If necessary, you can break the material up into smaller pieces, or try shredding it while still fresh and softer. If there is a lot of rust in the chipper, it could contaminate and darken your liquor. Consider running some branches and leaves through the unit to clean it out.


COOKING POTS

It is possible to extract the tanning materials from plants with cold leaching, but it is much faster to cook it out. Even though I don’t know that it isn’t safe, I have always avoided aluminum. That is easy for me to do though, because I have large stainless steel pots from 3 to 5 gallons. Enamel pots could work, but be sure there are no rusty spots where the enamel has chipped away. Copper was used at one time, but large copper containers are expensive and uncommon. Large thin walled stock pots with thin bottoms can be very cheap and are fine for cooking bark, but will easily burn food if you are not careful. Try to get at least 16 quart and preferably 20 quart or larger. I find large stock pots like this to be indispensable tools in my lifestyle and they are a lifetime investment. When shopping key points to look at are thickness, build quality (especially handles) and steel quality. Some stainless imports are made of inferior metal. Read reviews carefully. When I won some fancy all clad cookware in a contest, I sold it on ebay and bought a Tramontina stock pot, which I’m happy with.

A 3 gallon stainless stock pot. Get 20 quarts or larger if you can afford it or better, repurpose a stainless beer keg.

A 3 gallon stainless stock pot. Get 20 quarts or larger if you can afford it or better, repurpose a stainless beer keg.

You can also modify an old beer keg, which many home brewers do for cooking beer mash. Full sized Kegs are 15.5 gallons and a 1/4 keg is 7.5 gallons.

I also own a large pool filter housing that must hold around 25 to 30 gallons. I set it up with a valve and cook large batches of canning jars and bark in it. I have never seen a comparable one. In most units the lid is nearly as tall as the body, making them of limited use.

My pool filter housing bark boiler, aka the MEGA CANNER.

My pool filter housing bark boiler, aka the MEGA CANNER.


Happiness is tan liquor on tap. It doesn’t get any better than this folks.

Happiness is tan liquor on tap. It doesn’t get any better than this folks.

SLICKING TABLE OR BOARD

To use the following two tools, the slicking iron and slicker, you need a large flat surface of some kind. The skin is stretched, smoothed and flattened with this trio. These are only used if you want to dry the skin smooth and flat. If the hide is to be softened you dry it in some way that is less involved. A good technique for drying hides flat is to paste them down to the board with fat applied to the flesh side. This technique allows us to finish the grain out perfectly smooth and then leave it on the board to dry slowly. Just put it where your chickens can’t walk on it! You can also nail the skin to a wall to stretch it, or lace it into a frame, but for leaving hides well flattened and finished, you probably can’t beat the slicker and slicking Iron on a smooth slab. If you are doing thick skins, you can get away with something that has a rough surface, such as unfinished plywood. When working thin skins on a slab, the surface should be smooth or the texture of the surface will show through on the grain, much like the technique of rubbing a piece of paper placed over a textured surface with pencil or charcoal. I use plywood and a large slab of thick salvage plastic. Traditionally, stone tables have been used. If you run across a large surface that is very smooth, water resistant and 4 feet or more wide, grab it.

A large sheet of salvaged structural plastic that I use as a slicking board.

A large sheet of salvaged structural plastic that I use as a slicking board.

Cattle leather oiled and pasted out to boards to dry with the slicker. When working with thick skins, the board texture will not show through. When finishing thin skins, you will need a smooth surface unless the skin is to be softened later, or the …

Cattle leather oiled and pasted out to boards to dry with the slicker. When working with thick skins, the board texture will not show through. When finishing thin skins, you will need a smooth surface unless the skin is to be softened later, or the wood grain will show through on the hide’s grain surface.

The skin can be pasted to the board with a coating of fat on the flesh side. It will stick well enough if it is dried slowly. When pasting thick skins to boards, you must use wood for thick skins or the skin may mold from drying too slow. For thin skins you can get away with pasting them to a non breathable surface like plastic, but make sure they still dry out within a couple of days. I use this technique a lot. I also often use it if I’m going to use the graining board to soften the skin (see below), but in that case, it is okay to use a rough piece of plywood, because the grain is going to be wrinkled and reworked anyway so the texture of the board showing through the skin is of no consequence.


SLICKER

This tool is usually made of stone or glass and you can make your own with a piece of slate. it is a slab of hard material, with one rounded smooth edge, and and smooth rounded corners. A handle is nice, but not necessary. The tool is used to smooth and even the grain side of the skin and to paste it down onto a slicking table or board with fat for slow drying. You could probably have a glass shop make you one out of a 3/8” glass. A shop that works with stone tiles should be able to make you one as well, or at least cut a slab for you if they don’t already have some spare tiles of the right size. If you want to make one, cut a piece of slate or other clean hard stone and grind the edge round on a slab of cement or sand stone. Use water as a lubricant. If the stone is hard, add sand with water to make a slurry. Slate is fairly soft and easy to work. This method will even work with hard stone or glass if you are patient. It can be finished and polished with diamond sharpening hones and/or sand paper. A belt grinder would also be very handy, but the dust will mess up your lungs. Silicosis fibrosis anyone? Glass grinders are lubricated with water to prevent dust. You can also still buy slickers new, since a few leather workers use them for polishing. I have also used hardwood and moose antler in a pinch.

Size should be around 4x5 inches and 1/4 inch or more thick, with the long edge being the rounded working edge.

Vintage slickers from the museum area of the Muir McDonald Tannery in Dallas Oregon, now sadly closed. Both are slate. In the tool on the left, it appears that there may be screws for clamping the slate into the handle.

Vintage slickers from the museum area of the Muir McDonald Tannery in Dallas Oregon, now sadly closed. Both are slate. In the tool on the left, it appears that there may be screws for clamping the slate into the handle.

Glass plate in a leather working machine. This partly replaced and augmented the slicker. This may be the scariest machine I’ve ever seen in operation. Muir McDonald Tannery, used to polish the grain of tooling leather.

Glass plate in a leather working machine. This partly replaced and augmented the slicker. This may be the scariest machine I’ve ever seen in operation. Muir McDonald Tannery, used to polish the grain of tooling leather.

Smoothing the grain and flattening.

Smoothing the grain and flattening.

Home made slate slicker 1/4 inch thick and a slab of repurposed jade with the edges polished

Home made slate slicker 1/4 inch thick and a slab of repurposed jade with the edges polished

ideal slicker edge is evenly radiused and polished.

ideal slicker edge is evenly radiused and polished.

The slicker at work dealing with wrinkly edges. This tool is always used with fat as a lubricant.

The slicker at work dealing with wrinkly edges. This tool is always used with fat as a lubricant.


SLICKING IRON

My current ideal slicking iron prototype. I would favor a thick blade. This is a tool where weight and rigidity can be advantageous.

My current ideal slicking iron prototype. I would favor a thick blade. This is a tool where weight and rigidity can be advantageous.

This tool is similar to the slicker in size and shape, but it is a metal scraper with a dull edge. It is used on the flesh side of the skin to even out wrinkles and smooth and stretch the skin out toward the edges, before turning it over to use the stone or glass slicker. The slicking iron should not be super wide, about 5 inches wide at most. If I made one to my specifications right now, it would as in the diagram. It would have a very, slight radius across the working edge. I would also add a generously sized hardwood handle that is slightly drop shaped in cross section, copper riveted, and saturated in raw linseed oil. Regular carbon steel is okay to use, but always check it for rust and clean before using. Never leave it resting on the skin.

A serviceable homemade sicking iron and a cheap dough scraper. The dough scraper is on the thin side, is already rusting and should be modified to narrow it. It is probably better to check in with local scrap yards, metal fabricators and sheet metal…

A serviceable homemade sicking iron and a cheap dough scraper. The dough scraper is on the thin side, is already rusting and should be modified to narrow it. It is probably better to check in with local scrap yards, metal fabricators and sheet metal workers.

Dough scrapers can be used if modified. Most dough scrapers are wide and could stand to have an inch or more removed from their width to make them 4.5 to 5 inches wide, which you can do with a hacksaw and files. Use a file to sharpen and modify. The corners should be rounded off well to a 1/4 inch radius and the whole thing sharpened from both sides to form a fairly obtuse edge (not too thin) and then dulled enough that it won’t cut the skin. The edge should be of such a dullness that it will easily grab the skin and pull it when the tool is used, but will not cut or gouge it. If shopping for one, look at reviews to make sure it is not too thin. Cheap scrapers will bend under the high stress applied to this tool under normal use. I bought this one and it is barely thick enough. It is also already showing some rust as cheap stainless steel is prone to do. Here are a few that look like they may be thick enough, but it’s hard to say until you see them in person. pizza cutter, RSVP, OXO. Keep in mind that they will still be better if modified by narrowing them, so dropping by your local sheet metal worker or metal fab shop first is probably smarter. They usually have lots of scrap around and all the tools to make something like this quickly, minus the handle. If you have a file, a drill and a saw to cut a kerf in a wooden handle, just have them cut out a slab for you and do the rest yourself. If you have a good metal salvage yard around, look there for scrap stainless.

This paunchy spot was eventually flattened completely by persistent work with the slicking iron and slicker.

This paunchy spot was eventually flattened completely by persistent work with the slicking iron and slicker.

You may very well be able to use some sort of household item or kitchen tool in place of the slicking iron, for instance a thick stainless spatula. You can also do some of this work on the beam with the fleshing knife, like stretching the skin our toward the edges. At times though you may wish you had the slicking iron for dealing with tough wrinkles and lumps in heavy hides. I would definitely say it is more necessary and useful when dealing with big thick skins. It’s not a tool you have to have to start tanning. You will know when you need it. Checkout this image of Talcon working down a paunchy spot in a bark tanned bull hide. That spot ended up totally flat in the end. This is the kind of application where the slicking iron shines.

The same hide flattened, smoothed, pasted with fat to the board and left to dry slowly.

The same hide flattened, smoothed, pasted with fat to the board and left to dry slowly.


OTHER OPTIONS FOR STRETCHING AND DRYING

If you do not have a slicking table, and need to stretch a skin out to dry, you can use a frame with ropes. Cut many holes, parallel to the edge and lace the skin evenly and tightly. This will not always remove wrinkles and paunchy spots like slicking out on a flat surface can. Framing a hide is also a lot of work and wastes skin around the edges. Similarly, you can stake the skin out flat just off the ground. A better option than both for most people will be to nail the skin out to a large board or wall. Use hot dipped galvanized box nails if you can. Any nail that will rust is not recommended and nails that are already rusty are a sure way to leave black stains on your hide.

Horse sides framed for drying. Not the best solution in terms of labor and material conservation. It also does not provide the best options for flattening and smoothing the skin.

Horse sides framed for drying. Not the best solution in terms of labor and material conservation. It also does not provide the best options for flattening and smoothing the skin.


PALM AND ARM BOARDS

Old engraving of a Currier at work with an arm board. If you look closely, you can see that the artist illustrated the wooden teeth on the sole of the board

Old engraving of a Currier at work with an arm board. If you look closely, you can see that the artist illustrated the wooden teeth on the sole of the board

Skins can be softened by rolling on a table with the hands and forearms. These tools are used to make that job easier and work the skin a lot harder.

The soles are designed to grip the skin’s surface. One type has a wooden face with ridges carved into the sole from side to side for when the tool rides on the flesh side of the leather. Boards with cork glued to the soles are used when the tool will contact the grain side.

There are two basic sizes, a hand board, sometimes called a pommel, and an arm board. The hand board is short, 8” or less, with a strap that goes over the hand. The arm board rests along the forearm and has a strap at the back and a peg at the front for a handle. The difference is size and scope of work. Any home tanner ought to do fine with hand boards.

If the skin is worked folded grain side to grain side, the result is a pleasing wrinkled grain surface since the grain is crushed and compressed. The process of creating that grain effect is called graining, thus the term graining board. In this case, the sole of the tool touches the flesh side only and the teeth cut into the wood provide excellent grip.

Postion for graining process. Note the ridged graining board contacts the flesh side only.

Postion for graining process. Note the ridged graining board contacts the flesh side only.

Surface produced by graining

Surface produced by graining

DSC00568.jpg
DSC00575.jpg

If a board is used with the skin folded flesh side to flesh side, the grain surface is left smooth because it is stretched instead of compressed. The cork soled board is used in this case to prevent denting and damage to the grain surface.

An antique cork faced arm board from the Muir McDonald Tannery in Dallas Oregon. Note that the cork is partially worn off on the front of the tool

An antique cork faced arm board from the Muir McDonald Tannery in Dallas Oregon. Note that the cork is partially worn off on the front of the tool

Fancy Antique cork soled board.

Fancy Antique cork soled board.


MALLET

In some cases, we may want the skin to be compressed and hardened, not softened and broken loose. The tool for this is a wooden mallet with a polished face, which is used to condense the leather when it’s in a damp, but not wet state. The face can be close to flat, but the edges have to taper off and round out gently. If you are leaving any kind of dents in the skin, then you need to either hit the leather flatter, or refine the edges. The leather should be smooth when finished. Use the heaviest wood you can, mine is probably iron wood and is extremely dense. Polish the face to a gloss finish. In the past, both Iron and brass/bronze mallets have been used, but make sure they are very clean and polished, with zero rust or oxidation. Even so, you are risking staining the skin with a steel hammer, so I recommend sticking with wood.

The mallet for compressing and firming leather should be dead smooth. Use the densest wood available. The hide underneath in the foreground has been pounded leaving it about 1/3 thinner, much denser, stiffer and polished. Otherwise, it was exactly t…

The mallet for compressing and firming leather should be dead smooth. Use the densest wood available. The hide underneath in the foreground has been pounded leaving it about 1/3 thinner, much denser, stiffer and polished. Otherwise, it was exactly the same as the top piece.


STAKE

This is a dull metal blade set into a post that is used for softening and breaking open the fiber of skins. They are useful if you are trying to get skins really soft and for working furs. Unless you are doing one of those two things, it’s not a very essential tool. I find them more useful in braintanning buckskin and working furs of any kind. The post can be permanent or in a stand of some kind for portability. The blade should be rounded at the corners and they usually have at least a very slight radius. The width of the blade can vary. For any kind of large skins, a wider blade would be better. 5.5 inches with the edges rounded to a 1/4 inch radius and a very, very slight radius to the whole edge would be good for general home tanning work of all kinds. A lot of dough scrapers are 6 inches wide, so that might be a good source of material for a blade. It should be stainless if possible, so you can leave it wet or in the weather. Use stainless steel screws as well.

A simple portable stake used for classes. A fixed stake or one on a heavy base is better if you’re going to use it a lot.

A simple portable stake used for classes. A fixed stake or one on a heavy base is better if you’re going to use it a lot.

Use stainless steel screws

Use stainless steel screws

A good stake blade design for the home tanner.

A good stake blade design for the home tanner.

This blog post and similar content is informed by almost 30 years of research, experience and communication with other tanners. You can support my efforts to bring back and preserve these traditional self reliance skills and arts by sharing content to friends, forums and social media, with general financial support on patreon.com/skillcult, or with one time donations using the link in the side bar. I also now keep separate accounts for earmarked donations toward research in tanning and apple/plant breeding. If specified, donated funds will be used for things like tools and materials, and outside labor solely related to either endeavor. Thanks for reading :)

Spoiler Alert, BITE ME Delivers the Goods! Early Oct 2018 Apple Variety Taste Testing, With New Seedling Apples

In my latest apple tasting, Sunrise and my own seedling BITE ME! rose to the top of the heap out of 18 tested. I also taste tested 3 new seedlings, out of which one is decidedly mediocre, one pretty good and one incredibly sweet, even though it is still ripening. Some others were bad others I am ambivalent about.

Rubinette: Intense anise flavor this year with high flavor, sugar and good acid balance. I am still not a big fan of this one for whatever reasons, but it’s very popular. If I approached apple tasting analytically for the most part, I might like it more, but I don’t, and I don’t.

Norcross Red Flesh: Got this from apple collector Nick Botners some years back. It is not very good. Light, juicy, tender, barely any red flesh, low sugar, low flavor.

Sunrise: This was one of the stars of the show in this tasting. Everything comes together really well in this apple. Very juicy, very crisp, good sugar levels, good acid/sugar balance, unoffensive skin and mild, but tasty flavors. More of a modern crisp type of apple than anything else in this tasting. It’s downfall may be a lack of distinctive flavor, but I want to eat them and that’s the best acid test.

Reinette Thounin: I got this from the USDA I believe. It is a true spitter. Totally inedible, bitter, tannic, low sugar. Honestly doesn’t even seem suited to cider, maybe just for the tannins.

Zabergau Reinette: Pretty good, always kind of tart, dry flesh, interesting but not sensational flavor. Could take it or leave it. Alleged to improve in storage.

St. Edmund Pippin: This one was no good when tasted a couple of weeks ago off of another branch on another tree. This time, some small stunted apples off of another tree were quite good, juicy and crunchy enough, with nice flavor and no discernible pear taste like the last ones had.

Tydeman’s Red: Or so it’s labelled, unconfirmed. Large lopsided apple. Open texture, juicy, crisp, tasty enough, more like a cooker and seems like it’s probably great for sauce.

Sweet 16: This year has none of the beloved cherry and almond flavors, but it has anise flavor that is seriously all up in your face. Not my favorite flavor. This apple can really vary drastically from year to year.

Mannington Pearmain: This apple has always cracked badly, but this year it didn’t too much. It’s not very good though and I still won’t keep it. It’s not bad, just not anything I’d recommend for any use.

Saltcote Pippin: the presentation is a little thin, lowish sugar and fairly acid. Good flavor though. probably would be a good sauce apple.

Coe’s Golden Drop: Intense candy flavor, said by some to be “pear drop”. Definitely does have a pear taste, but with more going on too, making it a very singular apple. It is small, dry, hard fleshed, tannic, thick rough skin, and still very intriguing. I think better specimens are coming down the pipe as it ripens more.

Peace Garden: small, stripped red apple. Outstandingly boring in every way.

Seedling, Grenadine x ? (proably Goldrush) 11/4: Kind of boring, a bit tannic, nothing really very wrong with it, just a generic yellow apple. Probably will not make the grade

Seedling, Grenadine x Goldrush, 11/17: A very healthy looking seedling that stood out for scab free, healthy green foliage early in the season. Apples are small for the most part, fairly round, often with flesh protruding out of the stem well, like an outy belly button. Small speckles, yellow skin. Flesh is fine grained and a little chewy. Flavor unremarkable yellow apple flavor. Sugar seems very high! As it is chewed, the fine chewy flesh gradually releases a rising flood of sugar. It also still had a bit of starchiness to it, so the sugar will probably continue to rise even further. Thanks to Mike of Walla Walla’s contributions to my apple breeding project fund, I just purchased a brix refractometer. That measures dissolved solids, which in fruit juice is more or less indicative of the sugar content. So, I’ll get to test this apple next week.

Seedling, BITE ME!: This was the first apple I ever fruited. Read more about BITE ME! here. In this tasting it is probably tied with Sunrise for me, though Bite me has the more interesting flavor for sure, Sunrise is a very pleasant eating experience and has outstanding texture. I’m thinking a Wickson Sunrise cross could be good. Mild flavors as always, with the special crab flavor component inherited from it’s mother Wickson. Any specific analysis and description aside, I want to stuff them in my face and chew them up to get that awesome flavor out. Sugary and low acid, thin skin. Flesh texture can tend toward what is called melting in fruit tasting terminology, or kind of chewy and tender. At least this one was. The downside to BITE ME! is probably going to be apple scab, which is had very bad last year.

Seedling, Wickson, OP, 2010: Red skin, very pretty, with crazing, like the surface of an old cracked oil painting. It has watercore this year, which makes it hard to test. The bits I found without watercore were not super remarkable, though perfectly good. As a small apple, it kind of needs to perform very well as a dessert apple to justify it’s existence, unless it’s some kind of amazing cider apple. Not as promising as I thought earlier in the season. I’ll give it a couple more years and hopefully it will outgrow the watercore.

I hope to have scions of some of my best apples available in the web-store this winter.

The Tanner's Knife, An Essential Multipurpose Tanning Tool for Fleshing, Dehairing, Scudding and Frizzing

P1160238.jpg

The fleshing knife as it is commonly known, but probably more appropriately known as a tanning or tanner’s knife, is the primary tool of the tanner. This versatile knife can be used for fleshing and re-scraping the flesh side of the skin, de-hairing, removing the grain (frizzing), scudding out liquids to flush unwanted moisture and loose material from inside the skin structure, moving the hide on the beam and trimming the edges of the skin. While there are specialized two handed knives for some of these tasks, they can all be performed with the same tool if it’s within certain design parameters, which is what will serve most home tanners best. In this Blog post and video, I go over some of the different types, both commercial and homemade with some tips on weight, length, styles, making your own, and other such things.

The focus here will be on the home tanner working on beams about 8 to 12 inches wide. Keep in mind that most new models are designed by and for fur trappers, most of whom do not do a lot of general tanning work. The amateur tanner can get by with tools that are much less than ideal, so there is no need to overthink the problem too much, or find the perfect tool just to get started. You can always upgrade later if you want to.

Length: The typical professional tanners knife of the European style is quite long and not really best suited to the home tanner. Samples I have range from 3 to 3-3/8 inch wide. 16 inches is a typical working edge length. These long knives were often used on very wide beams with shallow curves. The strong, experienced men using these tools, combined with the large area of contact formed between the gently curved edge of the tool and the wide beam, would make for very efficient and quick work. I think the ideal length for home tanners working a variety of skins on narrower beams is about 20” long in total with 11” working edge and 4.5” handles. A working edge up to 12 inches and down to 10” with 4.5 inch handles is also fine. With such a length, the tanner can comfortably do all manner of work from very large hides, down to fur skins. Wider beams require wider knives and/or the edge of the tool may need to protrude out in front the handles. I would not recommend working edges much smaller than about 10 inches, and then only out of necessity. It is not just the working edge though, but also the space between the handles, which allows for comfortable work.

Styles: Nearly all traditional styles seem to be curved. The classic European style of tanning knife that is most common is wide, curved and dished. The compound curves of the cup and the arc combine to strengthen the tool, allowing it to be fairly thin, and yet still very rigid. The concavity of the underside seems to offer some geometric advantage in scraping. The concavity also means that the tool can be used flat on the hide without rubbing on it, which I suspect might be part of the impetus for the design, although I have rarely used them that way. Professional tanners who worked hides day in and day out would probably be able to get away with doing things that the rest of us can’t, such as using sharper tools at lower angles. These traditional, wide, dished knives are very nice to use, though if I were designing one from scratch for home tanners who are doing many different types of skins and tasks, I would probably make it considerably narrower than they usually are and no wider than 3 inches. The back edge is sometimes kept very sharp and can be used for tough spots, gaining access under tough membranes, or as a sharp slicing knife for trimming the skin during fleshing. I have also read of tanners filing teeth into the back of the knife so it can be used to pull skins up the beam to reposition them for scraping without using the hands. You can do this maneuver on small skins without cutting teeth in the back of the tool, and I do, but on large heavy hides, I can see why they would make this modification. The option is to let go of the tool with one or both hands to readjust the skin on the beam as each area is worked over, which is much slower.

Traditional style knives. From the top down, A cheaper modern version @ 16”, W.H.Horn & Bro’s England 15” edge-3-3/8” wide- 27” total length, Horn Brand cut down to a 12 inch blade by someone who probably thought 16 inches was too long. I just saw a…

Traditional style knives. From the top down, A cheaper modern version @ 16”, W.H.Horn & Bro’s England 15” edge-3-3/8” wide- 27” total length, Horn Brand cut down to a 12 inch blade by someone who probably thought 16 inches was too long. I just saw a picture online of one cut down exactly the same way. It even had a similar handle. Just goes to show, those super wide tools are for use by professionals in a professional setting and not suited to everyone and every task.

W.H. Horn fleshing knife from ends.jpg

Other tools are narrower and usually thicker, sometimes with only one working edge. This type is good for home tanners with a surprising number of models and brands available new. Newer ones are often sharpened on the back as well and many are fairly flexible compared to older ones I’ve seen.

Width: A versatile knife for the home tanner would probably be anywhere from 1.5 to 3 inches wide. Though still very usable, extremely wide tools can be less stable when it is required to push very hard as is sometimes necessary when graining (frizzing) un-limed buckskins or fleshing very difficult skins. My two favorite tools currently are a shortened traditional cupped knife that is worn down quite a lot to about 2.5 inches wide. More relevant though, is that the concave curve, which is the main working edge, has been worn back closer to the handles, making it more stable to use when pushing very hard. A full width knife however is fine as well, but if I designed one from scratch it would probably be under 3 inches wide.

Another favorite tool I have was forged out of a wagon leaf spring and is about 3/16 inch thick and 1.5” wide, which makes for a durable, versatile tool of a good weight. Tools as narrow as 1 inch can be fine too depending on material and use. There is a type of knife that is very thin and flexes to conform to the curve of the beam, but I have never had a chance to examine, let alone use one. If the tool is both narrow and short, the handles may get in the way, necessitating the use of a very narrow beam.

For whatever combination of reasons, these are the tools I’m most likely to grab first. The. traditional wide knife is worn back, making the edge closer in line with the handles, which is more stable when doing hard work. The second is forged from a…

For whatever combination of reasons, these are the tools I’m most likely to grab first. The. traditional wide knife is worn back, making the edge closer in line with the handles, which is more stable when doing hard work. The second is forged from a wagon leaf spring, 3/16” thick, 20” long, 1.5” wide. The working edge is only 9.25”, but there is plenty of working room between the handles. If I made a knife like this again it would have a 10” or 11” working edge. the handles are antler.

If the tool is too short and narrow, you will not be able to use it on wide beams like this one, because the handles will interfere. It also doesn’t give you a lot of real estate to work with on the edge. If the hands are held too close together, it…

If the tool is too short and narrow, you will not be able to use it on wide beams like this one, because the handles will interfere. It also doesn’t give you a lot of real estate to work with on the edge. If the hands are held too close together, it can become less ergonomic to work. The wider your shoulders, the wider the tool could be.

Thickness and weight: Wider tools are generally relatively thin in order to avoid excessive weight. Narrower tools are often a lot thicker, though many of the newer, higher end tools are thinner than the older ones were. A range of weights are usable, but tools can be both too light and too heavy in my opinion. I’d much rather a tool was too light, but some weight offers stability and the advantage of momentum in some scraping processes.

Straight v.s. curved: Straight tools are perfectly serviceable. I do prefer a curve and would never design the perfect tanning knife with straight edges, but if material is available to make a straight tool, I would not hesitate. I’ve used straight planer blade tools for countless hours and endless square feet of hide scraping. Once I started using a curved tool, I was sold instantly, but I could go back easily enough. I think the main advantage of curved tools is that it is easier to incorporate tilt and slide techniques in scraping.

Tilting the knife edge slightly off of perpendicular is an important refinement to scraping technique. Imagine a straight edged fleshing knife held at a slight angle by putting one hand slightly away from you, and one hand slightly back toward you. If the tool is pushed straight forward while tilted askew like this, there is a slight advantage in scraping, something akin to a slicing action, though not quite the same. You can achieve the same effect with any cutting edge in wood, such as a plane, spokeshave, knife or draw knife by tilting it. This subtle difference in technique can have a large effect. Curved tools, when held slightly to the left or right, create this effect automatically without having to hold the tool askew at all, or at least less so.

Sliding the tool side to side very slightly in a slicing motion as the tool is pushed forward is another very important subtle refinement of the hide scrapers art. Combined with tilt, it is even more effective. Since tilt is already built in to a curved knife, it is easier and more ergonomic to achieve this combination of techniques when using a knife with a curved edge.

The radius of the curve should not be too drastic. Shown are some curved tools to give you an idea of what some look like. A factor in degree of curvature, or lack of curvature, is that the radius of the beam combined with the radius of the knife determine how much of the tool contacts the beam. That contact width has everything to do with how much work is done with each stroke and how hard it is to do that work. In one extreme case, you might be scraping off the grain from the tough neck skin of a deer, which is going to require a narrow area of contact. If the width of contact between beam and knife is wide, you will have a very tough time of it. Still, with an 8 inch beam and a very moderately curved knife, you should still be okay. For general work, I prefer a beam around 12 to 14 inches wide with a moderate curve. Coupled with a curved knife, that makes for a reasonably wide area of contact resulting in efficient work for most processes. If I used a 6 inch wide beam with a high crown and a straight tool, I would be at my work much too long when doing most of the relatively easy processes that I engage in most often, such as fleshing and dehairing, simply because the strips I would be scraping off would be so narrow.

If a straight line is drawn from one corner of the edge to the other, the distance from that straight line to the tool edge at the center of the tools are as follows Top to Bottom:9” long, 5/16” to edge,15” long, 3/4”16” long, 3/4”12” long 1/2”Botto…

If a straight line is drawn from one corner of the edge to the other, the distance from that straight line to the tool edge at the center of the tools are as follows Top to Bottom:

9” long, 5/16” to edge,

15” long, 3/4”

16” long, 3/4”

12” long 1/2”

Bottom tool, not measured

The bottom line is that I prefer a moderately curved tool for general work. The curve I would start with as a prototype for testing would arc in an even radius, with a rise of about 3/8” at the center of the tool on an 11” blade.

Material: The cheapest knives are made from cheap mild steel which cannot be tempered to keep an edge. This type of budget tool can work, but they are not preferable and will require more frequent sharpening. Better knives are made of tool steel and tempered to take and hold an edge. If at all possible, I would recommend something that will hold an edge. Stainless tools are nice to have when working around water and salt, but If tools are taken reasonable care of, regular carbon steel is fine. Planer blades, discussed below are rust resistant, but not stainless. For making tools at home, you can use a number of common pieces of steel.

Miscellaneous steel items that could be used to make a tanner’s knife. Left to right, a set of car leaf springs, section of leaf spring, chainsaw bar, lawnmower blade, planer blades

Miscellaneous steel items that could be used to make a tanner’s knife. Left to right, a set of car leaf springs, section of leaf spring, chainsaw bar, lawnmower blade, planer blades

Leaf springs from cars are good. If possible, find a set that is narrow. Almost every junk car has a full set of springs under it waiting to be salvage with the removal of a few bolts. The steel is temperable and already hard enough to work well enough. If you can find a narrow spring, you could grind out a tool and retain the temper if you are careful and patient.

Chainsaw bars seem like a great source of steel of a good thickness. I’ve never used them, but I understand they are carbon steel of some kind, and would already be hardened and tempered to hold their shape under hard use. Once worn, they are of no use on a chainsaw and should not be hard to find in any rural area in the states.

Lawnmower blades: are fairly common and seem like reasonable stock to work with. They have a propeller twist which would have to be removed, necessitating heating, forging and preferably re-hardening and tempering afterward.

Large files are a good source of tool steel,and could be used. I would grind or file out all the teeth though. They are too hard as is, so making a good tool with one would entail at least heating to anneal (soften), grinding to shape and preferably re-tempering. If you’re going to do all that, you might as well forge it out into a better, wider, curved tool.

Misc mild steel bars can be used, but will not hold an edge well. In a pinch, you can even use a square edge, instead of a more knife like beveled edge.

Planer blades of high speed steel make very nice scrapers. They are extremely hard, tough, rust resistant and hold an edge incredibly well. Another advantage is that since they are straight, some will have two usable edges. I use two tools or edges of varying sharpness during the processing of most hides into bark tanned or braintanned leather, so having two edges of different sharpness on one tool is great.

Tools made from planer blades. The top three are made from narrow blades and pretty short. The top two have handles made of wood covered with rubber or vinyl tubing. the third is antler handled and the fourth is a short blade tied into a slotted woo…

Tools made from planer blades. The top three are made from narrow blades and pretty short. The top two have handles made of wood covered with rubber or vinyl tubing. the third is antler handled and the fourth is a short blade tied into a slotted wooden handle, giving a longer working edge on a short blade.

The steel in planer blades is too hard to drill with normal tools, but can be ground easily enough with a 4 inch grinder, belt grinder or bench grinder. [EDIT: Melvin Beattie, one of my tanning teachers, Just wrote me the following: “Yes you can drill planner blades, files, etc.. Here are the drills that work, I have used them many times putting handles on planer blades. If I am using a hand drill start with a 1/8 “ then use 1/4” but you have a drill press just use the 1/4’’ and a good drill lube.” ] Handles for planer blades can be of two pieces of half round wood with rubber or vinyl tubing or epoxied wood (rough up and clean the metal surface before applying epoxy).

Planer blades can’t be drilled or sawn easily. To shorten, grind from both sides until thin, clamp in a vice, then break off.

Planer blades can’t be drilled or sawn easily. To shorten, grind from both sides until thin, clamp in a vice, then break off.

P1160275.jpg
Vinyl tubing with wood. Grind handle section down to 1” wide. Wood 1” wide. Vinyl tubing 1” available by the foot and many hardware stores. total length 4” to 4.5” Some will just pound tubing over the flat wide handle, but it’s very uncomfortable fo…

Vinyl tubing with wood. Grind handle section down to 1” wide. Wood 1” wide. Vinyl tubing 1” available by the foot and many hardware stores. total length 4” to 4.5” Some will just pound tubing over the flat wide handle, but it’s very uncomfortable for protracted use. The wood can be any easily split straight grained wood. There is no reason to use hardwood.

Antler handles are also very nice and may be the best option if the planer blade is only 12 to 14 inches long. You need at least 1.5” stuck into the antler, preferably more. Grind the end of the tool that will go into the handle to fit within the antler pith as shown in the photo below. Smooth and round off all sharp edges and grind the end into a slight wedge. Soak the antler overnight then boil for 15 or 20 minutes. Clamp the blade in a vice if you can and pound the antler handle onto it. Don’t drill the antler, just pound it onto the end of the blade. Allow the antler to dry completely before using it at all or you will loosen the union. Finding comfortable pieces of antler that are not too curved or too small can be a trick, but you can end up with very nice handles. Antlers vary in the amount of pith they have and general density and strength. If the antler is not too pithy, this method can also work for narrow tangs.

Antler handles set while wet and boiling hot at least 1.5” deep, deeper is better.

Antler handles set while wet and boiling hot at least 1.5” deep, deeper is better.

The width of the blade should roughly match the width of the honeycombed pith.

The width of the blade should roughly match the width of the honeycombed pith.

Grind the end of the bar to a slight wedge and round off all sharp edges.

Grind the end of the bar to a slight wedge and round off all sharp edges.

Grinding out tools: If you have a piece of stock that is already tempered, such as a chainsaw blade or car leaf spring, it is possible to grind and or file it to shape without changing the temper. If you overheat a hardened and tempered tool in grinding, it will become soft, a mistake commonly referred to as “burning” the steel. If you see colors appearing on the edge of the tool during grinding, you are flirting with danger. For something the hardness of a tanning tool, avoid letting the steel turn anything darker than bronze color, after that it will turn a purplish color, then light blue. Dark blue is pretty much dead soft, so stay well on the right side of that color. Using a high speed bench grinder, 4 inch angled grinder or belt grinder, it is very easy to overheat steel, especially when thinning the edge. Work in very short spurts, with frequent water cooling and watch for those colors with unfailing vigilance. For a tanning knife, one of two soft spots are not likely to cause you huge problems, but do your best to prevent them.

So, what is the ideal tanning knife for home users? I would definitely be a compromise in some way, but that would also be it’s strength. I have drafted up some plans and I hope to someday experiment with some prototypes. So many projects, so little energy :-/ for a fairly simple tool, I would say a good place to start would be a moderately curved, 3/16” thick, 1.5” to 1.75” wide, 11” working edge and 4-1/2 inch handles for a total of 20” long. Such a tool could be filed or ground out of a chainsaw bar, or forged from leaf spring or a large file. I would put a bevel on the back, to keep sharp for trimming skins during fleshing and other tasks. The bevel on the front concave edge should be at least 45 degrees, but thinner would be better, maybe something like 20 to 30 degrees?

As far as new knives go, there are a lot on the market. On the low end, the Wiebe 12” knife is as cheap as 20.00 before shipping from some dealers. According to Dakota Line Snares, a Wiebe dealer, “The steel on all three of the fleshing knives (8”, 12” and Elite) is 3CR13: Hardness Hrc52-55. The Elites are sharpened in the U.S.”. I think the Wiebe 12” flesher might be a very good budget option for new home tanners. Reviews on Amazon are good, but it’s hard to know what people are doing with them or how many of them are experienced enough to judge. In some pictures I’ve seen, it appears to be bent just in the middle in the classic dog leg formation common in cheap knives instead of forming a long gradual arc. In others it appears to be bent off center, or not much at all. I would not expect too much quality wise. They are produced in China with Chinese steel. A step up from that class of tool, there are the Wiebe elite, Neckers of various models, the caribou and Au Sable are in the 65.00 to 95.00 range and generally get good reviews. Many of them may be more flexible than would be ideal for a home tanner, so shop with caution. I have the Necker 600 and am not crazy about the handle design or the down sloped handle angle, but I actually haven’t used it yet. It is also more flexible than I’d prefer. The wider necker 700 looks interesting but it’s a little more costly at 95.00

Also in the mid range, there are affordable imitations of the European style knives that are sold in the U.S. According to one supplier they are stainless. The 12 inch version (which I would recommend over the 16 inch) is about 45.00 to 50.00 My guess is that the tangs will be the weak link in these English knife copies. There are also new real English Sheffield knives by J. Adams which have separately attached tangs that run all the way through the handles. They are expensive at about 145.00 for the 12” model. This is the high end of new tanning knives, outside of custom made tools. I would hunt ebay for an old european style knife before purchasing the new Sheffield knives. The problem with the antique ones is that they are usually on the long side for a home tanner. Exercise caution in shopping for new English knives as the American made copies are sometimes unscrupulously marketed as being from England or Sheffield.

Typical of old school quality, the two tools at the top have heavier, thicker tangs forge welded onto the blades, while the lower tool has a thin tang that is cut out of the same metal the body is made from. As a result, the thin, sharp edged tang h…

Typical of old school quality, the two tools at the top have heavier, thicker tangs forge welded onto the blades, while the lower tool has a thin tang that is cut out of the same metal the body is made from. As a result, the thin, sharp edged tang has split the handle. The sad thing is, it’s much easier with modern welding to weld separate tangs on.

The older tools have full thick tangs that go through the handle to the end where they are pounded over like a rivet, making for much stronger handles that put less stress on the wood. I don’t think this is one of them, but I suspect that the new pr…

The older tools have full thick tangs that go through the handle to the end where they are pounded over like a rivet, making for much stronger handles that put less stress on the wood. I don’t think this is one of them, but I suspect that the new production Sheffield, English knife copies sold in the U.S. probably have these these type of cheap flat tangs. I may try to modify this tool to make is shorter with thicker tangs and handles that come more nearly straight to the sides instead of arcing downward. I’m thinking some small metal parts and some JB Weld…

For me to buy and test all of these tools would be quite expensive obviously. I also don’t tan enough currently to put them to the kind of test needed to sort them out really well. None are what I would design from scratch, but again keep in mind that most of these are designed by and for fur trappers, whose only job typically is fleshing furs.

For used tanning knives, ebay is the best market, although they do show up on Etsy now and again. Obviously you can hunt old junk and antique stores, but you will be lucky to find one at all, let alone at a reasonable price in good condition. Avoid the cheapest and very common knives that are bent in the middle instead of in a continuous arc. These cheap tools usually have wire wraps on the handles, but some have solid ferrules. They are made of mild steel. They will work, but get something better if you can afford it. With the Wiebe 12” budget knife being tempered steel, there is hardly an excuse to buy a mild steel tool.

The common very cheap tools of mild steel like these should be avoided if you can afford something better.

The common very cheap tools of mild steel like these should be avoided if you can afford something better.

Quality vintage tools of both the old school thin wide cupped European type and the thicker narrow type tools come up on ebay, but they are often over priced. Patience is key. Look at ended auctions to see what has and hasn’t sold in the past and for how much, as well as what has been re-listed recently or lowered in price. There is a W.H. Horn and Brothers knife, just like mine, in nice condition for 85.00 plus shipping on ebay right now. Last week it was listed for 150.00

Some August Apple Tasting

In this video I taste some usual suspects, Kerry Pippin, Chestnut Crab and Williams' Pride, and a couple of newer ones, Viking (very interesting) and Salem June (meh...)

Peasant King and My Tree Collard Selection Project

About 5 years ago, a friend gave me some tree collard seeds from Montenegro.  Some years since planting those seeds, I’ve selected one seedling that stands out from the rest to name, propagate and distribute.  I have ostentatiously and awesomely dubbed it Peasant King. 

Tree collards are a perennial vegetable also variously known by other names like Tree Kale, Palm Cabbage, Walking Stick Kale, Tree Cabbage and no doubt more.  They are something like collard greens or Broccoli leaves, except that they grow all year for multiple years without flowering eventually becoming very tall.  They could be compared to regular collards, but generally are heavier in texture and maybe stronger flavored.  I also suspect they might be more nutritious, but who knows without an analysis, and I don't know that it's been done.  Tree Collards are a member of the species Brassica Oleracea, which includes, Broccoli, most Kales (not siberian or red russian, which are Brassica napus species), Cauliflower, Kohlrabi, Brussel's Sprouts, Cabbage and Collards.  Many people are surprised to find out that these are all the same species of plant and and as such can inter-pollinate.  The only reason that lets say a cauliflower and a kale plant look and act so different is that they have been bred for different characteristics for a very long time.

"In Jersey, the Palm Cabbage is much cultivated, and reaches a considerable height. In La Vendée, the Cæsarean Cow Cabbage grows sixteen feet high." PLANT LORE, LEGENDS, and LYRICS, RICHARD FOLKARD, JUN. 1884 http://www.gutenberg.org/files/44638/44638-h/44638-h.htm

Tree Collards are traditionally grown in various parts of the world as fodder for both humans and animals.  They probably originated in the British Isles.  A variety referred to locally as Purple Tree Collard has been grown in my area by both old and young back to the land types for a long time, but they are generally propagated by cuttings, not seeds.  That is because the particular purple tree collard that is grown around here rarely sets any seed.  Flowering is not very common to start with and they flower only weakly when they flower at all.  Also, they don’t seem to pollinate themselves and I suspect they may only set seed when pollinated by another genetically unique variety of tree collard or other member of the Brassica Oleracea group.

When I got these rare and unique seeds, I saw it as a chance to find out if the trait of resistance to flowering was transferable, with an eye to selecting out some new perennial varieties worthy of propagation by cuttings.  I grew out around 35 new plants in some out-of-the-way long term test beds.  I was impressed early in their growth that many of the plants seemed more vigorous than the standard tree collard I had been growing for years.  I wondered if our tree collards had picked up virus or genetic damage that caused them to grow more weakly.  I won’t be 100% sure if the average plant is more vigorous unless I grow multiple varieties side by side with the old type. What I'll probably do instead is yank out all of my old Purple Tree Collards so that they don’t infect my new varieties if they are carrying something infectious.

Peasant King shows much darker purple and more completely colored leaves than the average seedling in the group. The leaves also average much larger. More average leaves are to the left.

Peasant King shows much darker purple and more completely colored leaves than the average seedling in the group. The leaves also average much larger. More average leaves are to the left.

Out of those 35-ish plants, I have selected just one so far that is clearly superior by a combination of leaf size, color, shape, vigor, uprightness and resistance to bolting.  It has beautiful, large, dark purple leaves.  While most of the seedlings more or less resemble the purple tree collard grown here, they vary in color, with a few being more or less purple.  The old cuttings everyone grows here are partially purple, but probably average 50% or more green.  My new selection is among the most completely purple of this seed population, though, like all of them, there are green patches.  Keep in mind that the color trait will vary somewhat with weather, soil and culture.  The leaf shape is a little more frilly and rounded as well.  All in all, it stands out from the crowd in it's physical attributes, and if random leaves are picked from all of the plants, it's leaves are easily distinguishable from the rest

The original plant is now about 7 feet tall at 4 years old.  it is not the tallest, but that may be just as well.  I think a combination of tall and short types might be best scenario in terms of design options for gardens.  It has resisted flowering through at least two hot California summers with no water, and two of the worst drought years in living memory.  Those trial beds have also gotten very little fertilizer past the initial establishment.  The conditions I’ve grown these in shows out just how tough these plants are.  We have no significant rain for usually about 5 or 6 months of the year, depending on the year, yet the percentage of plant loss to drouth was not all that high.  Heavy environmental stress often causes plants to flower, probably as a reproductive imperative- as in, "I might die, I better make babies to pass no my genes".  Growing these under these challenging conditions creates heavy selection pressure to weed out the weak plants.

I named the variety Peasant King because it is tall, with a beautiful crown of royal purple leaves, and tree collards are the epitome of healthy old school peasant food.  My home girl Sophia Bates acquired these seeds, which were gifted to her by the Matron of the farm she was staying at in Montenegro.  She said that they are a regular staple among the farming folks of that region and are grown in every nook and cranny of the homestead that is not used for anything else.  They are pretty neat.  A tough resilient plant that is easy to propagate from cuttings, is very nutritious and grows with little care in out of the way spots.  To boot, it looks cool.  I think further trial will show Peasant King to be more upright and handsome than the usual collards.  Only further trial will tell us for sure, or whether it will show out some other problems such as susceptibility to pests or disease.

So what’s the down side?  Some people don’t like them for one.  They are also not very hardy.  John Jeavons of Ecololgy action, a long time promoter of tree collard growing, says the usual purple tree collard can freeze out below 18 degrees Fahrenheit for extended periods I do not recommend trying to grow them in areas where they don’t really want to grow, but see below for possibly more hardy options.  Being perennial, they can be host to long term pests, like aphids.  I have gotten aphids and if I recall, maybe some fungal disease on my Purple Tree Collards in the past, but they always seem to outgrow everything eventually.   Once I can grow more of them and get them to some other people, we will find out how they fare in the long run.  I hope to have cuttings of Peasant King to offer in the next year or two.  I should be rooting cuttings within a couple of months to grow more plants, to make yet more cuttings to distribute.  The first available cuttings will go to a combination of influencer types and content creators and as usual my patreon supporters.  Sometime after that I’ll probably distribute cuttings for at least a year or two as long as it keeps performing well here.


THE FUTURE

In doing research I ran across a blog comment somewhere by Chris Hommanics saying that he has been working with tree collard hybrids for some time.  He had actually contacted me last year about getting me some apple scions, which I unfortunately wasn't able to take advantage of.  Anyway, small world.  It turns out he is offering a population of hybrid Tree Collard seed that he’s been working on.  It is a randomly mixed hybrid pool of tree collards mixed with Kales and other oleracea types.  The seeds are available for experimentation and can be acquired here.  This seed offers a much more diverse genetic range, with improved texture and varying form.  This looks like a really promising project.  I also ran across a video by Plant Abundance on YouTube, showing a kale, tree collard hybrid which he grew from chance pollinations with Kale in his garden.  I think the future of tree collards is likely more along these lines than the more traditional inbred line I’m working with.  Only the future will tell if that is all good, but I’d say expect to see an explosion of tree Brassica diversity over the next two decades.  The internet makes spreading knowledge and plant material so much easier than it used to be and new people are inspired every day to do backyard breeding and selection.  Even a few years ago when I started this project, there wasn’t all the much about tree collards out there on the web.  Now there are lots of videos and blog post.  The internet has been good to the humble tree collard.

The seeds are still viable and I planted two flats this spring

The seeds are still viable and I planted two flats this spring

My plan from here is to germinate a bunch more of this Montenegran tree collard seed.  This time, I’m going to do a pre-selection in the flats, choosing only the healthiest looking vigorous seedlings.  Then I’ll plant those in trial beds on a close spacing, of maybe 6 or 8 inches to do a second selection.  The winners will be transplanted to trial beds and once established, I’ll neglect them, just like I neglected the current trial beds and see what survives and thrives.  In the name of diversity and resilience, I would eventually like to select out three or more plants worthy of naming and propagating from cuttings. The seed stock I have here would also ideally be crossed with the common local purple tree collard as well, for some genetic refreshment, diversity and invigoration to the line, but I may leave that up to someone else.  After that, if I continue working with them, it will probably be to hybridize in some other Oleracea varieties, like kales and maybe purple cabbage, and start growing those out.  I think Chris Homanics said that about 25% of hybrids inherit the perennial trait of resistance to flowering, and I think my seedlings might show a pretty similar rate of inheritance of that characteristic.  Transference of perenniality was my biggest question going into this project.  Now that we know that the trait is transferable, even when crossed with other B. oleracea types that tend to seed quickly, it opens up a huge window of opportunity to work with perennial tree Kales and Collards.

If you want to experiment with breeding and or selection, tree collards should cross with other members of the Brassica oleracea group, including many kales, broccoli, cauliflower, collards and Brussel’s sprouts.  There are hybrids of Brassica napus with Brassica oleracea, but I'm not sure how easy that is to achieve.  The idea of a cross with the napus Russian or Siberian Kale is very intriguing though.  Read more about those inter-species hybrids here.

Please don't contact me about cuttings unless maybe you are a collector or breeder that will in some way ultimately benefit others by distribution, education, research or breeding.  If I have cuttings, they will be offered in the web store as they become available.  Since the variety is named, it should get into circulation from other sources eventually, as long as it proves it's merit over time.  I still have to look into options for release to the public.  I'm going to check out the open source seed initiative, an organization which one of my gardening heroes Carol Deppe is involved in, but I still need to think about whether I think their whole concept is a good idea or not.  My intuition tells me there is something wrong with the framework of the project, and that is usually the start of something lol.  I'm also not sure if they do vegetatively propagated varieties.  I have my own ideas about what the future of seeds and perennials, plant breeding, legal issues, the plant breeding community, and the broader gardening and orcharding culture could look like, but that's another bag of worms.

How to Find Fruit Wood Scions for Grafting, Scion Exchanges and People to Trade Varieties With

DSC05929.jpg

I commonly get requests for scion wood or questions about where to find scions in general, or of a particular variety.  Below are my best recommendations.


Scion Exchanges and Swaps

These are usually free, sometimes with a small entrance fee, but I've never heard of one where the scions are not free.  There are more and more of them, though large areas of the U.S. still don't have any.  Search the web for terms like scion exchange, scion swap, grafting class or grafting workshop along with your large city, state or region.  If there are none nearby, maybe you can find some like minded people and eventually start one.  To my way of thinking, there should be one within easy driving distance of everywhere :)


Online Trading, Fruit Communities and Fruit and Nut Organizations

  Below are listed some online forums, destinations and organizations where people trade cuttings and seeds. They generally are also places to meet like minded people in your region.  The best information and collaborations are often local.

!GROWING FRUIT’S SCION SOURCE PAGE! http://growingfruit.org/t/scionwood-s...   I like this forum a lot.  Friendly with a lot of knowledgeable people.

NORTH AMERICAN SCION EXCHANGE Facebook page: https://www.facebook.com/groups/scion...  Started by my Friends Andy and Little John because they had no nearby scion exchanges.  There is a website too, but the facebook group is most active

NAFEX, North American Fruit Explorers: http://www.nafex.org/  A long standing organization of fruit variety enthusiasts.

MidFEX, Midwest Fruit Explorers: http://www.midfex.org/

CRFG, California Rare Fruit Growers: https://crfg.org/  Membership organization with multiple chapters up and down the state.  CRFG scion swaps happen up and down the state over the winter.

Home Orchard Society (Pacific Northwest): http://www.homeorchardsociety.org/  An excellent organization for NorthWesterners.  From what I hear, their scion swap is one of the largest and best in the country.

Temperate Orchard Society: Apparently cloned the enormous Nick Botner apple collection, so they should have over 2000 apple varieties. (scion sales) http://www.temperateorchardconservancy.org/contact-us/

DBG Scion Exchange, EDMONTON CANADA: https://dbgfruitgrowers.weebly.com/sc...

MOGFA, Maine Organic Farmers Association, Scion Exchange: http://www.mofga.org/Events/SeedSwapS...

SEEDS Durham North Carolina: http://www.seedsnc.org/2018/01/upcoming-grafting-workshop-scion-exchange/

WCFS, Western Cascade Fruit Society, Scion and Grafting Fair in March:  http://wcfs.org/

Michigan Home Orchard group:  https://groups.google.com/forum/#!forum/mi-home-orchard  Group by YouTube user Prof Kent for michigan folks.

For Europe, Fruitiers.net scion trading:  www.fruitiers.net


Buying Scions

Finally, you can buy scions.  They have become more expensive, but if you really want a variety and you can't find it anywhere else, it might be worthwhile.  Also, once you get interesting varieties, it gives you trading leverage.  I sell scions sometimes, but I rarely trade, because I'm not collecting much anymore.  Also, the apples that remain on my wants list are very rare, some probably even extinct or at least lost.  If you want a specific variety, just search the net for the variety name and the work scion.  You might be surprised to find some for sale, or to find at least someone that grows that variety or has it for trade.  If I have scions for trade, they will be in the webstore around January and February.  Unless you have some amazing rare stuff to trade, don't contact me about trading.  I like to help people and will go out of my way to help serious collectors and breeders, but I get way too many requests.  If you can find it anywhere else, please do.

If were to make a list of scion wood sources, they would all be on this page on the GrowingFruit.org site anyway, so I'll just refer you there....   http://growingfruit.org/t/scionwood-sources/3346

Grafting, the collecting fruit varieties and scion trading are fast growing in popularity, and for good reason.  It's always an adventure finding out about new varieties, tracking them down and fruiting them out.  I hope it grows enormously in the future.  It is important to the preservation of food plant diversity that everyday citizens grow, share, eat, talk about and even create many different varieties.  Even at it's most diverse, the larger industrial food model will always lack true diversity and soul.  When there are quite possibly tens of thousands of apple varieties, even 20 varieties in markets looks pretty weak.

Feel free to contact me or leave a comment if you know of other good online communities, organizations or annual scion exchanges.  Happy hunting

IMG_0338.jpg

A Review of Tanning, Leatherworking and Skin Related Books in My Collection

Below are Tanning and skin working related books collected by myself and Tamara Wilder over the years.  The video version talks about these books and a little history and such.  Some of them are broadly recommended, and some are only for people with certain specific interests.

Many, many books on Tanning, Glue Making and Leather working that are not listed here are available as free downloads from the Downloads page, SkillCult.com/freestuff

51Y6BJ9E6CL._SX307_BO1,204,203,200_.jpg

Buckskin, The Ancient Art of braintanning, Steven Edholm and Tamara Wilder, 1997: 

The book I wrote with Tamara Wilder in 1997.  From what I've seen, it is probably the longest and most detailed book on home tanning to date, especially considering it's focus.  As of writing this, it is currently out of print with plans to revise and re-print in digital and print forms.  Covers wetscrape braintanning, with some satellite subjects like sharpening and dyeing buckskin with natural materials.  If you've read it, please consider leaving a review on Amazon.


513MHSX5GKL._SX300_BO1,204,203,200_.jpg

Deerskins Into Buckskins, Matt Richards, 1997: 

Published the same year as our book, this one also covers the wetscrape method, but focused on bucking, which is using alkali to soak the hide instead of water.  It is the best, if not only, book reference for that technique.  There is also a companion DVD.


lotta tanning.jpg

Traditional Tanning Leather and Furskin, Lotta Rahme, 2014:

This would probably be my number one recommendation of a book on general tanning covering a lot of ground and many methods.  It has lots of anecdotes and tidbits on traditional tanning from various parts of the world, and good basic information on tanning chemistry and theory.  If a person were interested in braintanning primarily, they should get a book on that subject.  This may be currently the best single book reference for vegetable (bark) tanning.  Lotta is an experienced, small production tanner, with her own micro-tannery, so she has real insight, skill and knowledge to offer.


61V66pz-kLL._SY344_BO1,204,203,200_QL70_.jpg

Fish Leather Tanning and Sewing, Lotta Rahme, 2006: 

Lotta's cool book on tanning fish skins.  This is a popular subject.  I keep hearing about and seeing more and more fish leather. Much of the information is also contained in her general leather tanning book, but there is also a lot of information specific to fish skin and various species of fish, though they seem largely to be species from her part of the world, Sweden.


Screen Shot 2018-02-18 at 7.09.20 AM.png
jim riggs .jpg

Blue Mountain Buckskin, Jim Riggs: 

My teacher and teacher of my teacher Jim Riggs.  Jim was largely responsible for disseminating braintanning knowledge, having learned from his teacher Buckskin Slim Scheafer, who's book is below.  This is the best all around reference on dry scrape braintanning.  Fun, thorough and insightful.  #1 recommendation for a book on dry scrape braintanning.

Jim died last year.  He was friend and mentor many and had a profound and enduring effect on the primitive skills movement.  Many people's live took radically different directions because of either contact with Jim, or with others infected with his knowledge and philosophy.  My buckskin book contains much of Jim and would not exist without him.  Blue Mountain Buckskin is an enduring slice of Jim in the best way.

Tribute page for Jim Riggs: https://www.facebook.com/pg/jimriggsmemories/community/


Melvin_Beattie_Skinning.jpg

The Tanning Spirit video, Melvin Beatty, click here to watch:

Mel is one of the best tanners I know to this day and has always produced the best quality wetscrape buckskin.  His tips helped me get to producing better wetscrape buckskin.  You can watch his video on the subject on youtube now.

Also visit mel at the following.  He posts tips and experience on braintanning at his facebook page.

www.Braintanbuckskin.com

And Facebook as BraintanBuckskin


Screen Shot 2018-02-18 at 4.11.12 PM.png

The Indian Art of Tanning Buckskin
"Buckskin Slim" Schaefer, 1973

Jim Rigg's teacher Slim wrote this book at Jim's urging.  It was published the same year as Larry Belitz' book, Brain Tanning the Sioux Way, those being the first two books specific to braintanning that I know of.  This book is out of print, but they show up on ebay and elsewhere now and again at not unreasonable prices.


belitz.png

Brain Tanning the Sioux Way, Larry Belitz:

This is a small book and lacking somewhat in detail. There is enough information to learn the process, but it will be more trial and error than when using a more in depth book.  I think a lot of braintanners in the 70's and early 80's probably learned at least partly from this book.


9780941531009-us.jpg

Making the Attikamek Snowshoe, Henri Vaillancourt:

Available on the Author's website, this book is fantastic.  It is exactly what it should be, a detailed documentation of a traditional art, with as much important detail as possible, recorded in quality images and insightful text.  Henri is part anthropologist and part craftsman, which is how it should be, but almost never is.  The section on hide working outlines interesting traditional methods common to moose country for tanning skins and producing rawhide, both very important skills in that part of the world.


8490.jpg

Home Tanning and Leather Making Guide, A.B. Farnham:

This guide has some useful information, but leaves something to be desired as a stand alone guide to tanning.  It is still one of the better references for vegetable tanning and well worth taking advantage of, all the more so, because it is out of copyright and can be download from tanning book collection


Hardings_Pleasure_and_Profit_Books_Home_Manufacture_of_Furs_and_Skins_10__30838.1450192916.386.513.jpg

Home manufacture of Furs and Skins, A.B. Farnham, no date: 

A useful book when it comes to handling and dressing furs.  Available as a free download from tanning book collection


61pSFtkB0AL._SX325_BO1,204,203,200_.jpg

Home Tanning of Leather and Small Fur Skins, USDA, 1923:

Of limited use due to lack of detail, but worth reading.  Download from tanning book collection.


295352._UY475_SS475_.jpg

Primitive Wilderness Living and Survival Skills, John and Gerry McPherson, 1993:

This book contains John McPherson's small book on braintanning by the dry scrape method.  It is a competent and useful guide to that subject, and also contains lots of other great stuff on primitive living skills of all kinds.  A good and useful book worth the price of admission from some old friends back in the day.


Aboriginal Skin Dressing in Western North America, Arden Ross King, 1938: 

This book is unobtanium, and likely only available in a few large university libraries.


The art of leather manufacture, Alexander Watt, 1885:

One of the better old books on tanning, although the only digital version I could find is the later 1906 version.  Available to download from the tanning book collection.  Much of the better part may be derived from the De LA LANDE translation below, which is more recommended.


The Art of Tanning and of Currying Leather... Collected From the French of monsieure De La Lande and others, 1773:

or download in my tanning book collection here

Maybe the best all around old resource I've found, introduced to me by friend and tanning colleague Jason Leininger.  Unusually well written and exhaustive for that time period.  Anyone who reads french should go to the original text, as no doubt things are changed, left out, or lost in translation.


51ATZS12P7L._SX327_BO1,204,203,200_-1.jpg

Dictionary of Leather-Working Tools, Circa 1700-1950 R.A. Salaman,1986:

Another book primarily for the enthusiast, tool maker and researcher.  A jillion variations on leather working tools as well as some tools of the tanner and currier.  Helpful in identifying old leather working and tanning tools.


71ABI1d95uL.jpg

Secrets of Eskimo Skin Sewing, Edna Wilder, 1976:

Traditional patterns and techniques from the source.


glue book, dawidowsky.jpg

Glue, Gelatin, Isinglass, Cements and Pastes, Dawidowsky & Brannt, 1905: 

This is the book I learned most of what I know about glue making from.  It is a technical manual for manufacturers from the intersection of tradition and science at a time when hide glue was still king.  Dowload free from Glue Books Collection


41ZLXqzsHzL._SX276_BO1,204,203,200_.jpg

The American Indian Parfleche a Tradition of Abstract Painting, Gaylord Torrence, 1994:

An art book, packed full of art-speak.  There is some interesting history, and the small amount of functional detail it does contain helped me figure the process out eventually.  The photos are excellent.  This is a beautiful and unique practical art form that originally combined a functionality tailor fit to a singular lifestyle with expressive art.  Very neat book.


Axe Cordwood Challenge 2018 is On, Rules and Stuff

The Axe Cordwood Challenge for 2018 Kicks off today, Jan 1st 2018, through Sept. 1st 2018.  Here is the official video.  Also, below is the "must watch" playlist of videos for the cordwood challenge, which I hope to add to in the coming months.  Stay safe and have fun.

Penetration, Saturation and Coating, 3 Main Factors in Oiling Wooden Axe and Tool Handles

P1020374.JPG

Over the years I keep evolving and refining my methods and understanding of the process of oiling tool handles.  Although it is painfully simple, the obvious is not always so obvious.  I've been soaking my handles pretty deeply with oil for a long time, but still have had something of a fixation on coating them with a protective coat.  Until, I realized that a well saturated handle is it's own finish, and more.

a Coating ona a handle is a barrier between the wood and the environment.  But does it achieve that goal well, and what is the goal anyway?  The goal is to protect the handle from environmental changes in moisture basically.  Moisture swells the wood, and when it leaves, the wood shrinks.  When wood shrinks, it is stressed and those stressed can lead to cracks.   For some reason cracks seem more likely to form if the wood swells and shrinks repeatedly.  If the wood swells within the eye of a tool, the wood compresses against the hard metal of the eye walls, becoming crushed.  When it shrinks on drying again, it many shrink smaller, than it was before it expanded.  That is why soaking the eye of a tool in water when it is loose will eventually make it even looser.  A good thick coating of cured linseed oil can help prevent the entry of moisture, and anytime oil is used on a handle, some of it soaks into the wood to some depth, bringing in the factor of penetration, which must help some.  A coating is basically still very thin though and will wear off over time.  These are handles remember,  They are essentially rubbed over and over again.  And although some penetration is always occurring, the questions to ask is how much good is penetration when it is shallow and of a low saturation.

Enter Saturation.  Saturation if you look it up, basically means full or at maximum capacity.  But it is commonly used with a quantifier or clarification like partially, mostly, completely.  If I soak a handle numerous times with linseed oil, it will penetrate to a certain depth, but unless it is applied regularly and in quantity, it will have a very low saturation as the oil spreads itself out deep into the wood structure.  Eventually, it either reaches the middle or some unknown depth and starts to increase it's saturation eventually filling the wood to the point that no more will soak in.  This 2 minute video shows the process I pretty much use now.  If you get tired of adding expensive oil to a handle, try stopping for a month to let the oil in the handle cure and penetration should slow down.  Some handles will take a lot of oil.  Fortunately, oil is light.

Now if we think about a handle that is fully saturated with oil, for even 1/8 of an inch deep, let alone more, we now have something like the equivalent of a 1/8 inch coating.  But even more cool, it is actually protecting the wood itself by filling the pores and structures that water would fill.  If you leave such a handle out in the weather, water droplets just bead up on it and sit there.  Not recommended, they aren't necessarily immune to moisture, but it's telling.

droplets on a well saturated knife handle.  Two hours later they were still there, though smaller, but I have little doubt that at least the majority of missing water left be way of evaporation and not penetration.  That is a test better d…

droplets on a well saturated knife handle.  Two hours later they were still there, though smaller, but I have little doubt that at least the majority of missing water left be way of evaporation and not penetration.  That is a test better done in high humidity, not on a warm breezy morning.  This handle has probably not been oiled since it was originally treated 2 or 3 years ago.  After all, the treatment cannot wear off.

Try it on a handle and see what you think.  It is a long process and the oil is not always cheap.  many tools are also not subjected to much in the way of atmospheric changes, so it's not something we have to use everywhere.  I'm pretty sold on it though and any axe that I plan to keep and use gets the full treatment now.  Dudley cook recommends the same basically, but he maintains with an occasional coat, which I think is unnecessary if the wood on the outside of the handle is well saturated.  The wood essentially becomes it's own finish.  If the wood will ever take oil on and soak it up, do it, but it it doesn't, there is no need to keep coating it. 

I use food grade linseed oil (usually labeled as flax oil, which is the same thing) anymore and have found ways to pick it up cheap enough.  Boiled linseed oil is toxic and I think it probably dries too fast.  Prices change on amazon constantly, but this brand is usually about the cheapest, but do your own research.  I've also found flax oil at the local cheap food outlet where they send overstock and expiring stuff.  Other oils can be used as well, walnut, hemp, poppyseed and tung oil should be adequate, but I really haven't used any of them enough to say for sure.

For handles that you don't need to saturate, I recommend a thin coat of oil once or twice a year, or better, just whenever you have an oily linseed rag.  Raw linseed oil will cure, it just takes longer.  So called "boiled linseed oil" contains metallic driers and solvents that speed curing time.

I have more ideas and experiments brewing around this problem, and no doubt you'll hear more about it in the future.

Winnowing Seeds for the Bulgarian Giant Leek Seed Saving Project

Leek seed cleaning 111.jpg

Seed saving requires seed cleaning.  In this video I use simple methods to clean the leek seeds from the Bulgarian Giant Leek seed saving project.  Without the use of fans, and without any breeze, seeds can be winnowed and "sifted" on flat tightly woven baskets.  The seeds will be ready in 2 or 3 weeks after final drying, germination testing and packaging.

Some Slightly Ranty Advice on Expensive Boutique Axes

My main points in this video.  Expensive axes do not carry super powers and will not be greatly more effective than an inexpensive axe of reasonable quality.  Quality can matter up to a point, but an axe which does not have the best edge retention or strength is often suitable enough.  Beginners should not be seduced into buying expensive axes.  It is better to start with an inexpensive axe and beat it up, break some handles and generally learn one's way around them.  That kind of use and experience can build experience for making a larger purchase as some point.  One might find that after using some inexpensive axes and vintage axes, that they don't really want to buy any, and may be perfectly happy with vintage heads.  A lot of axe purchases are for collecting's sake alone, or maybe retail therapy or over accessorizing.  The problem is that beginners often won't know what is and isn't important and can be easily up-sold to higher cost axes on selling points that are probably not going to matter that much to them if they are even true in the first place.  Expensive axes are worth a lot and will be devalued by the clumsy use they will often see in amateur hands.  Don't learn to drive in an expensive sports car.

Bottom line, get a cheap axe and use it a lot.  Mess it up, play with modifying it, break handles, learn to sharpen, then see if you want to spend money on fancy axes.  Best case scenario, get a cheap or free axe with a handle.  Next best, get a cheap or free used head and make or buy a handle.  Third best, buy a budget line axe, like the council boys axe and hope that you get a good handle and head.

Finishing the Oak Bark Tanned Deer Leather

Cute and practical, just how I like 'em!

Cute and practical, just how I like 'em!

Last winter I started a project oak bark tanning a deer skin to make leather for the axe strop project.  The project follows the collecting and processing of materials to build pocket sized sharpening strops as prizes for people who completed the Axe Cordwood Challenge.  I'm making everything I need for the strops and decided to show the whole tanning process and everything else in a series of videos.  Almost 6 months ago, I laid the prepared skin away to tan in oak bark.  It sat in there about 4 months longer than it needed to, but I took it out and finished it this week, and it looks like it turned out pretty decent.

The leather is perhaps a little light and spongy, "Empty", as they say in the tanning trade.  Emptiness results from the loss of structural proteins in the skin by chemical or bacterial action.  It isn't much of a surprise considering that I over-limed it to start with, and that it sat in a weak vegetable tanning (plant based) solution for 4 months longer than it needed to.  Those are actually the type of things that a tanner might do on purpose to a hide in order to make the finished leather soft and pliable.  That's not what I was planning though.  I would prefer a rather firm and weighty leather for this project, but that is not even the nature of deer to start with.  Deer skin, at least our deer skin here in the Western U.S. has an open, coarse-fibered, low density character that lends itself well to softened leathers.  It would have been better to move it through the process faster with shorter liming time.  But, a process that uses somewhat preservative solutions like lime and tannin, begs for procrastination.  Add that I have to make videos of it all and it's a perfect storm for not getting things done in a timely manner.  It will probably work fine for the project, but I haven't assessed it closely yet.  If it doesn't work out, I have plenty of other skins I've tanned over the years that are suitable and I got to show the process start to finish, with some of the warts and mistakes that any home tanner is likely to experience.

The next steps will be making the wooden paddles, making glue and putting it all together into the finished product.  I only need a small amount of leather for the project.  Seven brave and industrious individuals chopped one cord or more of firewood for the cordwood challenge using axes only and will receive a finished strop and a leather patch when they are made.  The balance of the leather will be stowed away with the rest of my leather cache, to wait for a suitable project.

A Tale of Three Watering Cans and a Hose Recommendation

I got two videos on watering for ya today.  One is about three quality built watering cans and watering can design.  The other one is recommending the Sears Craftsman rubber hoses on sale now and seemingly every spring at 20.00 for 50 feet.  My friend Mark Albert recommended them saying they are good for 30 years (also confirmed by a youtube viewer).  I've been using them for a few years and plan to keep buying them.   I haven't met a plastic hose that will last yet and If there is one I'll bet it's not this cheap.  If they aren't on sale in the actual store, you can ask for the online price with free delivery and they'll let you walk out with them for 19.99 each.  That's all you really need to know, so you don't even have to watch the video!

Splitting Axe Cut Wood With a Sharp Felling Axe, Safety and Effectiveness

The first video is a short trailer or propaganda piece to promote the second video.  Below are a few non-technical points I wanted to elaborate on.

I just have a few points I want to emphasize or elaborate on.  I made this video in response to a lot of questions from people about how to deal with wood that is bucked with an axe, since it can't be set on end, or on a block.  Also, because of how I'm operating with one axe, I assumed that it would be a small short axe and that it was intended to retain the edge in chopping condition.  That wasn't so much a plan as it was just how it turned out since that's my world right now.  It is not the only way to approach it.  You could, and most probably do, have a dedicated splitting axe, or maybe a splitting edge on one side of a double bitted axe that can taste a little dirt here and there without much worry, especially if it's ground with a fat bevel that is less likely to suffer severe damage than a thinly ground edge.  A longer heavier axe with a fatter grind is great, as is not having to baby it.  However, using a small, short axe and keeping it sharp requires one to refine technique and strategy, and I think that is a good thing.  I'm also very interested in making whatever tool I have work, and in processing wood with one axe.  You'll hardly find anyone out there recommending an axe ground for felling, limbing and bucking as a splitting axe.  Probably the opposite in fact.

One of the important points in this video is that it requires some investment to figure out what is possible.  Many will discount the possibility of using axes, but not always out of experience, but rather assumption.  I've been guilty of this to an extent myself and it's a mistake.  I personally think that it's worth some investment to figure out what is possible and where an axe is more advantageous than a maul.  I really like splitting with a maul and with some of the stuff I have to split, like dry hardwoods with knots and forks, I'm not likely to ditch my maul altogether.  But, I will keep pushing my limits with axes of various kinds to find out what those limits really are. 

It is not enough to just just smack a few rounds with an axe to see if anything falls off.  It takes some investment in yourself to develop good technique and at least a basic understanding of strategy as presented in these videos.  The flick technique, as Buckin' Billy Ray Smith calls it, or the twist as the Vido's call it, is essential to develop for splitting anything difficult with an axe.  It is just a way to use the power generated in the swing to good mechanical advantage by prying the wood apart on impact instead of just wedging it apart with the shape of the axe.  It can make up for the lower mass of an axe head v.s. a maul in some cases.  I believe that Tom Clark, inventor of the buster axe, an axe optimized for this technique, actually hit the wood with the head tilted at a slight angle.  I think I twist it on impact, but it's hard to know for sure without a slow mo study.  Either way, you'll develop a feel for what works.  It is a skill that has to be learned by some time spent as it's rather clumsy at first to get the timing right. If you have a very sharp short handled axe that you are trying to stay out of the way of, which often requires somewhat awkward positioning, and on top of all that are trying to hit the center of a knotty piece of wood within a quarter inch, you can imagine that some time will have to be put in to gain a reasonable level of skill.  The catch 22 is that it's only by gaining a certain level of proficiency that we can find out what is really possible and not.

The flick technique can be used as an alternative to generating velocity in splitting at times, but should not be thought of as a permanent stand in for it.  The ability to generate a high velocity is a critical tool to have and will only complement that sideways torque when both are needed.  I didn't go much into it, but will in the future.  From my observation and experience so far, high velocity is primarily created by the axe head scribing an arc around a relatively fixed, or at least more fixed, point, like the wrists, elbows, shoulders, waist, or a complex combination of all of those.  it is a complex topic.  With the target at a certain height, it becomes less possible to generate velocity, and the higher you go from there, the harder it gets.  That is one reason I don't use splitting blocks much.  Working close to the ground has the advantage that it is easier to generate velocity, because you have more distance in the swing and can use body mechanics to better advantage.

For me, doing the axe cordwood challenge, in the way I approach it, has been perfect for developing these skills.  I stick pretty much with the axe I'm chopping with, which for now is always small and sharp, and I split in the field with no blocks or contrivances of any kind.  I can only remember abandoning two, maybe three, pieces of wood that were just really knotty or more likely forked.  Even those could likely be split with enough energy, but I know when not to beat my head against a wall for a peanut.  I'm glad that I've invested in this skill, because it will ultimately increase my splitting efficiency in all arenas.  I now have a pretty good idea of what I can get away with and am further refining and defining when an axe will be more advantageous than a maul in splitting sawn rounds as well.  For what it's worth, these videos at least show some possibility that can be put to use or invested in later.  It's not for everyone, and not for every situation, and possibly not for every species, but in the right circumstances it is remarkably efficient and satisfying.  I can say, that just splitting what I incidentally have to cut here, which is Madrone, Bay, Fir, Tan oak and Black oak, that none of those species are consistently difficult to split when young trees are cut and split green.  Older Madrone and Bay can develop some wicked cross grain, but a person is not likely to be cutting those for firewood with an axe, and if they were, large trunks would have to be split, probably with wedges, before bucking, not after. 

The axe and the technique of using it with good strategy are just another set of tools in the bag to be applied where they are best suited, or when necessary.  But, again, it is a tool that has to be developed and refined to be appreciated and applied to anything but the most easily split woods.  I'm glad I've put in some time and forced my progress by using axes that are not ideal for the job and I get to reap the rewards of that from here out.

Did I mention that it's fun?  It's really fun :D

What to Do With Those Axe Cut Woodchips? The Burning Question

One of the most common questions, if not the most common question on my axe related content is some combination of what do you do with the chips, aren't they wasteful compared to a saw and wouldn't it be better to just use a saw.  The video below is about that and what we can do with the chips which are quite useful for anyone with a garden or who burns wood.  Below that are some further thoughts not really covered in this video.

What I covered in that video was, in short, yes there are a lot of wood chips produced when processing wood with an axe.  This tree was probably 9 inches in diameter and I estimated about two good firewood logs worth of chips were produced.  It takes under 5 minutes to pick up 80% or more, in this case 3.5 minutes.  I talked about what you can use them for, like biochar, mushroom growing and fuel, and how whether it is viewed as wasteful or not is a matter of context.  What I didn't really talk about is why some of us use axes and not saws for hand processing firewood. 

I didn't talk about that, because I more or less just forgot to!  I think that in my head it would be self evident that not I, nor anyone else, is using an axe because it is the quickest and most efficient method of firewood production.  I like saws.  I like my chainsaw.  I'll be using my chainsaw a lot for processing wood this year, not because I need the wood, but because I need to deal with a lot of sick trees that will soon be a fire hazard and which represent a short term opportunity to gather some resources that will soon be unavailable.

But, when I set out to do the cordwood challenge myself the previous season, challenging myself to cut a cord of wood in 3 months, I was slightly wary.  Before committing I think I went and cut up a small tree or two just to be sure I should be announcing to the entire internet that I was going to go for it.  Aside from potential personal limitations though, I knew I could do it, because people used to do it.  Dudley cook said in The Axe Book, that a good axeman could put up 2 cords a day!  I knew the cord he was talking about had to be in at least 24 inch lengths, and not the 16 inch stove lengths I was cutting.  More probably it was cut into between 32 and 48 inch lengths for industrial use, transportation in bulk and most probably very wide fireplaces.  Charcoal makers would cut wood even longer to make large stacks of wood.  Still, do the math.  I'm cutting about 3 times as much to get my 16 inch logs as a guy cutting 32 inchers, but even the slowish guy could probably put that up in just 3 days of average work!

Well, that is interesting to think about, but it doesn't prove anything to me for real or gain me a lot of real insight.  To gain knowledge it is required of us to take information and do more than absorb it, more than mull over it and make assumptions and inferences.  For me that process looks more like taking in information, contemplating it, putting it into practice, maybe getting more information, more experience, more contemplation etc.  At some point, something resembling truths begin to gel out of that process.  In short, I knew that to gain real insight into the problem of axe work and what it's potentials and limitations really were, I had to put it into practice for reals.  Not only that, but I actually had to improve my own skills to a certain level before I could really understand what that potential was and where an axe may be more or less useful than a saw.  Give an unskilled person an axe and a hand saw and tell them to limb this same tree and they are likely to conclude that the saw is easier and faster.  But no matter how good they get with that saw, I'll have the same tree limbed up more quickly, with much less physical effort and many of by knots will be trimmed more closely than theirs.

I'll also have way more fun doing it!  Axe work is engaging, exciting, focusing, cultivates coordination and provides a diverse form of exercise.  Sawing by comparison is dull and tedious work and the best you can do is trade off one side for the other.  I like sawing up to a point.  It is good honest contemplative work.  It is also skilled work and a good hand with a saw will out saw a newb every time.  But it is only so skilled and lacks the special combination of things that makes axe work really engaging and fun.  Saws have their place as do axes.  But the place an axe has in any one particular persons hands is informed by that persons skill level and understanding of it's efficient use, and that requisite skill is only gained by extended use, and not by dabbling at the thing.

All of which is to point out that, while my use of an axe on that fir tree in these last couple of videos did result in two fewer logs worth of large firewood, rather than smaller chips, such is simply part of the cost of admission into that understanding of what is and is not possible with an axe and what place it does or doesn't have in our tree work.  It's a rather small price it is to pay when they are easy to pick up and decidedly very useful as fuel or for other purposes.

And repeat thousands of times :)

And repeat thousands of times :)