The mostly finished mug's virgin voyage.
The video for this post is the visually interesting short version. I think it turned out really neat and hopefully entertaining, while still giving a glimpse of possibilities. But it is not intended to be instructional or detailed beyond offering crucial supportive visual information for this post. This written version on the other hand will be fairly long and rather utilitarian. It is far from exhaustive, but basically written for people out there who actually want to do this, but who hopefully have some experience with the things involved or can learn some of the necessary skills involved on their own. So, watch the video first and if you are sufficiently intrigued, you can read more.
I am somewhat fascinated with the idea of leather cups and bottles. There was a time when leather mugs, pitchers and bottles or flasks of various kinds were rather common in Europe. There is not a whole lot known about how they were all made, but there are some clues and the mystery just makes it more enticing to me.
The black jack was something of an English icon, and the use of leather mugs persisted beyond what seems reasonable from a practical perspective. I think so anyway, maybe not. Now that I’ve made one, I can say it is rather pleasant to drink from and seems pretty durable. It’s probably not going to shatter if some drunk drops it on the floor, slams it on the table too hard at the end of a draught or uses it to keep time with a drinking song, or all three! Or what if there’s like some really buxom barmaid with her mammaries threatening to breach her corset carrying a huge tray stacked with a pyramid of Bombards and black jacks and some red nosed drunkard spanks her butt as she’s walking by causing the whole arrangement to be scattered asunder, filling her cleavage with delicious foamy beer? Maybe I’ve seen too many movies, but I think that shit could’ve happened on a regular basis! My friend also just pointed out that they are probably a pretty good travel mug, light and not too fragile. BTW, the first person I showed it to promptly dropped it on the floor, no harm done. I'm just glad it wasn't full of precious beer!
Old leather vessels: Black jack with silver rim, bombards (pitchers) and a leather bottle from John Waterer'sbook Leather and Craftsmanship
I did what research I could and found a couple of useful things. Wayne Robinson uses a frame for stretching, but I simplified that into two boards, which seems to work fine and is much simpler. I’m glad I ran into his page on black jacks and got that basic concept, because I had no clue how I would stretch the leather on the form. His quotes and notes were also very useful.
Then I found Rex Lingwood and his article on working boiled or cooked leather. He is a very experienced leather artist who hardens and shapes leather by cooking it. What he does with leather is impressive and not at all expected. I watched his demonstration on youtube and that was really the key to my relative success with this project. I’d like to thank him for putting information out there for other people to take up and run with. Thanks! Here is Rex’s article on Cuir Bouilli, "boiled" leather, also very helpful.
Leather vessel by Rex Lingwood
We do know that black jacks were made of vegetable tanned leather, that is leather tanned with tannic acid from plant sources like oak bark and many others. I also think they were baked or boiled to harden them. They were definitely coated on the inside with some sort of natural waterproofing, most references seem to say it was pitch.
It is the actual process of manufacture that is least well known. I think it is a safe assumption that basic shaping was done before the sewing. I also feel pretty sure that all sewing was done before any hardening. The outside was probably treated with linseed oil and soot, though it may be somewhat more complicated than that.
I decided to shape the wet leather on a form, shape the base separately, dry the parts completely on the forms, then sew it all up, re-wet the whole mug, cook it, re-dry it, seal it with pitch on the inside, and then paint the outside with layers of linseed oil mixed with lampblack. What I didn’t know till toward the end was how I would keep it from deforming in the cooking phase, but we’ll get to that presently.
THE LEATHER
I used some bull leather that I had tanned a few years ago with oak bark. I would not recommend using any commercial leather unless the company is absolutely clear that there are no chemicals or metal salts used in processing at all. I’m not just talking about not using chemicals to tan the hide. They may be used in other parts of the process too, I think particularly in dressing the skin with oils which may contain solvents for better penetration, such as neatsfoot oil compound. I’m not sure what is available out there for truly natural, traditional leather, but it is certainly not much.
I used the neck section, which has a loose fiber and is probably not the best choice. But, I didn’t want to risk the best leathers that I’ve tanned in this first run. I had pounded the leather previously and was wondering if any of the black jack leathers were pounded either on forms, or before forming. I didn’t know, but it seemed like a really good idea to use the pounded stuff. Pounding leather while it is damp compresses it greatly. It might end up half as thick and that means twice as dense. Pounded leather is really cool and something I just started playing with recently after reading things like this quote from an old translation from french:
“This dressing is of great service to the hide, and there is a considerable difference between the goodness of a hide well beaten, and that which has not been beaten; shoemakers who value themselves on the goodness of their work, beat their soles strongly and for a considerable time.” The Art of Tanning and of Currying and Leather Dressing 1773
Pounded leather with stone sleeker and ironwood mallet. The bit on the lower left is the same as the upper piece, but unpounded.
So I used the pounded section and pounded the base piece as well, though not as thoroughly due to time constraints. More from me on pounding leather in the future, but the short version is that it is awesome. Use a heavy and very smooth faced mallet with rounded edges to beat the skin when it is in a slightly damp state, or on and off as it dries.
My leather also varied in thickness. Commercial leather is often split down to an even thickness. That is harder for me to do here and I didn’t have time to get it together and shave it down which is a sizeable project in itself. Parts of the rim turned out a bit thinner than the rest and it tends to deform a slightly, but it’s not a big deal, and especially not for this first run.
FORMS AND CLAMPS
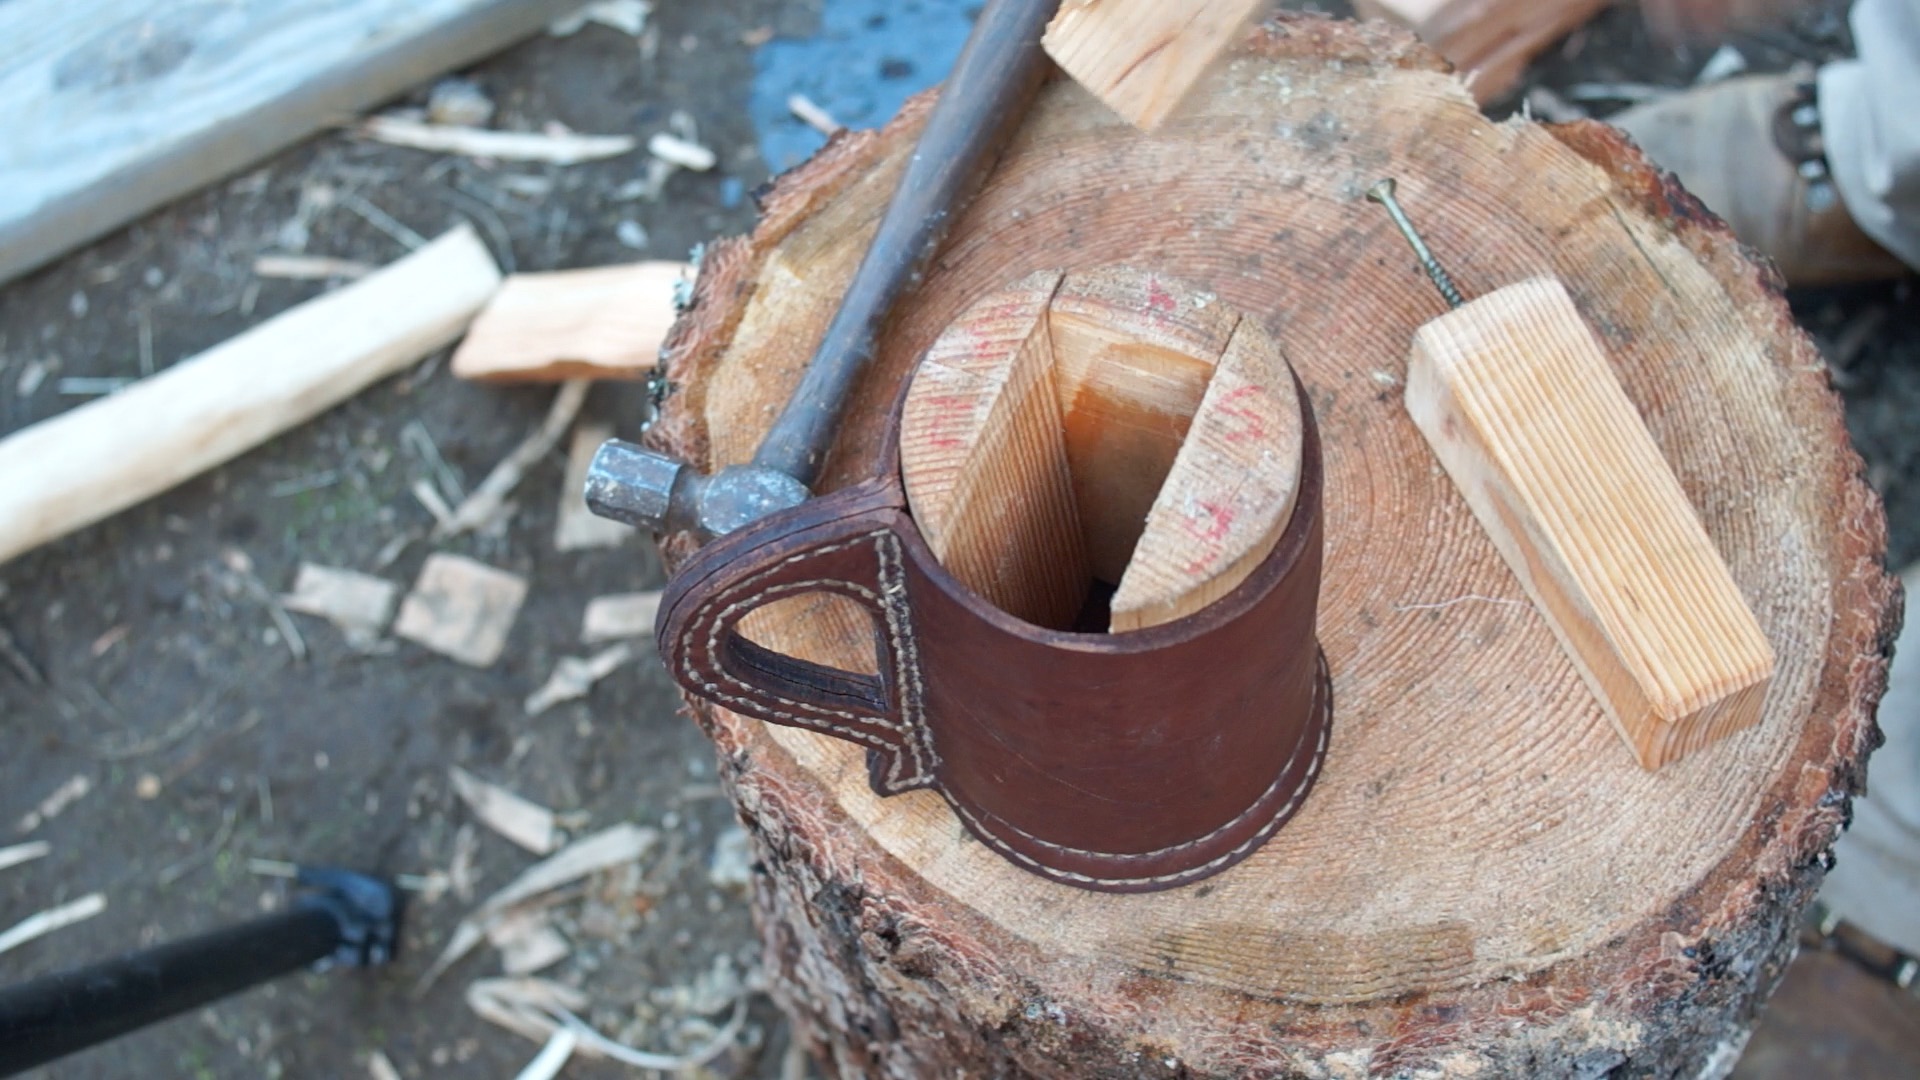
I had some nice fine straight, close grained fir lying about the yard that I used to make all the forms. It was so nice that I was compelled to make the two clamping pieces from it instead of using scraps of 2x4 which would have worked fine. The fir turned well enough on my lathe after roughing out with a hatchet. I needed three pieces. One for the main body, one for the bottom and a third to use as a form to shape a metal ring. The ring is used in conjunction with the bottom mold piece to stretch the leather into shape and hold it while it dries.
Raw material roughed out to put on the lathe.
The forms bottom and accompanying ring, and the main form before I cut it all up.
The metal work was a bit of a diversion. I had to find a piece of metal and set up a forge. Setting up the forge was possibly the easiest part of that. I cut a piece of metal tubing that was a little small, turned a piece on the lathe to form it on, set up a forge, grabbed some charcoal from a charcoal trench that I hadn’t emptied from last spring, heated the metal tubing, hammered it wider till it would start to fit over the form, heated it up nice and evenly hot and pounded it over the form to shape it. Just in case it might want to warp, I cooled it on the form by quenching it in water so it would shrink down to the shape of the wood. It went very smoothly all in all and could have taken a lot longer. Back when these vessels were common they didn't have scrap piles with pieces of welded tubing sitting about. A smith would more likely start with a piece of iron nothing close to the needed shape, beat it out into something they could use, weld it into a ring in the forge and then do what I did. Not a difficult job for any smith, but more time consuming.
The metal ring form, post mortem
The body was turned with a flared base. I like that look a lot and might even consider making the flare more pronounced in the future, though now that it is finished, and shrunken slightly, the flare is more pronounced. As soon as the pieces were turned I oiled them up with some old lard that was sitting about to help slow or stop any checking (cracking) of the wood as it dried, being especially generous applying it to the end grain. It was splattering me with moisture on the lathe, so it really was quite wet.
The clamps were hewn out of the split fir slabs with a single beveled hewing hatchet, and briefly planed smooth on the faces that would be next to the leather. Pretty smooth anyway. Then they were notched to accommodate the flare at the base of the form. The edge that would be pinching the leather was slightly rounded. That is one place where a 2x4 may not be so great since the edges are probably usually too strongly rounded as they come from the mill.
The clamp boards and the main body form. Note the notch cut out for the flared base. Very simple, but not wanting for effectiveness with a couple of good clamps.
I soaked the leather in warm water till it was completely wet through. some of the work of pounding was reversed in soaking because the skin swells in thickness with water, but I’m sure that work of pounding was not all lost. After a warm water soak, the thoroughly wetted leather was stretched on the forms using the stretching clamp boards and some nails. I had to pull the nails once and re-pound them differently to stretch it tighter. I just used a couple of clamps to tighten it down I wish I had pulled the nails and redone them one more time to stretch the leather even tighter around the body form, but it turned out fine. A welt (an extra piece of leather) was sandwiched between the two outside handle layers to increase the handle thickness.
That metal ring for the base was very hard to pound on over the thick leather. I lubed it up with some olive oil though and it went on eventually with much pounding. With everything pounded and clamped together, I cranked up the woodstove, hung the pieces to dry overnight right next to the hot stove, and went to bed!
STITCHING
In the morning I took it all apart and trimmed the pieces close to where I wanted them. To insure the pieces wouldn’t shift on me during sewing, I ended up glueing on the base to hold it during sewing and I also glued the three handle flaps together for the same reason. I put in a couple of temporary stitches at the top and bottom to hold it all while I got the first seam finished. I used hide glue, which is water soluble, but again, only temporary. I think I made this hide glue from pieces of this same skin. I ended up using that batch of glue a couple more times during this project. More on hide glue here.
Hide Glue Pieces
I have actually done very little of this type of stitching, so I was worried I would be lame at it. The first seam, had to be the one closest to the body. I have a stitch marking tool, which is a little wheel that marks dots on the leather so you can make even stitches. They are great. It seemed like the stitches it marked were a little far apart though, so I doubled them by marking stitches in between resulting in a hole about every 1/8 inch. That didn’t go too well. With the large thread, awl and needle sizes I was using, it just turned out pretty rough looking no matter how careful I was. The rest of the stitches are not all perfect, but I’m satisfied. I still think this stitch wheel is a little wide for this project at 1/4 inch wide, and would guess that 3/16 inch spacing might be closer to ideal. But it worked fine and the liquid proof nature of a black jack is not from tight stitches, it’s from the pitch coating.
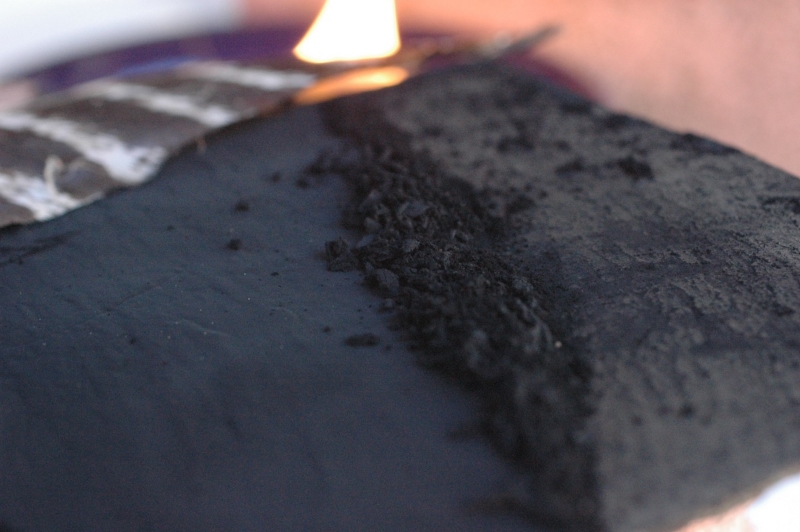
The stitches up against body in the first seam were definitely too close at 1/8 inch. The look sloppier and cut into the leather easily. 1/4 inch maybe a little bit long, but workable and they look much better. The mug still have a brown look now, but it will eventually be dead black as the layers build up.
I got to make a new awl for this project. I make awls to sell that are basically designed for sewing buckskin. They are stubby though and a longer handle is better suited to this type of sewing. Mostly, I had to get that first row of stitches very close to the body, so I knew I'd need a long skinny handle. I turned the new, longer handle out of some native oak on my lathe and wrapped the tip with sinew to keep it from splitting. Hide glue was used to paint the area before wrapping and several times after wrapping with time left to dry in between. After alternate sanding and re-coating with glue several times I put on a final glaze of glue, it is clean looking and very tough. As long as it stays dry it should perform admirably. Most leather sewing awls for this sort of thing are shaped like a diamond I think or maybe a triangle. Anyway, they are faceted so that they cut the leather as they go through rather than just stretch open a hole by parting the fibers like my round awl bits do. I thought I would compromise and make it faceted at the tip, but basically the same long tapered shape. I would say it worked pretty good, and honestly, as long you can get the job done with reasonable effort, the less cutting of fibers that happens in leather sewing the better. So, whether the facets I ground into the tip did anything or not, the awl worked well.
New awl
Sinew wrapping. Some may understandably doubt the ability of this wrapping to keep the wood from splitting, but after shooting blunt practice arrows wrapped like this into stumps, rocks and dirt over and over again, I have no doubts at all.
This stitch uses one long thread and two needles. The needles are passed through the same hole, from opposite sides, first one then the other. The stitch lines were marked carefully with dividers and a stitching wheel to offer the best opportunity for keeping the stitches even and straight.
Normally this type of stitching is done in a simple wooden vice. I have long wanted to make such a vice, but I decided that the cup’s shape was probably too awkward for the vice to be of much use anyway. Without a vice, the stitching was extra slow. It took about 1 minute per stitch at the very best, but that is after I got into the swing of it and not including problems or set up time, so two minutes per stitch is probably closer. At a rough count of 198 stitches, 2 minutes is about 6.5 hours, which seems about right, if not low. The basic process was to cut the handle to shape with a sharp knife, use dividers to mark the stitch lines, and run the stitch-marking wheel down the line. This sewing method uses two needles and one long piece of linen thread. The thread passes from both sides through the same hole. I often needed pliers to pull it through. That’s good, I wanted tight stitches anyway. Once both threads are through, they are both pulled tight. To finish off, the threads are back tracked down the seam through several holes and then simply cut off flush.I was up sewing till 3:00 am on day two, but the cup was ready for the next stage in the morning.

COOKING, FORMING, DRYING
I spent a lot of time in the morning reviewing whatever information I could find and finally decided on a plan of attack. Watching Rex Lingwoods video helped me understand what I might be dealing with when the leather shrank in cooking. What I decided was to cut the form into several parts, in this case 7. The center piece would be tapered for easy removal. That meant I had to cut the base off of the original form and will have to turn a new one with the same size and flared base if I want to use any of the rest of the form in the future. I was torn between cooking the leather with the form in place or cooking and then stretching it back into shape. I decided to go with cooking in hot water and then putting the form back in. I soaked the mug and heated some water to 85º to 90º degrees celsius (185º to 195º F). I think I could have cooked it longer, but it seems to have turned out fine. Once the leather shrank quite a bit, I put the form pieces back in and drove them home. I was really thinking it probably wasn’t going to work, but it did. Whew!
I had to push the shrunken leather back up the form and in retrospect would have liked to have done that more. I just rounded the edge of a hardwood stick to do that. A clamp of some kind would have really helped. So, there it was. The form was back inside, though slightly smaller than it had been because the many saw cuts I made took away a little bit of the wood. That was okay with me. having a smaller form accentuated the flare at the base and made it easier to put the pieces back in. I had to dry it fast, so I left it right up close to the very hot woodstove with a fan blowing on it, turning it often.
The cup dried on the split form. The deer tail is incidental.
PITCHING THE INSIDE
While the leather was drying I started messing with pitch formulas. I thought the pitch should be slightly flexible. After trying many different mixes of pine pitch, rosin, beeswax and raw linseed oil, I ended up with a beeswax/pine pitch mix. Now it seems a little soft when it gets warm and I removed it to be replaced with a straight pitch coating. There is a difference between pitch and rosin. Rosin is hard at room temperature and is made by driving off the volatile components of pine pitch. Pine pitch is more gooey and sticky. Rosin can also happen naturally when pitch sits long enough that the turpentine evaporates naturally. I had pitch in all stages from fresh to rosin, but favored the stuff that was closest to rosin. I think a fairly hard coating is probably what is wanted. Something that is not at all sticky unless heated up, and these vessels are not used for hot liquids. Pitch loses the solvent portion when cooked in my experience, so just heating it and melting it enough to strain out bark, bugs and pine needles makes it more hard and brittle. I thought that the brittleness would cause the pitch to crack and flake off. The mug was a little flexible, but as soon as the pitch cooled inside it, it was quite stiff! I was surprised that the pitch offered so much to the structure of the mug, and now think stiff pitch will probably not flex enough to crack under normal use. In truth, I would think that they require some maintenance no matter what anyway. Since pitch is thermo setting, it can probably just be melted back together if cracked badly. Or it could just be cleaned out competely and re-coated.
I poured the molten boiled pitch with about 1/5 to 1/4 beeswax mixed in, sloshed it around and dumped it back out a few times. As the molten pitch cooled a little, it allowed me to get a thicker layer. I'm not sure what it ideal, that will be learned over time I guess.
PAINTING THE OUTSIDE
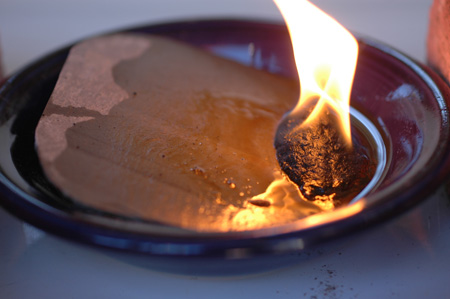
The lampblack for the outer painting was made with a simple oil lamp arrangement covered with a stone plate. You can read more about lampblack in this blog post. It’s cool stuff. The lamp black was mixed with linseed oil to paint the outside of the mug.
Simple arrangement for making lampblack. A simple oil lamp with a stone plate set over it.
Accumulated lampblack
There is something that you read about in old technical and formula books called Japaning. I imagine that term evolve from westerners trying to emulate the fine art of Japanese lacquer ware. So far as I can tell, it involves various process, most of which use linseed oil, resulting in a shiny enamel like finish. It was used on tea trays, cars and apparently on black jacks. It is hard to tell from pictures if all black jacks had that sort of gloss finish, but some certainly did. Linseed is a drying oil, which means that it cures over time by reacting with oxygen to form a sort of plastic-like film. Older recipes for this type of finish often call for Japan drier, which is a solution of toxic metals that speed the curing time of the oil, the same metals found in what is now sold as boiled linseed oil. I’m not going to use toxic metals on a food item, or probably on anything else, but there is a question I have not yet answered regarding whether the metals and other treatments of the oil, like heating it for a period of time in the absence of oxygen, just make it cure faster, or make it cure more thoroughly in the long run. I plan to test that eventually if possible. In the meantime, pure raw linseed oil, even the cold pressed food grade stuff from the health food store cures to the touch in a few warm days and seems fine for the things I use it for. I think I’m going to go as far as I can using just the raw linseed oil and lampblack for now. For a little more on linseed and other drying oils, see my video on oiling tool handles.
The goal is to eventually have a thick somewhat glossy outer finish. My basic process for painting the outside will probably be something like, paint on a thin layer, let it cure, then add another and so on. Maybe I can polish the outside once I build up and cure enough layers. The oil is best spread thin and allowed to cure. If it is thin, oxygen can reach it and it will cure faster than a thick layer will.
I put on two thick layers right off to get the oil to soak in as much as possible and a couple more the next day. I wanted to get the oil into the skin pretty far so that it would eventually stiffen inside the fiber structure and help harden the mug. I think I got quite a bit in there. The layers of oil applied will soak in for a while, then at some point one of the coatings will not soak in all the way because the surface has been saturated and sealed. This is the point at which you can start building up thin layers on the actual surface. At least that’s how it works with wood. This is new territory so we'll see.
Freshly coated
I put the mug near the open oven on low heat to drive the oil that was sitting on the surface into the leather. That melted the pitch coating most of which ran out, especially on the hot side, which was basically left with no coating at all. When I filled it, the mug leaked slightly where the pitch had drained away at the bottom seam. Otherwise it seemed to work fine and it was actually quite nice to drink out of. Boy that Racer 5 IPA tasted good after three days of frantic problem solving and work! There was no off taste as I suspected there might be. I don’t think I’d mind a little pine flavor in my beer anyway Pine is a common flavor component found in hops. Actually, I may not have detected it since I was drinking IPA. I missed the midnight deadline to enter the instructables leathercraft contest by 15 minutes waiting for my hastily patched together youtube video to finish uploading. It’s probably just as well, because it is pretty rough with missing footage, typos and clips out of order. The new video posted here is much better put together and contains footage missing from the first one.
Ye olde black jack bottom
THOUGHTS AND WHAT TO DO DIFFERENT NEXT TIME
I would like to eventually make a second black jack. I could do it much faster a second time, especially on the same forms. I would probably push the boiling further, and use leather that is pared down to an even thickness. I might also try boiling it with the form in it as a sort of second boiling to set the shape better and harden the leather more. Actually, I did try that, but I was having technical issues with my water heating apparatus and had to give up on it. The other option would be to bake it on the forms. This intrigues me as well and I’m curious enough to want to try it.
Other things I might try or do different. I would experiment before hand with stitch length, but would guess that 3/16 is going to be about right. Straight pitch as the coating, with no beeswax or oil. cutting the handle closer to the stitches after the mug is sewn up (I just think they could be closer, but sewing them that close to the edge might be awkward). I would make the rim too tall. You can see in the pictures how it shrunk down making the rim taper down away from the handle. It may be possible to push it back up enough to get it level, but not without a something to firmly hold it while it is being worked on. If there were extra leather on the rim it could even be nailed in place to shrink and dry and then trimmed to the desired shape. A wooden vice to hold the piece while working would be very nice, even if it only worked for some parts. maybe a special vice to accommodate the fat cup body. Proper leather stitching needles. I ordered John James Saddlers stitching needles size 2 on recommendation of Youtube user Ian Atkinson I also just need to bone up on general leather working and stitching skills. I'm still much more of a tanner than a leather worker, so I may also pick up these two books 1 2 that he recommends and work on those skills. Lastly, I'm not sure about the outer finish and would like to do some more research and experimentation around "Japaning" with linseed oil to get that high gloss finish.
Another project I'd really like to tackle is a leather bottle of the short keg-like variety as in this picture. They are so damn cute! I have ideas on how to make those, but again, we don’t actually know how they were manufactured. This experience was fun and just the kind of adventurous multi-disciplinary project that I like doing. Trying to resurrect old technologies from available clues gets me all hot and bothered. It was extremely time consuming though and ate up most of 3 days. I think I can figure out the leather bottle thing and will certainly post that as well. I’m also currently working on recovering the apparently lost art of making genuine old school apple butter, which is very exciting. I have already compiled hours of research that I’ll be publishing, which probably constitutes, much if not most of the best available references relating to that subject. I’m also amped up to make a throwing tomahawk out of wrought iron and steel forged and welded in the ground forge that I just built for this black jack project.
Must replicate adorable antique leather bottle!
Each of these projects takes many hours, or sometimes days, let alone the time required to write it all up, and to plan, shoot and edit video footage. In order to keep doing all this and building an archive of information here, without having annoying advertising on the website or on my youtube videos, I need to have at least a small income. If you appreciate this type of information, you can help me keep it up by using my amazon links. Thanks so much to the people that are already using them, you guys rock! If you bookmark this link in your web browser toolbar and use it whenever you shop at Amazon, I get a small advertising fee at no cost to you, regardless of what you purchase. It is usually not much, but if a lot of people do it, it adds up. I appreciate your support. If you make a black jack, or have already made one, please let me know!
CHEERS!