Posts tagged #axe handles

Commonly Axed Question: Charring Axe Handles, Why I Don't Do It

I’m asked a lot if I char the surface of my axe handles, have I tried it, do I recommend it, and so on. I’m going to tell you why I don’t, and am not likely to start. We’ll be looking at this problem largely through the lenses of primitive technology, bows and wood failure under tension, so there are some interesting general lessons to be dabbled in.

In spite of the very clickable, emphatic video thumbnail, even though I don’t practice it I don’t have a strong yay or nay opinion on whether anyone does or does not char their axe handles. People do it a lot and seem to get away with it, and it’s not my axe. I’m just sharing why I don’t do it. In searching for Youtube videos in preparation for this segment, I didn’t really see any dissent or contrary views, though I’m sure they must exist somewhere. It has become a popular and seemingly common practice lately.

I think of carbonized wood as compromised wood. Charring wood makes it harder up to a point, but also more brittle. I have done a lot of what is often called primitive technology, essentially stone age living skills. A very fundamental skill in primitive technology is heating and bending wood. Arrow and spear shafts, bows, hoops and other items sometimes need straightening, or curving. Many applications require the heating of dry wood, v.s. steaming the wood or heating green. If someone doesn’t teach you otherwise, you are likely to find out pretty fast, that if you scorch the wood of an arrow shaft, not even black, but just toasted brown, it becomes brittle and is much more likely to break when bent for straightening. It’s easy to do, I’ve done it many times, it’s a thing.

Let’s look at bows, because they are repeatedly put under a great deal of stress, and provide a perfect model of wood under extreme tension. Bows in fact often operate near the edge of failure.

A bow is made flexible enough to bend a lot. In order for the bow to do it’s work, and not break, the wood, and the design, have to be adequately RESILIENT to the stresses a bow comes under. Strength is a bit of a sloppy concept to use when looking at this problem. Strength is an important concept in resilience, but what kind of strength? resisting what forces? and in what context? Resilience is the total ability to withstand stress, though it is still dependent on what type of stress. I’ve discussed the importance of resilience in regard to axe handles in another post.

Some bows are curved back at the ends, which is called recurving. Usually heat is used to make the wood flexible. The heat can be either dry or wet, and often steaming is used. If you were to survey the literature, I’m pretty sure you’d find that if there is a standard recommendation, it is to avoid scorching bows when heating them to bend. Scorched wood is compromised, brittle wood. I think it’s very unlikely that you will find bowyers recommending that you scorch the surface of a bow at any time, and actually just the opposite.

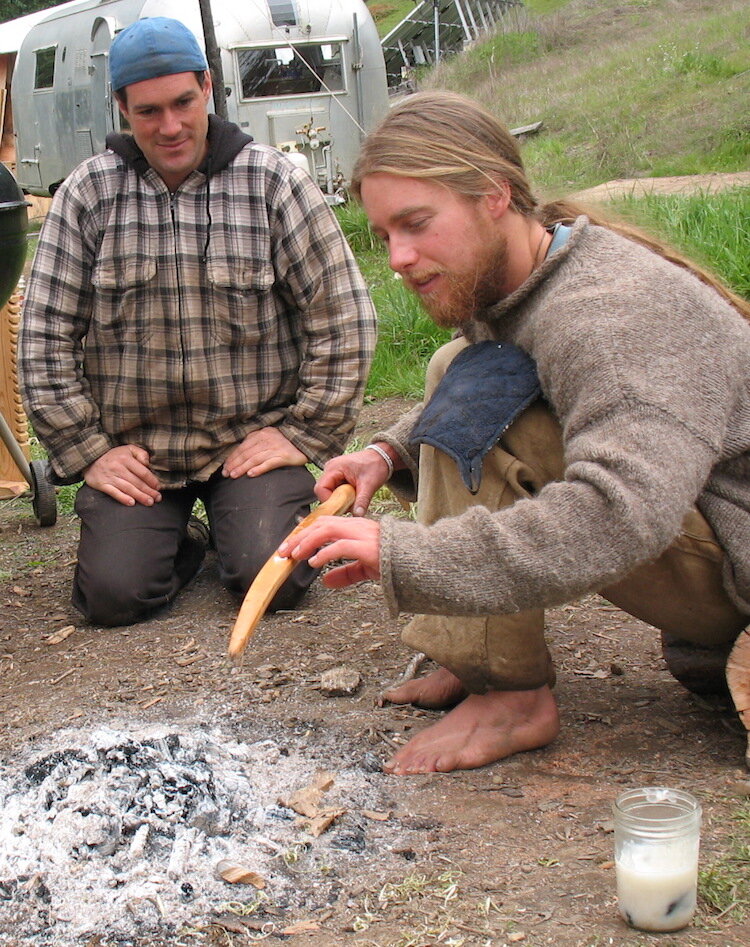
Primitive technologist Jay Sliwa heating and bending a yew wood bow in my front yard. He probably spent over an hour bending both ends of this bow, because it takes time to get the temperature high enough, and also deep enough, without scorching the…

Primitive technologist Jay Sliwa heating and bending a yew wood bow in my front yard. He probably spent over an hour bending both ends of this bow, because it takes time to get the temperature high enough, and also deep enough, without scorching the wood. Hot wood, even dry, will bend more easily. If cooled in the new shape, it will usually stay more or less that way.

Scorching and burning IS actually used in primitive technology though, to shape and harden wood. The common uses are for burning the ends of sticks to a pointed shape when making spears and digging sticks. This practice changes the character of the wood, making it harder, in order to resist the stresses of things like digging in the dirt, and that is a form of resilience right? A fire hardened digging stick tip is resilient to the stress of hitting dirt and rocks. It is more likely to retain it’s shape and will not dent as easily or wear away as quickly. Resisting the stress of digging is not resilience to bending though, it’s a resilience to impact, to denting and encountering other hard objects like rocks, dirt and animal ribs. These are the stresses encountered by a spear or digging stick point.

This digging stick tip is shaped and hardened by fire.  Great for impact and abrasion resistance, not so much for flexibility.

This digging stick tip is shaped and hardened by fire. Great for impact and abrasion resistance, not so much for flexibility.

That begs the question, might charring harden the wood of an axe handle to resist impacts that damage the wood by crushing, such as contacting wood on wood when splitting and limbing? I’m much more inclined to think that charring will increase the likelihood of wood tension failures, than that it will have any significant effect on impact resistance. There is also another solution to that problem, which is wraps, braces and collars.

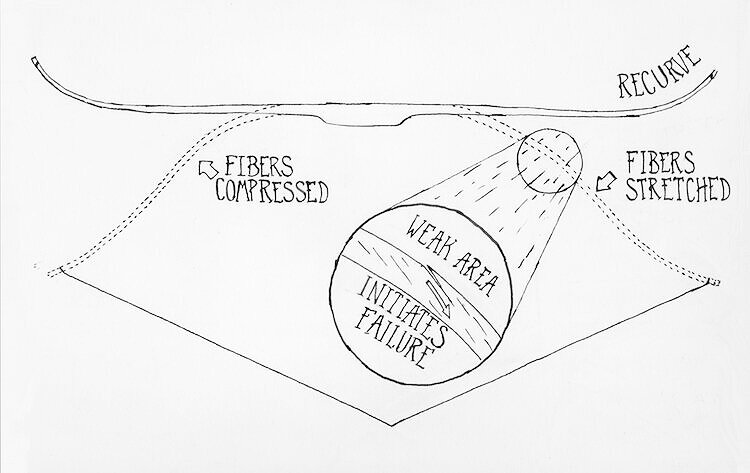
Lets go back to bows again. When the bow is pulled, the part of the bow facing the archer, the belly, is compressed. The belly fibers are smashed together and essentially made shorter if that is possible. The wood fibers on the back are stretched out and put under tension like pulling a thread tight.

I think in both axe handles and bows, breakage is much more likely than not, to initiate at a single point of weakness, in wood that is under tension. As the bow is pulled, tension stress builds and the further toward the outside back of the bow the fibers are, the more they are stretched. The fibers at the very back of the bow are not only stretched the most, but they have also been violated in most cases, by being cut through to shape the limbs. If there is a weak point on or near the surface, the wood will begin to split and separate apart, and that separation may travel causing a crack or a full break.

The inside of a bow is under high compression and the outside (back) is under extreme tension or stretch. If you studied it, I think it’s likely that you’d find failures initiating on the outside back of the bow and traveling inward from there in mo…

The inside of a bow is under high compression and the outside (back) is under extreme tension or stretch. If you studied it, I think it’s likely that you’d find failures initiating on the outside back of the bow and traveling inward from there in most, if not all, cases.

If you could study that break in slow motion, I think you would see that the wood doesn’t come apart all at once, but that the crack initiates on the outside of the bend, on the surface, and travels from there toward the inside of the bend. In either a bow or axe handle, that weak spot might be where the grain is violated and runs out more than other spots, or there is a nick, knot or worm hole, or a thick or thin area. A weak point might also be where poor design or execution in building stacks an especially high stress on the wood.

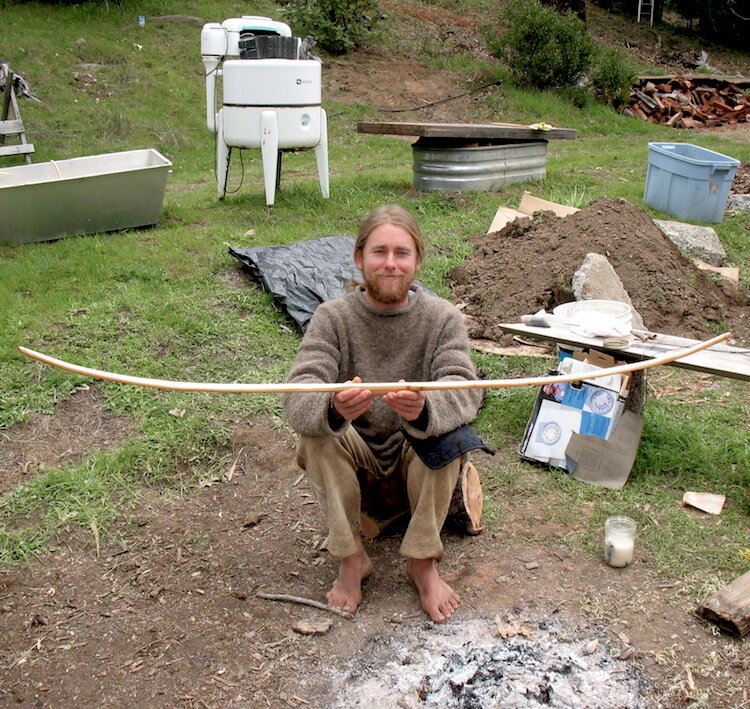
Dry bent, with no scorching. This yew wood is prone to exploding apart when it fails. It is easy to understand why bowyers avoid scorching the backs of bows, where the wood comes under very high tension. Understand that this bow is not strung with t…

Dry bent, with no scorching. This yew wood is prone to exploding apart when it fails. It is easy to understand why bowyers avoid scorching the backs of bows, where the wood comes under very high tension. Understand that this bow is not strung with this curve, but rather AGAINST this curve. It would be strung and pulled toward the ground in this picture.

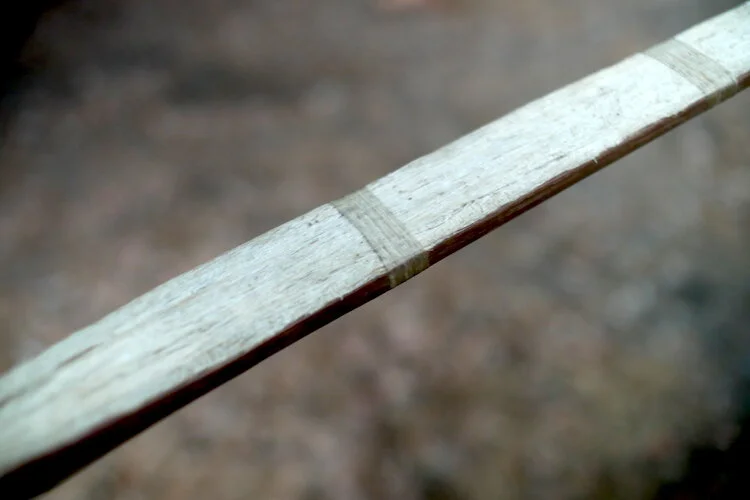
Many Native bows in Western North America have sinew (animal tendon) glued onto the backs, similar to a layer of fiberglass. If there is one main reason to glue sinew or rawhide on the back of a bow, it is to keep the bow from breaking. Given the same exact bow, with and without sinew backing, the sinew backed bow is less likely to break. The reason this dried sheet of sinew prevents cracks is that it prevents them from initiating in the surface of the bow’s back in the first place. If the crack can’t initiate and travel because the fibers are held in place and reinforced, then the bow cannot easily fail in the way it is normally most likely to fail. Sinew backing is a very common way, to prevent the breakage of short bows that are under very high stress. In quite a few cases those bows use wood that is actually somewhat brittle and sometimes could not take the stress of being used to make a short powerful bow. The reason I point this effect out is to reinforce the idea that the initiation of cracks in the surface of wood is probably the initiating event in most wood that breaks under tension.

Sinew backed bow limb. Just like a collar or wrapping on an axe handle, sinew backing helps prevent failure, largely by preventing the initiation of cracks.

Sinew backed bow limb. Just like a collar or wrapping on an axe handle, sinew backing helps prevent failure, largely by preventing the initiation of cracks.

Axe handles are only somewhat analogous to bows, but they are under some of the same stresses and it is very likely that cracks typically initiate on the part of the wood that is under high tension in any given scenario. Like a bow, it is going to happen more where the wood is under greater stress and where the wood is weak at the surface in those high stress areas. This chink in the armor could be a small knot, a dent or nick in the wood or very likely where the wood grain is cut across at a strong angle. Another common place for cracks to initiate is where growth rings come together, because the wood between rings and between the fast spring growth and the slow summer growth are different, so they behave differently under stress.

So here are my working assumptions about axe handles and charring.

In most cases, failures will initiate at a point of weakness in wood under tension, on the outside surface of the wood, traveling from the point of initial failure.

Charring wood reduces the tensile strength of wood fibers, increasing brittleness under tension, therefore making that failure more likely to occur given the same tensile stress.

It’s important to note that theory v.s. real life is not always an easy pile of yarn to unravel. I may be missing something entirely that I haven’t thought of or have not been exposed to. Our decisions are informed by processing experience and information, and those are limited, as is our intellect. It may be that it is rarely, or even never, an actual problem to char the outside of an axe handle. Personally, knowing what I know and having charred and then broken arrow shafts, atlatl darts and other wood items, I cannot think of any good reason that I would burn the surface of a wooden handle that can come under a great deal of stress; on the contrary, it would seem I have good reason not to. Tests that might shed more light on the subject could be done pretty easily, as long as the sample sizes are large enough to account for wood variations and other unknown factors. But I’m not likely to spend my time at that, since I don’t really actually feel any need to treat handles that way.

The primary motivation for charring handles seems to be aesthetic, such as making the tool look more used or antiqued, or just good. And it is a very nice looking effect. I love charred wood and have practiced it a lot for decades, for reasons and effects I won’t go into here. I just built a whole wall of charred and burnished wood for my Indoor YouTube studio corner! But, you’re not likely to find me weakening the outside layer of an axe handle where failure is most likely to initiate, just for cosmetic purposes.

This video talks about how I do treat my axe handles after they are tuned up how I like them.

Charred and burnished pine used to good effect.  This wood is basically under no stress.

Charred and burnished pine used to good effect. This wood is basically under no stress.

DSC09744.jpg

Another question I’ve been asked quite a bit is how to make axe handles look used. My sole recommendation for that is to use them. I get it, you don’t want to be the kid with glaring white new shoes. If I were to treat my axe handles to make them look used, I think I would feel like I was the tool. An axe handle patina earned with dirt, sweat, and sap, rubbed to a polish thousands of times with calloused skin is something of an accomplishment and a point of pride. If you want that, pick just one or two axes, and take the axe cordwood challenge.

So, there’s another in depth dive into more relevant, if obscure topics, brought to you by my patrons @ www.patreon.com/skillcult

Splitting Axe Handle Blanks From a Windfall Tan Oak Log

Recently I was driving out my road and had to stop in the rain and shovel ditches out. I got so wet that I went back home to change my clothes, but within the hour or less I was out, a large Tan Oak fell down in the road.

tree+in+road.jpg

I had been eyeing this group of trees already as potential wood working fodder, but this one just succumbed to heart rot and fell over. While cutting it up, I spotted one straight section and saved it aside to split up later. In this video I’m splitting it into 12 parts to stash away for woodworking projects.

tan oak group before.jpg

You really don’t need much to split a log. A maul and disposable wedges can be made almost anywhere, usually from the trunk and limbs of the same tree. There are a couple of pointers here about making wedges, the use of boys axes as a one handed hatchet and methods to keep your splits going with the grain. Also basic wood splitting theory regarding run out, which is perhaps the most relevant problem in splitting rails like this.

making wedge.jpg
wedging whole copy.jpg
active split copy.jpg

I have begun slowly processing these rough split staves down into billets one or two at a time, by removing the rotten heart and the bark. I’m also chopping off about 3/4” or more of sapwood, which is more brittle, weak and rot prone than the pinker heartwood. I’ll be washing the outsides of each billet with a borax solution to prevent insect attacks by powder post beetles, which are populous here, especially with the abundant food available to them with the big Tan Oak die off that is occurring now. They are very destructive to certain woods, Bay and Tan Oak being among the most affected. I’ll also dip the ends into paint, or seal them with fat or pine pitch to prevent the ends from cracking due to rapid drying. After that I’ll just try to dry them at a reasonably slow rate to minimize warpage and cracking.

staves and quarter copy.jpg
staves .jpg

While watching this video footage, It occurred to me that I could have made a really neat drum out of that log, or two or three actually! Also that I should try making a barrel out of tan oak. I may save some of the short ends from this log and others this year to have a stash of well seasoned wood for a possible small keg project. Maybe a Calvados keg, hmmm….

Axe Handle Breakage, Designing For Resiliency, Weak Links and Stress Distribution

An axe head with a wooden handle has some inherent problems. The head and handle are made of very different materials that behave differently. Steel has a very high density compared to wood. Wood is much more flexible than steel and will dent and break more easily. When using an axe, these differences can cause problems, such as the wood being damaged by forceful contact with the hard unyielding metal head, or the relatively high density of the steel head behaving differently than the handle, thereby putting stresses on the weaker wood. Breakage just below the eye is a very common occurrence. This article and video are an attempt to explain some common reasons why axes frequently break near the eye, having to do with design, or perhaps lack of design in some cases. Breakage in the main body of the handle can of course also occur, but I’m not really dealing with that here. I’m pretty sure that the greater percentage of axe handle breakages are initiated right where the handle meets the bottom of the eye, or within the first few inches of handle, especially if the breakage is not due to wonky grain or other defects. Shear stresses seem to be particularly high in this part of the handle.

In this article, I will be assuming that we are dealing mostly with American axe head patterns, which tend to have thinner eyes than European and Scandinavian axes. Even though American axe styles migrated back to Europe (many axe patterns on that side of the pond are actually American or modified American patterns) the axe eye sizes largely remained bigger than American axe eyes. This is an important point when we look at overall handle design, because with any given axe head, the eye shape just is what it is, and the size and shape of the wood where it enters the eye is therefore pre-determined. Some of these problems are obviated by the use of tapered axe eyes, in which the handle feeds in from the top and fits by friction, but that is a separate subject also. The assumption here is that we are dealing with American style patterns that are wedged from the top. For whatever mix of cultural and practical reasons, these axes have pushed the limits of strength and resilience of the wood used in handles, by evolving toward a small eye.

Aside from the size of the axe eye being fixed, there are two other things that are pretty much givens as well.

One is that the section of handle just below the eye, lengthwise (poll to blade) is wider than the rest of the handle. If the whole handle was the same front to back dimension as the eye length, it would be unusable, so the body of the haft has to slim down soon after leaving the eye.

Predetermined factor number two is that we need a slight flair in handle thickness just below the eye at the back of the handle, as well as on both sides, so that the head seats firmly around the bottom as it is driven on. The front edge of the handle can come straight out of the eye if desired, with no rise, but the other three sides need at least some flair, though not very much. In my view, it is always unnecessary, and also a detriment, to come out of the front of the eye and then immediately outward, forming a shoulder. I see no reason to do that, and every reason not to. If the handle isn’t completely straight coming out of the front of the eye, the rise is best made as a gentle transition.

WE CAN CONSCIOUSLY WORK AROUND THESE FIXED PARAMETERS. IN OTHER WORDS, DESIGN AROUND THE THINGS WE CAN’T CHANGE.

A Few Common Axe Handle Mistakes and What to Do About Them

On a recent snowy morning I answered a YouTube comment on axe handle breakage that led to a one take video shoot with a beautiful snowy background.  Being conceived and shot in one morning, this is just a partial snapshot of the subject.  It revolves around the specific problem of design factors contributing to handle breakage just below the axe eye.   It could easily have snowballed into a multi-part series on axe handle function and design ideas, leading to yet another video or series on user contributions to breakage; but the snow melted and I couldn't throw out that beautiful backdrop, which some people actually thought was done with a green screen!

This is viewed primarily from the perspective of American axes, which are evolved in the direction of high performance with the consequence of increased delicacy.  At least that is my current take on it.  An axe is a system composed of a handle and head which creates some inherent problems.  In America, the European axe systems that migrated here with early colonists eventually evolved toward higher performance creating narrower eyes that are inherently weaker than the wider ones they descended from.  European axe eyes seem to have remained wider for the most part, often even when copying American patterns.  In fact, I think the standard American axes are refined to a point where the handles could not be much thinner at the eye without becoming impractical for use with wooden handles, and some might argue that they already have become too thin.  That is a subject for another time though.  For now we will just look at, common problems that we see from both manufacturers and folks producing handles at home, which are easy enough to fix with some tuning up. 

While there are a lot of people that understand some of this intuitively and practice it, I don't recall seeing it spelled out anywhere.  It is my hope that this information will spread and eventually reach manufacturers, many of whom who are clearly not axe users.  Most axe handles will need work out of the factory and that is fine, but the mistakes that are greater in concept and scale are costing a lot of handle breakages at the eye that are totally unnecessary.  The essential problem is that manufacturers think they can just increase the thickness of the handle body to decrease handle breakage.  When viewed as a dynamic system though, it quickly becomes obvious that doing so puts undue stress on the thin eye portion of the axe, instead of sharing the stress across the length of the handle. At some point, continuing to thin a handle will obviously reverse that problem and create excessive vulnerability in the handle's main body.  That is really another level of this discussion though and one I purposefully avoided in this presentation.  Another issue is that there are other types of stress that are incurred from different types of use or mishap that may be more likely to break the body of the handle.  The grain of the wood and it's character is also at play.  We are dealing with a tool that sees different types of stress at different times, has inherent problems that are not entirely solvable and involves an inconsistent natural material.  Wood of even the best quality has fatal faults.  We continue to use it for the same type of reasons I continue to use vacuum tubes in my stereo and guitar amps, and that is user experience.  I personally also like wood because I can cut down a tree and make a new handle without relying on industrially produced products that I have to buy.

There is a lot of forgiving grey area in this problem and we don't have to engineer a perfect handle.  But, we do need to avoid the largest mistakes being made and if we get a handle that has them, we can tune those problems down until we have something that is more comfortable to use for long periods of time and also reduces stress on the eye.  I don't think I've seen a handle yet where the problem encountered was too little wood to work with!

Enough said here.  While this video is incomplete, it presents some ideas that I think are important and which can go a long way toward practical solutions. 

Axe Handle Shock and Preventing Repetitive Stress Injury in Chopping

These are factors I know of that play a role in the amount of shock you absorb from your axe handle, such as chopping style, grip, handle rigidity, cutting ability and wood type.  These are the kinds of things that can allow a person cut more, longer and in harder wood without incurring numb sore hands, tendonitis, etc.   More text below.


Chopping with an axe is a high impact, high energy exercise.  As choppers, we necessarily absorb some of that energy since we are holding the tool.  There are a number of factors I know of which are important in the cause or prevention of repetitive stress injury or discomfort in chopping, most of them at least partially controllable. 

The axe should not be gripped very hard while chopping except as necessary in specific situations.  A hard grip unavoidably tires and stresses the hands, but it also creates a more efficient transfer of the energy from the vibrating axe handle back into the hands.  The Style of chopping is also important and interrelated to grip.  A heavy handed chopping style should be avoided.  Don't think of chopping as pushing or forcing the axe through the wood, but rather as whipping or throwing the axe head into the wood using the handle.  Pushing on the handle after the axe hits the wood adds little if any real power to the cut, but stresses the handle and the hands and probably sacrifices control to some extent.  You can cut plenty deep if you build velocity in the axe head before it hits the wood.  If the work is done before the axe hits the wood, then the grip is only to lightly control the axe after it strikes.

The handle of the axe, depending on it's thickness, density, inherent flexibility of the wood and probably other factors, will transmit more or less shock.  Thin handles transmit considerably less shock than thick ones do and tuning your handle or thinning it down is probably mentioned by authors writing about axes more often than not.  Older axes tend to have thinner handles than modern axes, and vintage axes, old photographs and older illustrations demonstrate this fact.  There is a reason that axe handles have become thicker, which is that they aren't actually used very much.  Most axes are now the equivalent of handbags for men, and are put to real use only infrequently for short periods of time.

If you cut into wood at an angle, usually around 45 degrees, it cuts more easily than if the cut is made at a right angle.  When cutting at 90 degrees the axe stops suddenly and more of the energy embodied in the head is transferred to your hands rather than cutting into the wood.  It's fine to cut at 90 degrees as needed, but generally a poor habit to get into on a regular basis.  Most axe work is done with cuts around 45 degrees for a reason.

Another way to transfer a lot of the energy embodied in an axe head back up the handle and into your hands is to use an axe that is not cutting well for any number of reasons.  The axe must cut well and easily or it will stop suddenly causing more vibration.  Most axes as they come from the factory, nearly all in fact, require at least some reshaping to get them cutting well.  In most cases, a significant amount of metal needs to be removed from the sides of the axe near the bit in order for it to be able to slide easily into the wood.  It is often recommended to file the cheek of an axe in a fan shape, but that depends on the shape of the axe head to start with.

Finally, the wood plays a role.  When chopping hard dry wood, less of the energy from each blow of the axe is dissipated in cutting, whereas when cutting soft and green woods, the energy is dissipated gradually as the axe sinks deeply into the cut.  You may or may not be able to control what wood you end up cutting, but you can control other factors that cause or prevent the kind of handle shock and fatigue that might keep you from working or cause a longer term injury that will put you off of work for a while.  The stuff mentioned here is important if a person want's to be able to use an axe under varied conditions, on varied woods, for longer periods of time, on consecutive days.  What separates the men from the boys isn't being tough enough, young enough or dumb enough to tolerate a club of a handle or an axe that otherwise doesn't cut well, but to be wise enough to work smart and not hard.  If you are going to sit at your computer trying to breath life into your flaccid member to some freaky internet porn, or work your thumbs out pushing buttons on your t.v., remote then I guess maybe none of it matters all that much.  If you're going to dig, carry, lift, hammer, weed, process and otherwise use your hands, wrists and arms, you'll be able to do all of it more, and longer, day after day if you pay attention to these types of details.

My Simple Deep Penetrating Axe Handle Oiling System

It took my many years to finally arrive at a very simple but effective system for oiling axe handles.  I'm pleased to say that Author Dudley Cook came to the same conclusion and recommends pretty much the same as I do in The Axe Book.  This is the first of a series I hope to continue of super accessible bullet point videos called 2:00 Minute Technique.  The idea is to deliver very useful information in two minutes or less.  Of course being rather thorough most of the time, most subjects will be covered in more depth as well, but these will be quick start guides with enough information to get to work.  I'm also linking the long version of oiling tool handles where I talk about drying v.s. non drying oils and geeky stuff like that.

This system penetrates the handle deeply.  How deeply I don't know as I haven't sliced open a handle to find out yet, but it has to be pretty deep considering all the oil some handles are capable of sopping up.  It probably builds up especially a lot in the outer rind of the handle wood.  I think of it as replacing water that was once in the living tree.  As long as you use a good drying oil, like linseed, it will cure to a tough plastic like substance, the same stuff oil paints are made of.  I use raw oil because it has a slower curing time allowing for deeper penetration before the oil on the surface seals off the pores.  The other reason I use raw is because the product known as boiled linseed oil is not boiled linseed oil at all, but rather a compound containing solvents and toxic metals to the end of decreasing curing time.  I've actually gone now to using food grade flax oil only (same as linseed oil,  but food grade is usually called flax oil).  The last can of "pure raw linseed oil" I got smells of solvents, so I just found the cheapest flax oil I could on amazon and ordered that.

There is concern among some that raw linseed will never cure enough and will remain sticky.  I've been using it on my handles for a long time and it cures out plenty well.  Whether it will cure as hard and tough by comparison to boiled I'm not sure, but it's definitely more than adequate.  I can assure you of that.

I see "oil finish" recommended a lot, like Watco or Danish Oil Finish.  As far as I know, they are all cut with solvents and dry quickly.  If part of the liquid that soaks into your handle is solvent, then when that solvent evaporates it would seem that using these preparations would leave less total oil in your handle with each coat, penetrating or not.  Personally I avoid working with solvents because they give me heartburn every damn time.  Using food grade oil is great for me since I'm applying it over and over again all day, I can keep it in the house near the woodstove for faster curing and don't have to put on gloves or even wash my hands if I don't want to.  I usually just wipe off the excess oil and get on with my business.

Once the handle is thoroughly penetrated the oil will not soak in anymore.  If you get tired of putting oil on, or don't want to use so much oil, I think you could stop for a while and let the oil cure a bit before continuing.  Eventually, you can start to build up coats as a surface finish one thin layer at a time. Just apply the layers very thinnly and allow to cure to the touch before adding another.  Building up a surface finish is not a necessary step, but it looks nice and insures the handle is completely sealed.  I tend to just add a thin coat once or twice a year when I have an oily rag.  Polish comes with use.  There is probably a way to fake it by buffing etc.  I wouldn't know.  I'd feel like a dumbass sitting around trying to make my tools look like I use them when I could just be using a tool instead.

This system takes a lot of oil and a lot of time and may be overkill for some of your handles, but give it a try on something and I think you'll like it.  The knife handle below is deeply saturated and turned out awesome.  Repeated oilings took that porous, soft birch handle and made it into something altogether different.

And here is the long version.

Posted on December 20, 2016 and filed under axes.