Posts tagged #Lime Putty

Lime Squad IV: The pets, straw clay lime kilns.

pet II header

"None of these goals and design parameters will be considered in a myopic sense.  Context must be considered with an assessment of cost benefit ratios in a holistic sense that includes values beyond convenience and control."

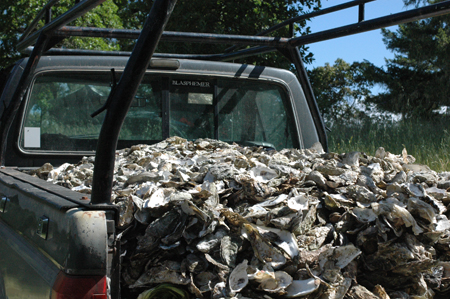
After taking lime burning in a steel drum as far as we felt we could without adding something to the drum.  Tonia and I decided to venture off into building a kiln with available materials.  That was one goal- to explore the possibilities of available materials.  Another was to experiment with design changes in order to improve smoke and efficiency issues.  We decided to add a grate and a fire box to see where that would lead us and how effective burning the fire separate from the shells might be.  The metal drum taught us that we needed either insulation, or mass, or both together which I gave the silly, but relevant, name massulation. We thought of using some bricks that were around, but decided to go a little more primal using stuff we might be able to scrounge up anywhere.  That meant having a base which could support a grate.  We chose to use bricks for just the base because it was faster for our experimental purposes than mudding one up with cob, though the cob would probably have worked better.  We slapped some mud onto the outside of the bricks to seal most of the air leaks.  The base had a short firebox leading to a grate at the bottom of the column.

The Pet's base, slapped together with bricks and then covered in mud, was a quick way to try out the idea of utilizing a fire box and a grate.

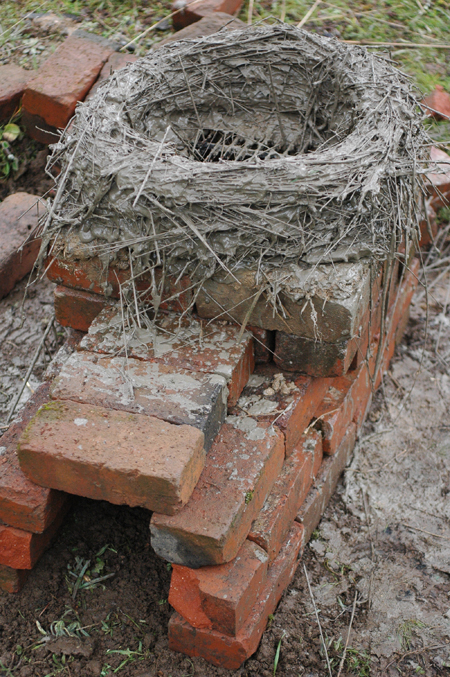
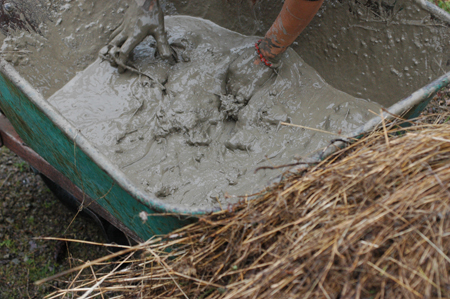
I got the idea for the kiln body material from a visit to Emerald Earth, a local community that does a lot of natural building.  They use a wattle and daub system that replaces the stick wattle with bundles of straw dipped in clay slip.  I decided that it would probably work for burning a kiln at least one time.  It seemed like a lot of work, so to cut down, we just dipped the bundles of straw in slip and laid them up without any vertical supports.  And it worked fine.  We pulled up bundles of dry wild grass straw, dipped them in a rough clay slip made using some clay from a deposit here on the land, and just built it right up. The walls turned out about 3 inches thick or so.  Since the straw is hollow, and the slip has substantial weight, this system gave us just the massulation that we were after with very little effort.  Our friend Yoshi said it seemed kind of like a pet and the name stuck.

Clay slip was made from some clay we dug up while digging a vernal pool.  The slip is pretty thick and we used quite a bit, since that is the glue that holds the whole thing together.  I also figured that a thick coat of clay around the straw would protect it from burning up too quickly.

Straw with quite a bit of clay slip formed the Pet's walls.

The shape of the body was somewhat constricted toward the top.  Given no limitations in materials, I’d be inclined to build a kiln slightly bulged in the middle and constricted slightly at top and bottom, with the top considerably more restricted.  Many traditional kilns are made this way.  I can’t say why for sure, but I think it’s because the larger space in the middle would give the gasses and heat a place to sort of spread out and slow down, while the constricted top could further slow the gasses down.  Also, if the inside is somewhat spherical or concave, the heat radiating from the heated walls would be radiating down and up instead of straight across, which would at least theoretically retain the heat longer as it bounce back and forth inside the curved walls of the kiln.  That's what my intuition tells me anyway.

The Pet was given a slight taper toward the top.

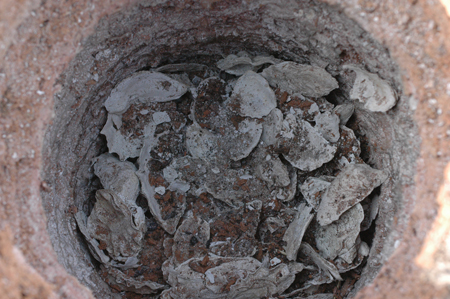
A small fire was kindled in the fire box to dry the kiln more quickly.  When it was partially dry and firm to the touch we did a burn in it.  Burning just the firebox, with no fuel in the kiln body was hopeless, as I suspected it would be.  Maybe it could work if using a large burn chamber with a relatively smaller kiln and a ton of wood to really pump an intense amount of heat in there.  Such an arrangement might also require more insulation than we had.  While our straw/clay kiln body contained a lot of pore space, there was also a considerable amount of clay in the body which would suck heat away.  Still, I don’t recall the outside of the kiln ever being super hot, so we were retaining most of the heat, or at least losing out the top as would be expected, rather than out the sides. Using alternating layers of fuel and shells, the firebox seemed of some assistance in getting the fire off and running with less smoke, but probably not enough to justify it’s existence.  Overall, I would say that the firebox was a fail. The good news is that the percentage of thoroughly calcined shells did go up when doing mixed fuel/shell burns.  Shells touching the side of the kiln were not destined to be under-calcined as they are when using a plain steel drum.

The percentage of calcined shells in the pet was always higher than in the drum.

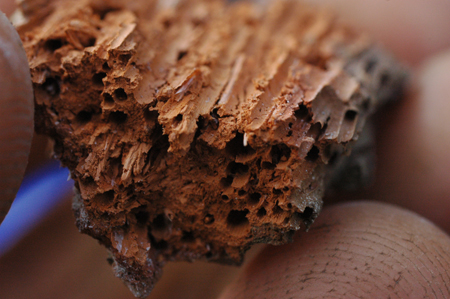
We burned at least 8 burns in the pet before it disintegrated.  It was covered from the rain at all times.  It became fragile after a few burns and was barely nursed along for the last 2 or 3.  That seems like a waste of effort, but there are good points.  I think the burned clay will make a great soil amendment, we didn’t have to buy anything, it was fun to build and we got a little exercise.  In researching historic accounts of biochar in Europe and North America, I found a number of references to the great value of burned clay being used as a soil amendment.  The clay burned from the pet is really neat.  The straw burned away in most of it, leaving small tubes throughout.  A nifty system might be to burn agricultural lime in a similar kiln, while producing charcoal if possible, and then putting the whole lot into the soil when the kiln is too burned out to use anymore.  It may be quite a bit of work, but the charcoal and clay should be a permanent investment, not like a one time fertilizer application.

The pets walls fired into a porous fired clay which crumbled away from the inside with each burn.

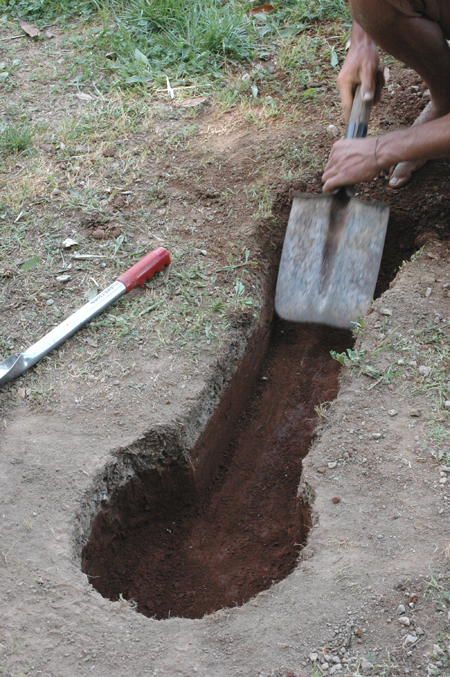
Pet version 2.0 was built at The Buckeye Gathering in 2012.  We built this one with Bryce the blacksmith as a dual smelter/lime kiln, using a bale of wheat straw and clay slip.  Bryce collected some iron ore to smelt and we thought we could maybe cook two birds with one kiln.  this time we dug into the ground a little to make a gathering area for the slag.  That didn’t work so well with the lime burning, and probably not for the smelting either.  It just created a cool zone against the back of the kiln, in spite of adding 3 vent holes at ground level.  The lime burned, but there was a high percentage of under calcined shells.  The smelting also failed, but we were inclined to think that fail was due to bad iron ore rather than to the kiln design, or management.  Lesson learned for lime burning, the air should come from the bottom of the kiln, not part way up.  That may not be true in taller kilns, but for the micro scale kilns, I think it probably is very important to have the air enter at ground level.  This kiln was only burned twice and was then abandoned on site, but it had more burns in it yet.

The Pet II's base was below ground.  Not recommended.

The Pet II in action. (photos by tonia sing chi)

The pet’s straw clay concept is pretty cool.  It’s fast to slap together and doesn’t require that you buy anything.  Once burned out, there is no waste and, if anything, the leftovers are useful.  I would recommend building it on a low cob base, or just on the ground leaving four vents at ground level created by two shallow, intersecting trenches crossing each other in the center.  A slight constriction toward the top would probably be a good idea.  If the kiln is taller than you can reach into from top to bottom, you would probably need to build in an archway at the bottom for cleaning it out.  This design, which is basically like burning in a drum (see part one of this update), but with mass and insulation, does not solve the problem of excessive smoke.  For that solution, it’s back to the drawing board.  Smoke can be reduced a little by starting a fire before adding wood and shells in layers, allowing each layer to get underway before adding the next.  Burning from the top is also an option, but probably would require extending the height considerably with some provisions for flaring off gases (see below for more on this concept.) Cob (a mixture of clay, sand and straw for those who don’t already know) could be used to build a kiln and would probably outlast a pet by a long stretch.  It would also be a lot more work and still far from permanent.  Cob would also be much less insulating than the pet’s clay coated straw construction.  I have the good fortune to hang out a little with Kiko Denzer each year at the Buckeye Gathering.  He is pretty savvy when it comes to fire stuff.  One of his ideas was to use sawdust, or probably more like wood flour, mixed with clay to build a kiln body; he says this is how firebricks are made.  The sawdust would serve as a sort of aggregate, but would burn out when fired, leaving a light, porous material.  Another idea he tossed out was to try a technique used in firing pottery, where the wood and pots stacked together are wrapped with newspaper which is first dipped in clay slip.  This forms a temporary kiln.

The pet two.  (photo by tonia sing chi)

If energy and other priorities don’t get in the way (not unlikely), I’m hoping to explore home-scale lime burning some more.  The objective is to keep kiln design simple and accessible in order to remain inline with homey goals, while increasing efficiency and decreasing pollution in the form of smoke.  Raising the percentage of thoroughly calcined shells as close to 100% as possible is also on the agenda, but that really falls under efficiency. None of these goals and design parameters will be considered in a myopic sense.  Context must be considered with an assessment of cost benefit ratios in a holistic sense that includes values beyond convenience and control.  This is important (thus the bold italics ;).  For instance I am not going to focus narrowly on 100% calcination if it means burning 50% more fuel.  And what would I profit from a small gain in any goal if it means buying 500.00 worth of special manufactured insulating material or switching from wood to propane? The smoke issue will probably take priority for now.  I’m interested in a concept called TLUD Top Lit Up Draft.  I did one top lit burn in the pet using a piece of stovepipe to extend the kiln in order to provide draw.  The TLUD concept also requires flaring off of unburned gasses which, for me, was provided by unsealed gaps between the top of the kiln and the stove pipe.  The burn went Ok as I remember (though I'm not sure how well I do, I think I'd remember if it went very poorly), and with much less smoke.  so I’m encouraged.  The basic concept is that the draft comes in at the bottom (the air is often preheated by passing through a space between the inside container which holds the burn and an outside layer) and travels all the way through the kiln where it is consumed by the fire at the combustion zone.  Since the fire is lit from the the top, it is not smothered by a giant pile of fuel and shells as it is in a bottom lit kiln.  The fire is actually starved for oxygen in a way, but the extra gasses created by that are flared off at the top of the unit, consuming all of the smoke.  The TLUD concept is used in gasification stoves and to produce biochar.  I have some new metal drums to play with and already hope to be exploring this idea for making charcoal to use as a soil amendment. Finally, I’ve been interested from the start in exploring the possibility of producing biochar and lime at the same time.  I have no idea if that can work yet, but I’d sure like to try.  I hope to produce a lot of char anyway and it would be nice to use that heat for something.  Since we have acidic soils here, lime is a necessary addition, though using char in the soil is supposed to help raise ph as well.  I can get oyster shells by the ton for cheap or free (except gas and driving of course), so calcining a few shells while already producing a bunch of heat during charring sounds pretty awesome.  If that works, I have a feeling it will be in a fast burning, high heat TLUD design with mostly wood and just a few shells.  Those shells would still add up though when making a lot of char.   Hopefully this will not be the last lime burning post.  If anyone tries any of these ideas, please come back and let us all know how it went!

Shells, we're rich!

Posted on November 2, 2013 and filed under Uncategorized.

LIME SQUAD! II: The Slaking

LIME SQUAD! I:   A PHOTOESSAY ON LIME BURNING

LIME SQUAD! II: THE SLAKING

Having burned some sea shells into quicklime in photoessay part one, it was time to slake the shells into lime putty.

In the morning we went out to the kiln all excited and grabbed a few well-burned-looking shells for a quick experiment.  We put the shells into a dish and crushed them lightly with a spoon and added water.  In order to turn into calcium hydroxide, a.k.a. lime putty, quicklime has to undergo a chemical reaction with water which creates a good deal of heat.  Well, our quicklime just sat there cold in the water, no churning and boiling :(  what a let down...   After getting over our initial disappointment it seemed just not right that our lime didn't react.  The shells were completely white through and through.  So, we put the shells and water on the stove to heat a bit and that seemed to slowly kick off the reaction and eventually they broke down into lime putty.  That was encouraging, but it wasn't time for the champagne yet.

I had pretty much decided that we should use hot water to slake at this point, but considering the time and energy we had invested so far we wanted a more informed opinion.  I called Jeff Price at Virginia Lime Works who generously spent a small piece of his morning in the pursuit of my edification in regards to lime and lime burning.  Sure enough, he recommended hot water to start it off when using shells because the structure of shells is less conducive to the slaking process than the structure of stone.  The up side is that shells make more lime putty than an equivalent amount of burned stone.  I took my page of notes and was ready to rock.

The burned shells were added to an old wine barrel pre-charged with hot water.

It wasn't long before the exothermic reaction began to take place.  Note the surface of the water is roiling in this picture and the shells are starting to break down.

The lime was stirred constantly.  Goggles should definitely be worn here.  The the lime is dangerous not only because it is literally boiling and splattering but also because the Ph is very high making it caustic enough to cause chemical burns to the eyes.

Jeff had told me to keep the reaction going by constant stirring and addition of water as necessary.  A lot of water was added as the process continued.  The picture above shows the putty partially slaked, but still with a curdy, cottage cheese look to it.  The lime was stirred constantly to keep this stuff in contact with the water it needed to insure a continued reaction.

When the reaction had pretty much subsided the lime was broken down into a smooth batter-like consistency.

A few days after slaking the lime was stirred up with extra water to suspend the fine lime particles in a thin liquid for straining through a screen.

The lime was poured through a screen or two to strain out un-slaked particles which consist in this case wholly of under-burned shells.  The remaining milk of lime was stirred again in the barrel with a quantity of water to allow remaining particles to settle to the bottom as the stirring subsided. If any under-burned particles remain, they will make good aggregate for plaster or mortar, but for the finest finish plasters or lime washes (lime paint) these particles would be undesirable.

From here the lime sits under its blanket of water.  In time it will settle and congeal into a firm putty.  Hopefully the barrel will facilitate this process as the porous wood draws away water from the putty allowing it to evaporate out the sides of the barrel.

So far so good.  The seemingly small amount of shells expanded into a significant amount of lime putty... maybe 12 to 15 gallons?... and with the addition of at least two parts aggregate for almost any use, there is enough to do a significant level of experimentation in using it.  It the meantime it ages away improving with time in its wine barrel vintage 2011.

LIME SQUAD! I: A Photoessay on Lime Burning

LIME SQUAD! I:  A PHOTO ESSAY ON LIME BURNING

LIME SQUAD! II:  THE SLAKING.

I've been interested in lime for a while now.  I use it in tanning hides and I want to use it in building.  Lime is also used in processing corn into hominy as well as masa for tortillas.  Doing things completely from scratch always interests me, so project buddy tonia and I set out to burn some lime and see just how much work and fuel is required for what results.  The following is a photo essay on our first lime burn, but first a few thoughts on lime, lime burning and lime users.

A BRIEF DESCRIPTION OF THE BASIC PROCESS

Limestone or shells (Calcium Carbonate CaCO3) are burned for a time until they are calcined, that is reduced to Calcium Oxide a.k.a. "quicklime" (CaO).  This releases carbon dioxide into the atmosphere.

The lime is now what is called quicklime and it is quick… quick to react with water in an intense chemical reaction creating heat and converting the lime to Ca (OH)2

To make dry hydrated lime, which is more stable than quicklime, the quicklime is sprayed with just enough water to cause it to undergo most of its reaction and crumble into a powder after which it is bagged.  Hydrated lime is used as an admixture to increase the workability of portland cement mortars which, even with the addition of lime, are horrid to work with.  Other people use hydrated lime as one would use lime putty that is mixed with water to form a lime "paste".

To make Lime putty, the quicklime is mixed with a larger quantity of water whereupon the stuff boils like crazy and turns into calcium hydroxide, Ca (OH)2.  Lime putty remains as calcium hydroxide as long as it is kept from air under a cozy blanket of water.  Under water it only improves with age.

When the lime paste or putty is used it must be dried slowly. As the lime dries, it reabsorbs the Carbon which was driven away from it in burning back out of the atmosphere turning back into limestone (CaCo3) .  So, the lime putty is used wherever it is that you need limestone such as in mortar, lime concrete, plaster etc...  How cool is that?

This link is for a diagram of the lime cycle.

I've heard quite a bit of bad press on lime lately from natural builders, but I think if the facts are considered this trend indicates a lack of skill and knowledge on the part of users and/or the use of poor quality lime rather than any shortcoming intrinsic to lime as a building material.  After all, there are still buildings standing from Roman times that are built with lime.  There are also hella old cob houses in Europe that would be eroded into the ground if not for their protective lime skins.  In the book Building With Lime by Stafford Holmes and Michael Wingate there are numerous caveats about how the quality of lime products affects results in building projects and the care required in application and curing.  One of these is the recommendation against using hydrated bagged lime in building.  The impression I was left with after reading Building With Lime is that hydrated lime is an inferior product produced out of convenience and for specialized uses where powdered lime is required.  Freshly burned quicklime has a short shelf life, is highly reactive and is dangerous to handle which probably accounts significantly for its general absence from regular commerce.  Add a little water to get most of the dangerous reaction over with and voila- safe inferior product!

Lime putty is considered by traditionalists to be a greatly superior product, but it is hard to come by and what is available is quite expensive to buy as well as to ship.  It would be great if it was available locally where limestone or shells occur in sufficient quantity.

tonia and I had both done at least some homework on lime basics and lime burning.  I was looking around for local limestone sources (scant, yet promising) but then realized one day that I had a good sized pile of mussel and clam shells from foraging trips to the coast. I always dump my shells in a pile intending to someday grind them up for use as a fertilizer.

The shells were sorted out and weighed out at around 185 pounds.  (Note to self:  save the work of sorting by not dumping shells under deciduous oak tree.)  There were also a few periwinkle shells (a small sea snail) and a few ratty looking abalone shells were also thrown in.  (abalone shell dust is known to be toxic so I'm not sure whether this was a good idea or not.)  We realized that we didn't really know enough, but decided to throw together a first run so that we could get our feet wet and possibly clarify questions to ask and find answers to.

Manzanita was gathered from dead trees that had been overgrown by larger trees.  Manzanita is a pioneer plant.  It colonizes new areas where its dense shrubby growth shelters young tree seedlings of other species.  The sheltered tree seedling trees grow up like the ungrateful dependents of a wet nurse eventually shading out and killing the Manzanita.  The wood sits there for many years without rotting.  it has a very high fuel value and produces little ash.  Being winter, the wood was somewhat wet which may have been an advantage as its general tendency is to burn very fast and hot while lime should not be burned too hot.  Still, as woods go, Manzanita absorbs less water than most, dries back out quickly and burns pretty well when wet.

Half an old water tank with the bottom and top cut out was chosen for a kiln of sorts.  Originally bricks were considered, but there were not enough about and in retrospect loosely stacked bricks seems a poor idea while mortaring them up with clay seems like too much work for a one shot kiln.

A trench was dug to admit air to the center of the kiln and allow for ignition from the bottom.  A carefully laid crisscross of twigs and split pitch saturated fir was constructed to insure a quick and easy ignition.  This starter pile was then filled in from the sides.  The slate roofing scraps were to prevent excessive steam rising as the ground was wet and rain was expected, as well as to make a clean dry floor for the burned shells to settle on.

Fuel was laid as densely as possible by careful stacking, but in retrospect, more care might have been taken in some sections.  It was somewhat difficult to reach in and place fuel carefully, but I think it is probably important.

as the pile progressed, larger pieces of wood were placed in the kiln to form a flat surface to receive the shells.

The shells were placed in two layers.  Originally we had discussed keeping the shells to the center of the pile.  This idea was not carried out however and the shells were pushed all the way to the edge of the kiln.  With some experience now, I'm inclined to think that next time it would be best to form a flat layer of wood as we did, but then form a raised rim of firewood around the edge to contain the shells… something like building a gravy volcano in your mashed potatoes.

The second layer of shells was left on top of the wood.  In retrospect I think this was a bad idea and they should have had a layer of wood on top of them.  I thought it was okay because there are traditional burns that put the limestone or shells on top, but Jeff Price at Virginia Lime Works said that those traditional open burn piles are built carefully in such a way that they collapse in on the shells.  Leaving these shells on top probably cost us 50% of the shells being incompletely burned.  Possibly too, with a proper kiln that had some insulation or at least some mass that could heat up or a narrower opening? the shells might be able to be on top without a layer of wood.  In this case though, I think a layer of wood on top would probably be better.

The pile was lit from underneath with a torch of dry grass and slivers of pitch wood bound to a long stick.  It worked great and spread rapidly into the carefully laid fire base.

We had decided to wait until dark to light the kiln as I knew there was likely to be a great quantity of smoke and steam produced.  Good thing.  I was right and I'm sure it would have worried the neighbors greatly if not the fire department although it was quite wet out.  I wouldn't want to do this in our fire prone area in any but the very wet seasons.  The first 45 minutes or so were all smoke and steam though the side of the barrel near the air entrance was glowing red.

At some point it was decided that we needed air on the other three "sides" to get things burning evenly.  Holes were dug under the container just enough to let some air in.  The air flow was controlled with broken pieces of roofing slate.

The fire was cool enough by morning to start sorting and rain was expected, so we got right to work.  The burn was only partially successful in the goal of producing lime in that much of the shell was under-burned.  If making lime had been the sole goal we would have spent more time in researching and such.  The primary goal was to get our feet wet (dry?) and stimulate our questioning minds before bugging anyone with too many questions.

The shells that did not burn enough were darkly colored.  The fully calcined shells were white all the way through feeling almost painfully dry like fresh fired pottery.  Calcined shells are very light in weight and ravenously thirsty for some water which they will react with even in the quantities available in the atmosphere.  In short, freshly burned quicklime is unstable and should be processed immediately.

I was guessing that about 1/3 rd of the shells burned enough.  Considering that the shells lose a lot of weight and the end result was 40 pounds maybe I wasn't too far off  base on that guesstimate.  I'm guessing that a final layer of wood on top, laying the shells in such a way that they are completely surrounded by wood, and or some insulation or at least a heatable mass to the kiln could shift that into a more acceptable figure.

DON'T MISS PART TWO, SLAKING THE LIME! WOOHOO!

Having done this one simple, but largely successful lime burn, I am encouraged by the results.  I'm hoping that, aside from collecting the stone or shells, two people will be able to do a 200 lbs shell burn in one day including firewood collection.  How much this will yield is unknown, but I'm hopeful that it will be enough to make it "worth it".  I have my own ideas about what is and isn't worthwhile in terms of work v.s. returns.  It is difficult in the society we live in to step out of the monetary global economy enough to see value that is not directly weighed in dollars and cents terms regardless of other factors such as personal investment and satisfaction, meaningful work, broader impact, pride in workmanship and so on.  Neither view is correct in the strictest sense, but they rather reflect our values don't you think?  And because the economy we live in is so persistently invasive and all encompassing in most of our lives,  it shapes our values without us even knowing it causing us to use an assumed "bottom line" as a measure of worth for nearly everything we do.  The trick is not so much whether we can notice this phenomenon, but rather whether we can actually embody an alternative idea to the extent that it can manifest change in our behavior.

Building things with my own lime burned here on the land rubs me right on many levels and that feeling pulls a lot of weight in deciding whether its "worth it" or not.  I'm hoping that I can actually make another significant impact in bringing the pieces of my life home to roost outside of a network of supply and demand that I can't possibly grasp, understand or in the long run rely on.

Currently people use mostly concrete where lime was once used.  Lime however has some benefits that are overlooked by modern builders.  Concrete also has some benefits, but is more costly and energy intensive to produce.  A lime revival seems to be underway, though most of it in the US is still centered around hydrated lime paste.  The more encouraging part is the few dedicated people like those at Virginia Lime Works who are following traditional methods of production and use out of a sense of integrity.  I asked a Guatemalan friend what kind of lime they used in building and she said they just go buy the rock from a quarry cheap and burn it themselves.  I like that.

I think from here we will probably try another burn to correct some perceived mistakes and possibly build a better kiln designed to be re-used over and over.  As far as kiln size goes, I think I would favor the 200 to 300 pounds of shells (or whatever the limestone equivalent would be) range.  I have a particular interest though in figuring out how to make lime and bio-char at the same time.  People now are burning wood just to make bio-char without even using the heat.  What if we could burn biochar while making lime!?!  That would be awesome!  I have no idea of the real feasibility of this idea, but it is intriguing anyway.