
 This update is loooong overdue. In fact, it was started maybe as much as a couple of years ago, but never finished. So overdue in fact, that I've divided it into two parts. This part will deal with burning in a metal drum, while part two next week will assess some clay and straw kilns that were built later on.
Warning, extreme geekage ahead! This will be TMI for most people, but hopefully useful for those who want to understand and pursue lime burning. Although I think using a drum is not the greatest, I'm using it as a reference point to try to understand and relate the process as a stepping off point, because this has been our evolution. Future posts may be more along the lines of “how to do this right”. This article is somewhat of a chronicle of an evolution, but contains a lot of relevant ideas and information to help the would be lime burner better understand the issues involved.
Lime burning at Turkeysong is pursuing broad goals. One goal is to make home-scale lime burning practical enough to use in development of infrastructure here on the land. I'm also interested in assessing the practicality of burning lime for agricultural use. A small amount of lime is already in use here for processing leather and rawhide, as well as for preparing corn for tortillas and hominy. Other uses will no doubt arise, such as the tree trunk paint formula I’ve been working on and all sorts of building and paint projects. Another goal or motivation, as always, is to be able to share this information out to the end of providing achievable alternatives for small scale builders and self reliant tinkerers. I am encouraged by the results so far and am looking forward to experimenting more. I wanted to offer some insights gained up to this point, both for the benefit of people who want to try burning lime on their own and also just to have it written down for future reference.
The first burn (see lime squad #1) was done in an open ended (both ends open) section of old rusted water tank. After that burn, tonia and I decided to move to a 55 gallon drum with both ends cut out, essentially the same thing, but different proportions. We stuck with this plain unmodified 55 gallon drum for quite a while in order to observe just how far we could go with this simple and widely available object. We also used a smaller drum about 10 or 15 gallons, which worked, but harder to keep the shells in the middle of such a small drum. Having done 8 or 9 burns now, the capabilities and limitations of the drum on it's own seem pretty clear. insights into what might be important in future kiln designs have also been gained. So this review will be a summary of lessons learned by sticking with the plain metal drum for a while with an eye toward better kilns.
The simple drum, burning mixed layers of wood and shells, works but it does have many limitations which are unacceptable in the long run. Still, as it stands it can be a useful method and its accessibility is great. If a person wanted to do just one burn to make lime for nixtamalizing corn, to lime wash a building, or to build a small masonry project, etc… I don't see any reason why they should not go ahead and use this method if there is a clean (already burned out) drum and plenty of wood lying about. For anyone who wishes to continue to burn lime or needs a larger quantity than that provided by just a few burns, it may be considered fairly irresponsible to use these huge quantities of wood and produce so much smoke without trying to improve the system.
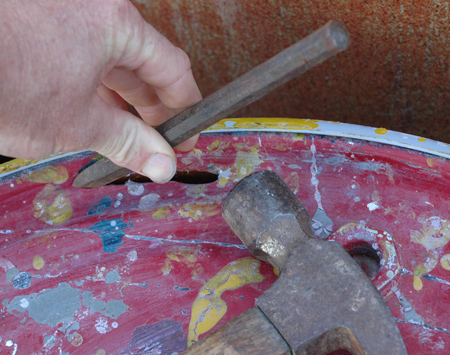
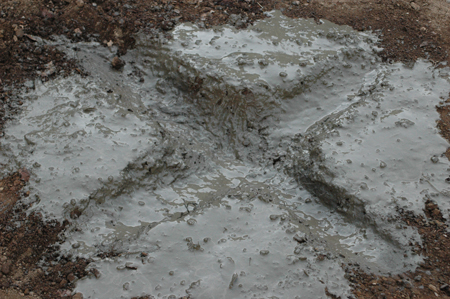
The basic drum system as used here is a 55 gallon steel drum with the top and bottom cut out. The drums are easy enough to cut with a cold chisel and hammer by simply chasing around the edge of the rim while holding the chisel at an angle. Two intersecting trenches are dug in the ground forming a cross which allows draft from four sides directly to the center of the fire. The trenches are probably 3 or 4 inches deep and about that wide. The trenches and ground were sometimes smeared with clay soil paste to keep the burn cleaner and stabilize the trench walls. This expedient, though not necessary, is quite nice and is recommended if there is some clay, or even just clay bearing soil, handy.

When adding sticks to build up a base for the fire, work in enough small stuff to spread the fire quickly. The starter fire is built up on 1 to 2 inch sticks laid parallel across the trench intersection with one inch spaces between to allow a good draft. On this platform/grid, lay alternating layers of crisscrossed sticks. Be sure to leave spaces between the all sticks for air flow, and put fine twiggy material in between the layers of larger sticks. Build up a pyre of sorts about 8 to 10 inches high. Place some wood in to fill in any gaps around the edges which will keep shells from falling below the level of this platform. A good quantity of small wood is used in these first layers to help spread the fire quickly, while most of the mass of the wood in the rest of the burn should be a little larger and up to 4 inches in diameter. Larger wood burns more slowly which increases dwell time (how long a shell or stone stays hot in the kiln), though too much will cause slower combustion and therefore more smoking time before the fire gets burning well enough to start flaming off the smoke at the top of the drum. Using a portion of green or damp wood will probably still burn the shells, but will produce more smoke and increase start up time. If available, working in some pitch saturated wood from an old pine of fir stump will help get things off to a quicker start.

Once a good layer of wood, including some big stuff, is in place and forms a flattish table, shells are poured in. In order to keep the the shells away from the sides of the drum, wood is sometimes stacked upright against the sides before pouring in the shells. At the least, try to pour the shells toward the middle of the drum, so as few as possible start out touching the sides. One square milk crate full of oyster shells has been our standard measurement for a shell layer. On top of the shells another layer of wood is added of mixed sizes, but use mostly larger wood in terms of the total mass. up to 3 layers of shells and a cap of wood can be fit into the first run, though if the lay is sloppy, only 2 layers of shells with a cap of wood will result, which seems okay since more shells and wood are added once combustion is well under way. The fire is lit from underneath by shoving in a wad of burning twigs and grass.


Even if the wood is dry, this arrangement will put out huge amounts of smoke for quite some time, that being one of its main drawbacks. Once the smoke and other gasses begin to flame off at the top and the kiln is burning more cleanly, some extra wood is added followed by another layer of shells, and then more wood. We have, with this method, burned up to 6 crates of shells in one run, starting with 3 and adding three more over the course of the burn. But at 6 crates, the top shells seemed a little under calcined and I’m more inclined to use 5 crates total in one burn. It’s good to put a fairly generous layer of wood on top of the last shell layer to help insure that they are burned adequately. It's okay to mound the wood above the top of the drum, because it will sink down as it burns. The vents are left open, and by morning the shells are cool enough to sort. If rain is imminent, put a lid on the drum when it burns low, so that the burned lime does not begin slaking. Slake as soon as possible.
(edit: In writing this post I completely forgot to mention that we did do a burn with charcoal only and that it totally works to eliminate the smoke issue. Charcoal is pricey, but if you need to do a smoke free burn for some reason, it does work.)
After burning, the lime shells are sorted according to color, weight and/or texture. Heavy shells with considerable greying (a sooty blackish grey color on the surface) are sorted from the "good" shells which are light weight, whiter and often soft or flakey. Many shells will appear to fit in between these criteria and a judgement call has to be made. Knowing what to select and not select is difficult. Around here, we slake the less ideal stuff for tanning hides, or it is used for agricultural purposes. The lime is slaked with hot water in a half barrel or wheel barrow using a hoe to stir after which it is diluted with water to a cream consistency, poured through a 1/32 inch screen and allowed to settle. The feed sack method can be used to achieve a firm putty more quickly, by pouring the lime cream into a woven plastic feed sack and allowing it to drip out water until firm. Store lime putty under a layer of water in a sealed container. The feed sack method gives a firm putty more quickly. (for more on slaking, see limesquad II)

SUMMARY OF THE DRUM METHOD
SMOKIN’: Because the fuel and shells are in layers, the draft is greatly inhibited by the shells and wood stacked inside, so the system produces copious amounts of smoke. Typically the arrangement will produce billowing smoke for 20 to 40 minutes before the top starts to flame off. For a while, a sort of chimney of bound small twigs was placed in the center of the burn to help with draft and spread the fire more quickly, but it really didn’t seem to help enough to bother. We also tried starting a fire in the bottom and then feeding the fire layers of shells and wood. By adding wood, letting it begin to burn, and then adding more shells and wood before repeating that process, somewhat less smoke may be produced, but not all that much less. The smoke is a fundamental problem with this approach which is probably unavoidable, so that is major issue #1 motivating toward a better system.
USES A TON OF WOOD: The system is also inefficient. I have not really weighed or otherwise quantified the amount of wood used per amount of lime gained, but it is certainly quite a lot of wood. Cutting wood is the most labor and time intensive part of the method and if a chainsaw is used that incurs use of non-renewable resources, so a more efficient system is definitely in order. Who wouldn't want that!
TOO MANY UNBURNED SHELLS: Another problem encountered is that only a certain percentage of the shells calcine completely. Many shells will show under burned grey areas and feel heavy. These are sorted out and can be slaked for hide tanning and agricultural purposes, if they will slake at all, but then the point of the process is to burn lime and make putty; so, although there is no "waste" here at Turkeysong in some senses of the word, the closer we can get to 100% calcined, the better. Numbers above 80% can be achieved in the drum with more careful fire lays where the shells don’t touch the side (I almost said sides, but I guess a cylinder only has one side, or does it?) which is not so horrible I suppose, but it would be nice to see that number rise.

LIME QUALITY: The lime burning literature from days of yore not infrequently mentions differences in the quality of lime from different burning methods and kiln designs which basically equates to how thoroughly the raw material is calcined. It is difficult for us to tell just how Turkeysong lime measures up in that regard because it is a qualitative judgement. The lime does slake very actively, but the question is how much remains un-slaked and under burned in very small particles that pass through our 1/32 inch screen? Aging should help by insuring that anything that will slake eventually does so, but the qualitative judgement of lime in the past is one that was hard won by generations of knowledge and experience which I don't have and am unlikely to encounter on the west coast of California, so I'm a bit in the dark. It just remains to use the lime and make what observations I can. I’m inclined not to worry overly much about it at this point, and think our lime is probably actually of very high quality.
DWELL TIME: Part of this quality equation may have to do with dwell time, which is how long the shell or stone is held at the calcining temperature. The drum burns are relatively fast. If started at dusk, the burn is cold by dawn. The actual calcining happens only in the short section of time that each area of the kiln is very hot. At this point, I feel unsure about what adequate dwell time is, but feel that it is probably not very long. In one burn we decided we should try to slow the process for longer dwell time and to make sure the burn was not too hot. We packed the wood in extra tight which took a very long time and required shorter wood. Once it was burning well, the vents on the bottom of the drum were shut all the way down. It was a total failure and the shells didn't even slake. Next time around we began measuring the temperature through a nail hole in the side of the drum and with the vents running wide open we always seem to be right around 900 celsius/1500 fahrenheit in the burn zone which is just where we want to be, and the temperature at which wood wants to burn without an artificial draft. This parameter has been so consistent in fact that we just quit measuring. (For the geekier readers, we used a two wire probe on a digital meter. Some electrical meters, notably Flukes, have a temperature setting. The probes use two parallel wires and often burn off in the fire, but are simply trimmed back each time. They last long enough to get a measurement.)
SHELLS TOUCHING THE DRUM DON’T BURN ENOUGH: Of shells which appear under burned (noted mostly by a grayish color to the surfaces, but also by weight and texture) most are those which are close to the outside of the drum. Our solution so far has been to try to keep the shells to the inside. In some burns we stack wood against the outside edges standing upright and pour the shells into this pen so that there is always a layer of wood between the shells and the drum sides. I recommend this approach actually, but the whole thing still falls to pieces and many shells end up against the outside. Shells touching the drum sides usually comprise the majority of those that are under burned. I think this problem touches on at least two factors in kiln construction that can lead us to a better design, which are mass and insulation.
ABOUT MASS AND INSULATION: I’ve done a little reading on kiln design, but mostly what follows is extrapolated from a working knowledge of, and intuition regarding, heat and fire. I feel sure that adding insulation would help minimize under burned shells by evening out the temperature. As it stands now, because the metal is a great conductor, the drum is a big radiator and is literally sucking heat away from any shells that touch it. Using enough insulation should help with that problem by insulating the metal of the drum enough to keep it hot while allowing heat to build inside the drum. It’s hard to say to what degree the temperature would be raised, but my guess is that it won't ever be too hot when burning wood with a natural draft, and may help keep the kiln at a more all around even temperature. Since we have consistently measured the temperature we want, the goal is not so much to raise the temperature, as it is to make the heat in the kiln more consistent and, if possible, have a larger area of heat in the kiln at any given time; that is to say that the heat zone of the kiln would have more depth. Still, a slight rise in temperature shouldn't hurt anything. It is probably difficult to get the wood to burn at a temperature that is high enough to over-burn lime, which is one of the advantages of using wood in the first place.
I feel that mass could help too, by creating a more even heat due to a moderating action. The three types of heating are essentially radiation of heat (think standing near hot coals), contact with a hot object and contact with heated air (Ok, so the last one is contact with gasses and therefore is similar to contact with an object, but for practical discussion purposes it is a common and useful division…). What we have when the shell touches the side of the drum is the opposite of contact heating. In the drum, we are relying on all three types of heating. When a shell touches the side of the low mass drum which is exposed to the open air on the outside, we suck heat away from the shell because steel is an excellent conductor of heat. Insulation would help keep the gaseous environment more evenly warm, but the thin drum still has a low mass. If mass was added it would suck up some heat from the fire initially but, even with no insulation, a thick, but not too thick, mass might have a moderating influence once it came up to similar temperature relative to the rest of the kiln. Also, and this is an important distinction, any material we are likely to use as a source of mass, or as a kiln building material or modifier, will have at least some insulating value when compared to metal. Any mud or clay based material would be a far cry from metal in terms of heat conduction and should function partially as an insulator as well as being potentially useful as a temperature moderating mass. Most traditional kiln designs do not seem to be insulated at all beyond whatever it is they are built of, so this concept of massulation must work more or less. What the mass portion has to offer would be an evening out of the internal temperature. Once heat is absorbed it is given back off as radiation toward the interior of the kiln. The re-radiation of the heat from the mass toward the inside of the drum should add a third useful element of heating, that being to even out the heat environment.
The short version of the above is that with a plain drum, we have hot gasses and a little bit of contact with the hot coals to cause calcination, while we simultaneously radiate heat away from the process with the highly heat conductive drum exposed to the air. A metal drum is probably one of the worst things we could use in that regard. Adding some mass (preferably slightly insulative) would add the element of heat radiation to keep the internal temperatures more even throughout the kiln. I'm leaning toward a thin layer of mass followed by a layer of insulation as an ideal. A combination of the two, a massulation, might provide enough insulation to prevent the radiator effect while possessing enough mass and its special benefits to improve the system. Practically speaking this may be the more useful option depending on what is available locally for kiln building. And this exactly what we’ve done in building a straw and clay kiln, which will be discussed in the next installment of the lime burning saga...


