

grain header
By Steven Edholm
UPDATED SEPTEMBER 2020
Hey!, the Buckeye Gathering barktanning class is coming up and I have bark on the brain. This article is going to be awesome. A lot of people ask my advice on barktanning and I see the same mistakes made over and over again. I can help, because I’ve made them all too (and still sometimes do), so I know whereof I speak! So listen up fledgling barktanners, because we can save you a lot of frustration, heartbreak and WTF moments.
PROCRASTINATION: This is a common mistake in tanning in general. I still do it all the time, unfortunately, but I shouldn’t and you shouldn’t either. Bark tanning is more forgiving than some other types of tanning because some of the solutions the hide is put into can be preservative to a degree, but that shouldn’t be used as an excuse to keep putting off what needs doing. The solutions used in liming and tanning are not foolproof and will not preserve the skin indefinitely, so try not to use their limited preservative power as an excuse for procrastination. good luck with that.

procrastination can lead to problems such as this damaged grain, which has lifted from the main body of the skin.
USING CRAPPY HIDES: For some reason, people tend to pick some crappy hide for bark tanning. I don’t like to start any tanning project with a crappy hide. It’s too much work to waste on something which can’t be better than the material which you are starting with in the first place. If crappy hide is all you have and you want to experiment with bark tanning, working with just a small piece of it can be a great learning experience. And in general, don't be afraid to "round out" scrappy skins, meaning trim off the rough stuff and tag ends, before tanning. I also don't think it's a great idea to start with a really large hide. Actually, squirrels are great and make a great starter project, and really nice leather.

This skin is scored. Try to start with decent skins, or use parts of them to experiment on rather than tanning the whole thing.
LEAVING IN THE LIME OR BUCKING SOLUTION TOO LONG: Leaving the skin in lime or a bucking solution too long is not uncommon. The skin can stay in for quite some time and come out okay, or even great, but try to leave it in for a reason other than blatant procrastination! This issue is dependent somewhat on the strength of the solution too. Although long liming is sometimes used intentionally, and sometimes in weak lime, generally you want to keep the liquor strength up. In the beginning, you should probably process the skin when the hair slips out easily. Overly long liming can weaken the skin and damage the grain. Keep the strength up by stirring or adding more lime as necessary. If using wood ashes, make sure they are strong enough to swell the hide well and again, keep the strength up as necessary. In either case, if the hide is not swelling a lot within a few days or the hair doesn’t start to slip within a week, bump up the strength. It is okay to use extra lime since only so much will dissolve into the solution at once. If there is extra lime, more dissolves when you stir it if the solution becomes “used up” by the skin.
NOT DE-LIMING ADEQUATELY: Re-scraping to push out lime and dissolved tissue is called scudding. Rinse the skin thoroughly many times, and scrape over it on both sides between soakings. Use the tool backwards on the grain side so you don’t damage the grain and make sure there are no nicks in the blade. In other words, hold the tool just like you are going to flesh the skin, then turn it around so the underside of the edge just drags across the skin. This is also a better way to de-hair skins, see the video linked below. You will see a lot of dissolved crap, white lime and yellow gunk come out of the pores. You don’t have to scud the hair side every time, but do it once or twice until there is not much coming out. When the water coming out is mostly clear, and the skin has “fallen” back into it’s un-swelled, flaccid and floppy state, it is de-limed. You can finish with bating or drenching (soaking in poop or fermenting bran respectively, but those are another story), or at least rinse with a splash of vinegar in water before tanning begins.
USING WEAK ASS MATERIALS: It takes quite a bit of tannin to finish out a full skin from a medium sized animal, let alone something large like an elk or cattle skin. There are tannins everywhere. They are in most plants to some degree. Finding sources rich enough, or abundant enough, to make good tanning solutions and tan hides safely and thoroughly is less common. Don't use, old dead bark or dead leaves. You need leaves or bark that have been gathered when fresh, and have not been rained on for a season, or worse. Keep your eyes out for freshly fallen trees and get the bark when you can, storing it for later. It is possible to use weak-ass materials, but it is not practical, nor very fun, and the results are likely to be disappointing. In most cases, older trees have bark that contains more tannins than younger trees. Stripping saplings may work, but be prepared to do a lot of it! When you get that good material, chip it up fine. Boiling large pieces is another common mistake. You just can't tan a skin with some big chunks of bark floating in a tub... not gonna happen.
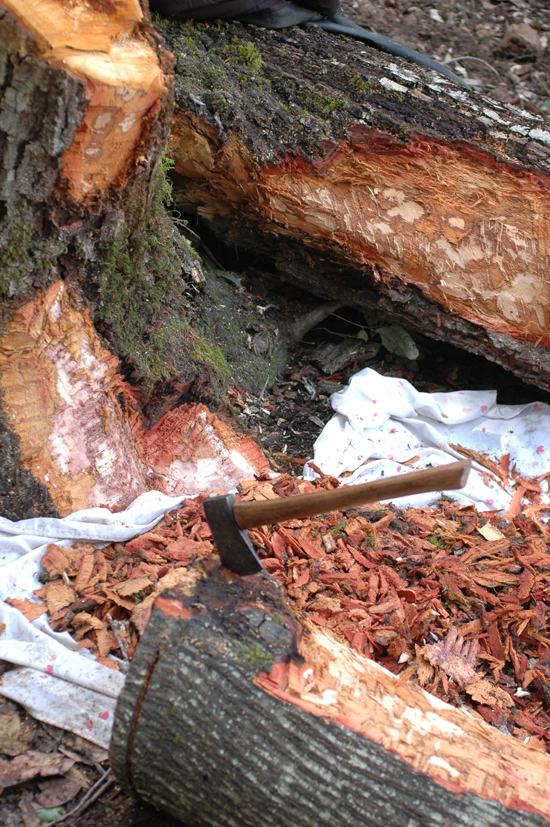
Gather fresh material whenever possible. Old dry bark that has sat out in the rain is poor in tannins. Be opportunistic as in this case, gathering bark from a tree that fell across the road.
MAKING THE SOLUTION TOO WEAK: This problem can happen for numerous reasons, some already covered above. Many people are so terrified of case hardening, that they start with a very weak solution and then finally end up with a solution that isn’t even strong enough for a good start. The skin can be put into a pretty strong tea in the beginning without adverse effects. It can also be brought up in strength very quickly once the skin is partly tanned. For instance, you can go from weak to medium over the course of a day and have the skin in a fairly strong solution on day two. Case hardening is not common and in my experience must require a very strong solution. I just threw some squirrel skins into a full strength tanoak tea and they came out soft and beautiful. (full strength meaning shredded tanoak bark just covered with water and boiled for hours, like the picture below.). Apparently, some materials cause case hardening more than others, but it is not hard to avoid and most err too much in the weak direction. It is only a problem in the beginning of tanning, so keep ramping up the strength as suggested next…

This bark liquor is awesome. It's hard to produce good rich liquor like this from tannin poor materials. It is possible in some cases, but be prepared to work at it by using the same water on two batches of material.
NOT STRENGTHENING THE SOLUTION ENOUGH DURING TANNING: This is the most common, and possibly the worst, mistake. The skin will use up tannins very quickly in the beginning! No really. A well prepared skin will take up most, if not all of the tannin in any starter solution in just one day, or possible less, especially if it is agitated as it should be. The process slows somewhat until the skin is struck all the way through. If the tan is agitated, the skin will tan quickly and the solution can be strengthened frequently to keep the process moving along. The typical beginner scenario is to put the skin in a very weak solution to start with, and then just leave it there until the solution becomes completely used up, which can take only a day, or even just a few hours in some cases. But even putting it into a strong solution, it is remarkable how fast the tannin can be used up, requiring strengthening.
If the solution is not strong enough, the skin will begin to suffer damage and loss of substance. Add concentrate frequently. If you are using materials which are poor in tannins, you will need a lot of the stuff to tan a skin (a good reason to do smaller experiments before moving on to full skins). Don’t judge by how much material you are using, judge by the strength of the solution and how the color is progressing through the skin. Judging solution strengths is difficult and has to be learned by experience for the specific materials you are using, but I also just don't think it matters that much unless it's too weak, which will be fairly obvious with a little experience. From what I hear from other people, and judging by my own experience, I’d say that a rule for beginners might be that if you think it’s strong enough, it could probably be a lot stronger. After the color reaches the center of the skin, most of the tannin binding sites are taken, and the fiber takes up the solution only very slowly. But it can still benefit the leather to remain in strong solution to soak up as much as it can.
Every time you check on a skin or on a liquor, pick it up in your hand and look at it. Pour it out and look at it too. While different materials will look different, you need to start getting some idea of how to judge strength and this is the most accessible way.

This is one weak ass tanning solution, because the new well prepared skin has slurped up all the tannin overnight. There is basically nothing left in here to tan the skins. Color does not always equate to available tannin. Add concentrate frequently in the beginning.
NOT MOVING THE SKIN ENOUGH: This mistake is probably most important to avoid during the tanning phase, but it applies to any process where there is a liquor involved. Any time a skin is put into a solution, stretch it over and move it around to be sure it is soaked all the way up in all areas. Several visits may be necessary if the skin is not well soaked up to begin with. Air bubbles trapped in the skin can also be an issue. Many beginners stuff skins into a bucket or vat and just leave them. The skins must have solutions contact all surfaces to be processed evenly. It’s okay to fold or wad hides into containers, but there should be some room, and the skins should be stirred several times a day for the first few days and then occasionally until finished. If not, they will not tan evenly and can finish uneven in color. A good strategy for small containers is to remove the skins and put them back folded differently each time. Just do it often enough. It is better to use large enough containers though. A bucket is hard to tan a deer skin well in, but an 15 or more gallon tub is pretty good.

This skin was dropped in the solution overnight and left there. Think what would happen if the skin was never moved? There are exceptions, but generally speaking, more the skin is moved, the more evenly and quickly it will tan.
DRYING THE SKIN WITHOUT OILING: It is best to oil or fat-liquor the skin once it is tanned, and before it is dried out. Otherwise the grain may be brittle and liable to crack on sharp bending. Oil functions somewhat like moisture does in living skin, providing lubrication for the fibers and engendering suppleness. A skin dried without oil, or with just a little on the grain side should still be like leather. It should not be stiff or crunchy and the grain should not be very brittle to the point where it cracks when bent just a little bit. If that is the case, the skin was damaged in tanning, likely from long soaks in weak tanning solution.

Oiling the skin re-lubricates the fiber and makes for a more wear and bend resistant grain.
OVER OILING: I’ve seen many hides that are over oiled. You don’t want the hide filled with oil. You want the fibers coated lightly with oil in most cases. It can be challenging to get oil into thick heavy skins, but just do your best and worry more about over oiling than under oiling.
BAD WATER: Water with iron can make skins dark and brittle. If you have to use high iron water, try to keep the time the skins are in the water to a minimum. If you have very hard water,or especially if it contains iron, consider collecting rainwater for liming and bark solutions. It is difficult to collect enough rain water for rinsing processes however.
Whelp, there are of course a lot more details to fill in but, given a basic working knowledge of tanning, that's actually most of the wisdom you need to know to successfully barktan skins! If you know someone dabbling in barktanning, send them this post. I rely mostly on word of mouth to get people here. Please let me hear your experiences and experiments in the comments section.


