Posts filed under Food and Drink Making

Saffron, Growing the Most Expensive Spice at Home

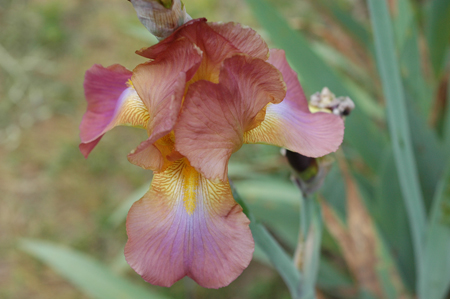
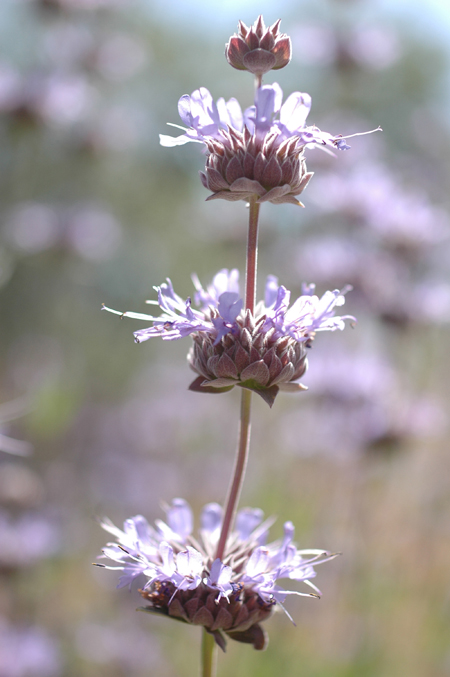
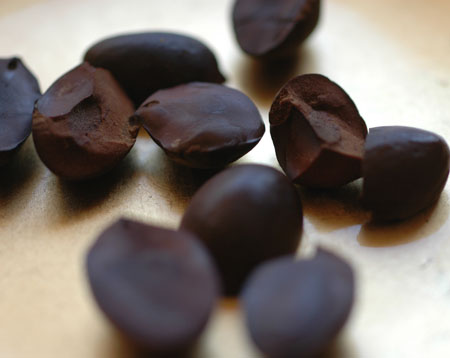
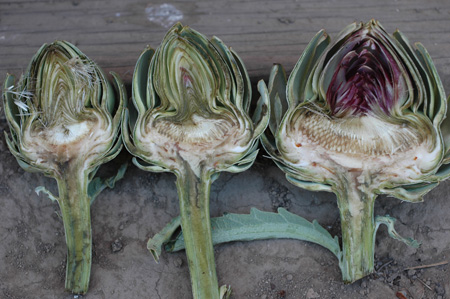
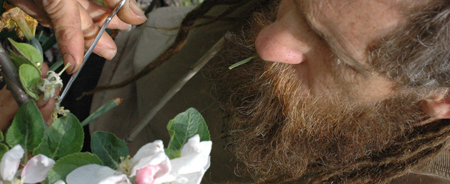
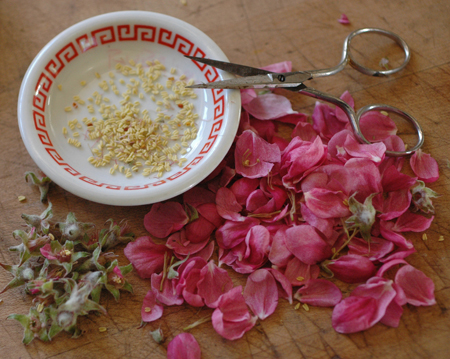
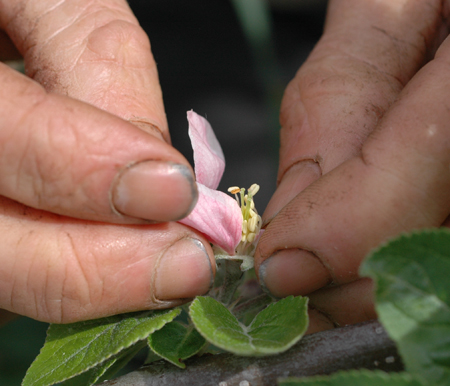
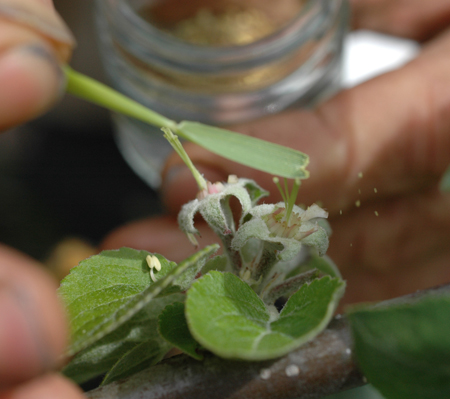
Todays video is on saffron.  Saffron is expensive!  a quick look on Amazon shows the lowest price around $5.25 a gram, which is approaching $2400.00 a pound.  Um, yeah, right?  Fortunately it packs quite a punch flavor wise and not only does a thread of saffron contain a lot of flavor, but it is essential that you don't use too much of it or it's rather odd and dusty flavor can unbalance a dish.  So we can be thankful for that serendipity.  Anyway, $2400.00 a pound and up, what's up with that?  I'll tell you what's up with that from personal experience.  Saffron is expensive for two reasons.  Not a lot is produced per acre and more importantly, there are no saffron processing machines.  Each flower produces only three threads of saffron, which are the red female flower parts that receive pollen (or at least they used to, now the plant is sterile).  Every flower has to be plucked out of the ground, which is slower than you might think because they are buried in a brush of tough leaves,  Then someone has to pick that flower up and nimbly extract the three delicate red threads without pulling out too much of it's lower white part which has no flavor, and without any other unwanted stuff like bits of petal or the male pollen bearing parts.  If the worker is to neither starve nor be fired post haste, this must be done rapidly and preferably by plucking all three threads at once, not breaking them off short or pulling off one or two at a time.

Every year thousands of mostly young and lazy people flood the region I call home to engage in the harvest of cannabis.  One of the more time consuming jobs employing thousands is trimming the buds to remove the larger leafy parts. Of course there are no statistics for a black market industry, but thousands flock here for this relatively high paying job.  It is tedious work, just like saffron plucking, but the pay is vastly better.  If saffron were illegal, people would flock to saffron growing regions to pluck saffron and leave with enough to live on for 6 months or more.  Alas, saffron production is an entirely legitimate business and if you go to follow the saffron harvest, I think you'd better save up for a while first and bring extra money with you for your saffron processing vacation!  I had some illusions of possibly growing the stuff for side income.  Well, let me tell you, those notions came to a screeching halt when I weighed an hours yield of saffron plucking not even including growing and harvest.  I'm going to try again someday when I'm better at it, but at this point is looks like it's the kind of work that the first world always shuffles off onto some place where people have fewer choices for employment.  I can tell you, if you pay 2400.00 a pound for saffron, someone is getting royally screwed in that transaction and it ain't you!  You're certainly getting a bargain.

But hey, money isn't everything and I'm about the biggest fan around of divorcing ourselves from the everything-has-a-price-tag, time-is-money, market value mindset.  I've spent a lifetime unlearning that way of thinking in order to pursue the kind of knowledge that I'm after.  If I stopped to value the stuff I do all the time, I would do very little of it.  That means I am poorly adapted to the modern paradigm and really have low survivability in the current default society, but that's okay with me.  There are things more important than money or survival.  Look buddy, when the local economy collapses because of the legalization of marijuana I'll at least have saffron aplenty for my mixed rodents with gourmet mushrooms and acorn sauce as I slowly starve to death up here in the hills defending the last of my carrot crop from wandering bands of starving out of work pot growers.  Nope, the saffron industry will never replace the pot industry in the emerald triangle but, thanks to it's inherent potency, growing enough saffron for your own yearly supply is very easy and not even that time consuming!  I enjoy plucking those precious little red threads out, at least to a point, and processing the flowers from a bed 4x6 even at the peak of the season is basically the amount of time it takes to watch a tv show or part of a movie.  I would present for your consideration the idea that kind of busy work is good for the soul.

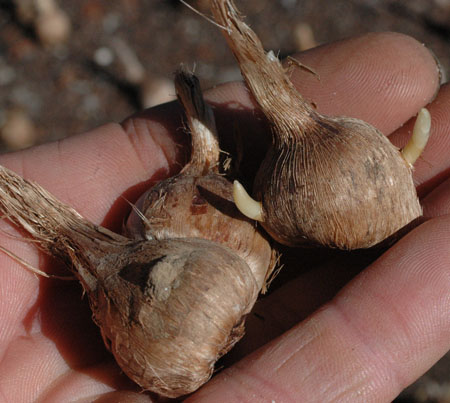
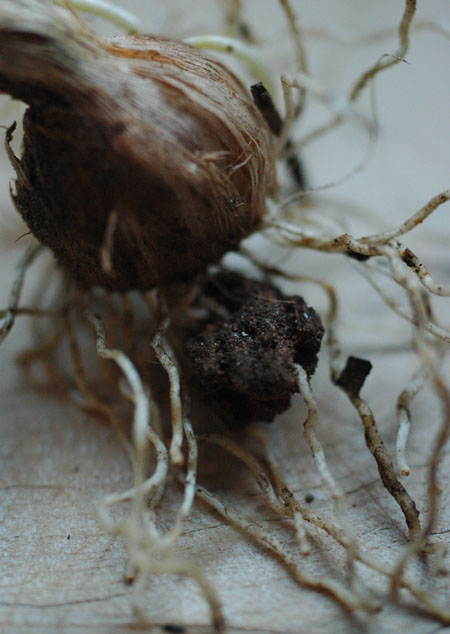
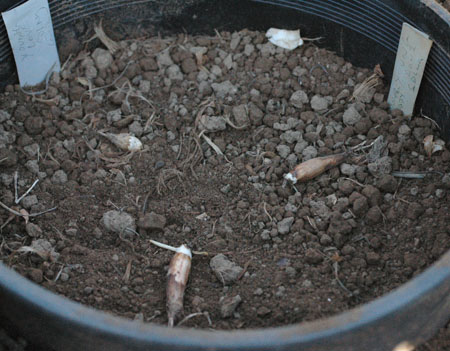
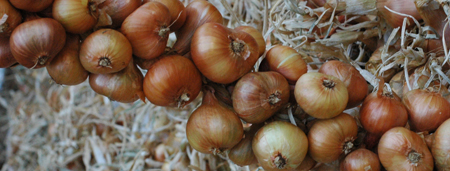
Saffron is easy to grow here.  I just plant the bulbs and maybe weed them and that's it.  I did get two different batches of bulbs and so far one batch is far out performing the other, so that is something to think about.  There are different strains, no doubt due to epigenetics or to random mutations over time since the plants do not produce seed but are grown solely by dividing the underground parts and planting them.  While the bulbs are rather pricey, it might be worthwhile to pay extra for a proven producing strain if you can find a seller you have that kind of confidence in, like a producer that sells bulbs on the side to subsidize saffron thread production.

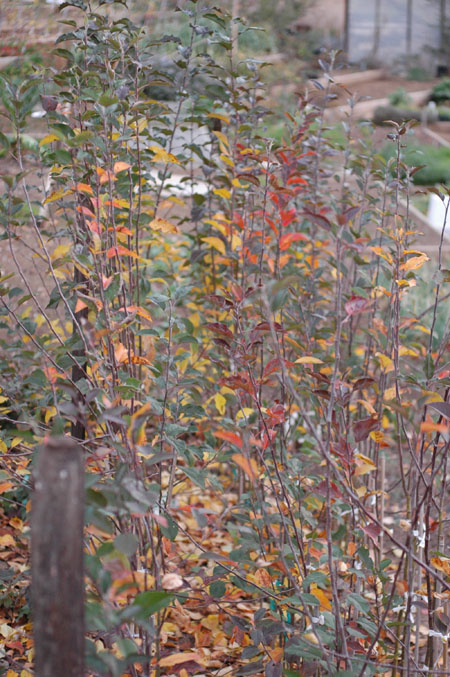
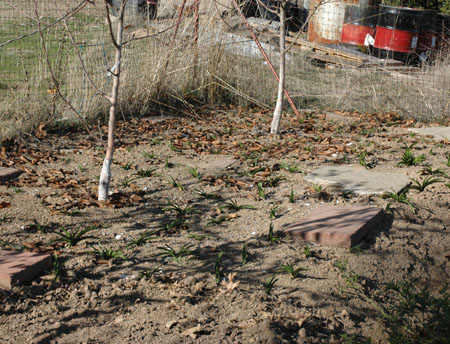
The worst problem I've had is that rodents seem to love them.  I had to plant them in a wire lined bed to keep gophers out, which has worked well for a few years now.  I've also made a lot of naturalized plantings, but they have done poorly so far.  I had hoped I could just scatter the bulbs all over the hills and wander around plucking them with the theme song to The Sound of Music playing through my head, but it is looking like they are not well enough adapted to this climate or soil.  I haven't given up yet, but it's not looking good.  I'm not sure where all you can get away with growing the stuff, but you can look into that on your own.  It seems to grow well in my mild Mediterranean climate.

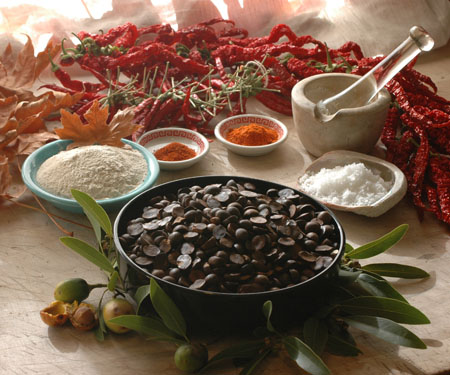
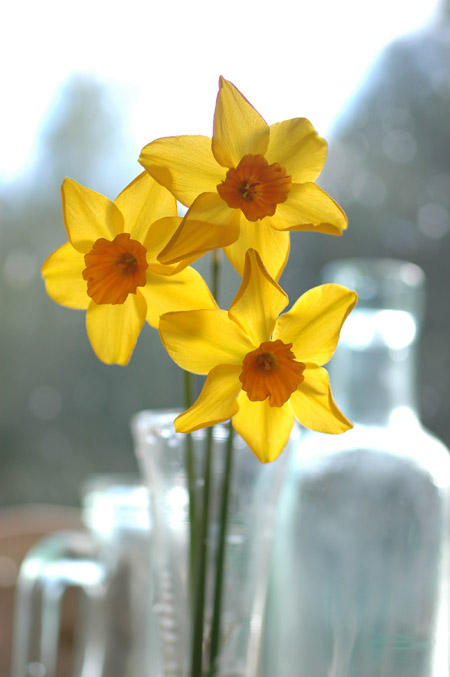
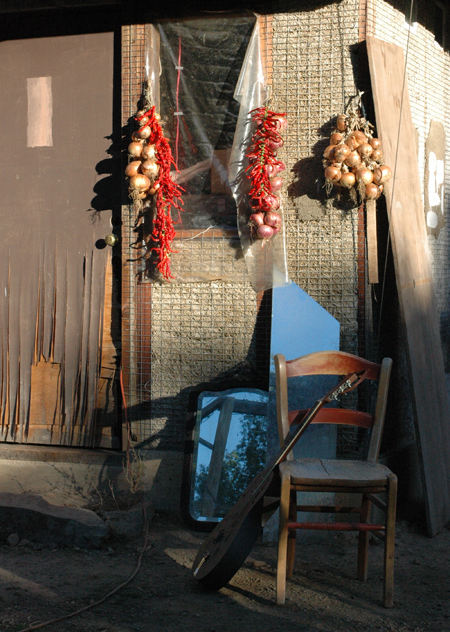
The flowers bloom in the fall and are harvested daily or up to every other day as they emerge and processed immediately.  Dry the threads quickly, but out of the sun and store in a dark jar.  It is an oddly flavored but delicious spice and I'm finding more and more uses for it.  Yesterday morning I made browned chanterelle mushrooms in a butter and caramelized maple syrup sauce with saffron, vanilla and candy cap mushrooms.  Was it good?  Do you have to ask?  Omg, it was so good.

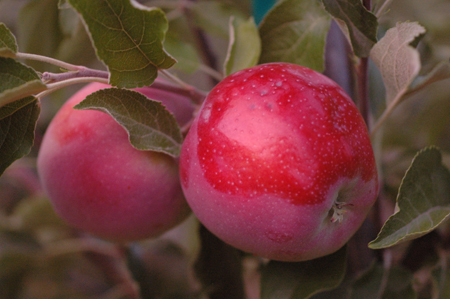
Well, that's it.  Watch my short and very pretty video, because it's cool and I worked hard on it.  And share it with someone you love so I can get more views and buy axes!  I don't actually really want any more axes, (though I probably want different axes).  I just want to test them all.  I'm only interested in having a pile of axes to the extent that it serves the purpose of learning me all about them.  Once I determine an axe or other tool is dead weight, just like an apple variety or saffron strain that doesn't perform, It's getting the axe so to speak.  Skills and knowledge over gear.  I have too many possessions already due to my not-so-simple living.  I also don't need more saffron than I can process, or tons of saffron that I have to care for, but can only process for 3.00 an hour.  Okay, maybe with the right marketing, selling local organic saffron to fancy by area restaurants maybe I could hit the point where saffron production is at least equivalent to very low paying job like working at walmart.  Or, maybe I'm wrong and I'll get super fast and crack the saffron code to make it a potentially viable business.  I think saffron will remain a labor of love though.   Anyway, I was saying that I don't need tons of saffron plants, so I can sell the extra corms to other would be saffron growers, which is honestly probably much more lucrative than saffron production.  Once I dispose of the poor producing strain and expand the good producing strain, I'll probably have bulbs for sale in my little SkillCult e-store or on ebay.  Until then, I think you'll see saffron cropping up in a recipe here and there.

Note that there is no advertising on this site, nor am I constantly pushing you to buy products, but only occasionally link products that I can pretty much get behind with little or no qualification.  That is no accident.  I feel that having advertising everywhere is contrary to my goal of convincing people to learn and do more for themselves and consume less.  The medium is the message as they say.  However, when you do need to buy stuff, you can help me succeed at my endeavors by bookmarking this link ( http://amzn.to/1Ne861e )in your browser bar and using it whenever you shop on Amazon.com.  It costs you nothing, but it has the potential to help me a lot if enough people do it.  If you don't know how it works yet, that link contains an ID that credits me a small commission around 4% to 6% on anything you buy through it.  That's why most sites are covered in links and ads pushing you toward Amazon or other affiliate programs.  I really don't want to do that, and I don't think you want me to either.  And a huge thanks to those of you who already use that link, it does make a difference!

One Year Shelf Stable Apple Butter Update, Still Going Strong

It's been nearly a year since I made my first batch of old fashioned shelf stable apple butter.  Today's video is an update on that project.  It spent the year in my trailer here with wildly fluctuating temperatures.  Many days were over 100 this summer and many more than that in the 90's.  There is no sign of spoilage and it still tastes delicious.  All the links to previous posts and videos concerning apple butter are listed below.  Unfortunately, I didn't have a lot of apples on my trees this year and have not been able to get any to make a larer batch.  It's an excellent product and not particularly difficult.  I hope you give it a try if you have access to apples.

Original blog post with recipe

All of the historical research I compiled

Hot Sauce, the Real Deal, Fermented, Delicious and Beautiful

DSC03166 (1).jpg

I recently wrote up a thing on the instructables site on how to make lacto-fermented hot sauce.  As of now, I’ve made the instructables home page as a featured post and have over 5000 views and 172 likes (edit, this morning this instructable also made the instructable daily email.  Likes and views are pouring in!  That's awesome.  I don't write this stuff for my mother to read ;).  It’s also entered into a contest.  I believe voting is open for another day here http://www.instructables.com/contest/preserveit/   I got my submission in kind of late, so there hasn’t been a lot of time to accumulate votes.


I’ve been looking forward to making this video because I get all fired up about fermented peppers and am prone to going on and slinging strong opinions about.  Many years ago, before fermentation was cool, I started trying to pickle some pepperoncini that I grew.  I love those wrinkly little things!  I looked up recipes for pickled peppers and they were all pickled in vinegar.  The results were basically inedible and certainly nothing like the pepperoncini you can buy in the store.  I was studying and experimenting with fermenting olives at the time and finally put two and two together, they had to be fermented of course!  I extrapolated off of a recipe for traditional fermented dill pickles and kaching!  Success!  I had figured out how to make pepperoncini that handily stomped the best brands you can buy (more on that and testing pepperoncini varieties some other time... and other pepper related stuff.  I basically can't grow enough of the things to supply all of my numerous pepper habits).  From there I started making pimentos and hot sauce and have done so ever since, gallons upon gallons of all of them.  I published my rather detailed and long article on fermenting peppers on the paleotechnics site 8 years ago, when there was very little on the web about fermenting much of anything.  It is worth reading if you want to know more and stuff like the rationale behind fermenting anaerobically in mason jars, though I think it could use some updating.  I haven't read it in a while. 

Cupboard stuffed full of lacto-fermented pepperoncini, pimentos, hot sauce peppers and olives.  None are heat canned.  They are live ferments sealed up with a protective layer of carbon dioxide from the fermentation process.  Damn, th…

Cupboard stuffed full of lacto-fermented pepperoncini, pimentos, hot sauce peppers and olives.  None are heat canned.  They are live ferments sealed up with a protective layer of carbon dioxide from the fermentation process.  Damn, this picture is making my mouth water.  I usually store my hot sauce peppers like this and just make up one jar at a time into sauce as needed.


This is the real way to make hot sauce.  Peppers ground up in vinegar will never be the real deal.  It is really easy too, no magic hoo-doo or lab coats required.  Read the instructable here, or you can just watch the video below, which is visually appealing and under 5 minutes long.  So here you go, full screen, HD recommended.


Two Sweet Crabs That Don't Pinch! Trailman and Centennial, Delicious Super Early Crab Apples,

https://www.youtube.com/watch?v=rV0EqNy7bw8

Here is my review of two crabs that fruited here on Frankentree for the first time ever. Centennial and trailman are very similar and seem to ripen at the same time.  Both have good flavor and very good to excellent texture, even after a recent heat wave with consecutive days over 100 degrees, 101, 103, 103 in the shade.

I have a particular interest in crab apples that are edible out of hand, with good dessert quality and these two really fit that description.   They are not only very good to excellent in eating quality, but they are also the second apples to ripen here, this year in the first two weeks of July.  "First early" apples are usually low in sugar, grainy or mealy and just not that great for eating.  Time will tell more, but I can already tell from just a few samples that these apples are a great find.  I'll probably be breeding with these in the future as I think excellent dessert crabs are something that needs work and has great potential.  These are super easy to eat, since you can eat the entire fruit with the core, seeds and all.  The seeds only add to the flavor, like an almond flavor filled center.


Amateur Apple Breeding Video Series Launched!

spread the love baby (you have to read that in the voice of Issaic Hayes;)

Yay!  The apple breeding video series is off the ground!  I really wanted to get it launched this year because I made a lot of pollinations this time around, and I'm not sure how many more years I'll be doing it.

The first two videos are published .  They are basically the same video in two parts, of me talking about why I'm breeding apples and basically why I think more people should breed plants, apple breeding history, along with some gentle ranting (only had to bleep out one %$#*& word!  Pat me on the head).  The next videos will be thoughts on selecting parents and then onto the fun part, the first how to segment which is on pollination.  The pollination segment is mostly done, and I think it really turned out beautifully with my new drastically improved video capabilities.

The concept of this series is to follow the entire breeding process starting from pollination, for many years onward, until those specific crosses bear fruit, and likely beyond that as the fruit is assessed over a number of years to see if it is worth naming and propagating.   Also, we'll be following my progress with the whole project which is around 4 years in right now.  I made my first pollinations in spring 2011, so I may get lucky and have some fruit as early as next year.  One of my first seedlings is actually fruiting now, but it is just an open pollinated seedling of Wickson from my friends at The Apple Farm near here, so the pollen parent of that one is unknown.

My main goal with this video series to is to continue to incite creativity and deeper participation in what we are growing and eating, so please share so I can corrupt more people!  mwaahhhahahahhhaaa...

This link is to the playlist into which all the videos in this series will be dropped.

Turkeysong, The Year in Pictures and Video, 2014

The short version of this year:  Felt like crap most of the year, didn't get a lot done, stopped growing stuff intentionaly for the farmer's market due to unreliable health and too many wasted crops, switched most of my energy and time over to trying to figure out health issues which occupies about 2 to 4 hours or more of research on most days and much of my thoughts.  But, even though I sat on my ass for about 80% or more of the great majority of my days, the pictures I took this year do show that I did get out a little bit. I'm in a full on war to regain my health.  It takes a lot of thought and time, so I haven't done as much cool stuff as usual.  Once I figure that out, I hope to be a fountain of useful output, but until then I'm running on fumes.  This year, I was really just getting by most of the time with little spurts of energy here and there which I generally use to do something interesting so I don't go completely crazy, often with piles of dishes and laundry as a result.  Give me a choice between a pile of dirty laundry with a pile of charcoal and, well... I'll just be adding some charcoal stained clothes to that dirty laundry pile son!  Let me tell you, a life of leisure is just not for me!

The spring ran on through the worst drought anyone can remember.  It was pretty slow, but there was still more water than I ended up using.  The spring really does make it all possible.  I feel like I should build a shrine or something.  Seriously amazing.

I actually got around to filling my deer tag this year!  Skippy the deer is mostly eaten up now, and good riddance.  He was busting down fences, messing up fruit trees and generally being a juvenile delinquent.  I was half expecting to find graffiti somewhere... DEERZ RULEZ! on the water tank or something.  The plan was to do a year long educational video series following the processing of Skippy into all kinds of cool stuff, but it proved too large of a challenge to pull off on my own and just getting him cleaned and in the freezer was enough at the time.  Maybe next year.

My ex partner and currently business and land partner Tamara Wilder has been back more this winter bringing some help in the form of work traders and such.  It's a bit of a challenge to have people here after living in solitude for a year and a half or more and I'm generally not up for managing anyone, but maybe some stuff will get done.

I've been a little more focused this year on video and hope to continue that trend. I still want a better camera, but I have an okay consumer camcorder I can use for now.  I am pretty excited about the great potential of video and the opportunity to reach a lot of people around the world with it.  You can visit my fledgling youtube channel here.  It's always helpful to get comments, likes and subscriptions, hint hint!  So this year it's two for one, The Year in Video and The Year in Pictures.  Or more like two for none, what a deal!

I'll let the images and captions tell the rest.

Watch in HD if your rural connection is fast enough.

https://www.youtube.com/watch?v=k6Vfg3EHQMk

_______________________________________________________________________

Edward's Winter apple re-grafted to a better (better here anyway) variety by frameworking.  Frameworking is generally superior to topworking, a more usual method, and I will be pushing this idea more in the future.  The Amaryllis flower bu…

Edward's Winter apple re-grafted to a better (better here anyway) variety by frameworking.  Frameworking is generally superior to topworking, a more usual method, and I will be pushing this idea more in the future.  The Amaryllis flower bulbs growing beneath the tree are part of my tree understory experiments.

The same tree in August, harvesting amaryllis flowers for sale at the farmer's market.  You can see the growth is pretty good on the new grafts.  It almost just looks like a normal tree.  The few fruits are from a few remaining branch…

The same tree in August, harvesting amaryllis flowers for sale at the farmer's market.  You can see the growth is pretty good on the new grafts.  It almost just looks like a normal tree.  The few fruits are from a few remaining branches of the old variety.

More fruit tree understory experiments with amaryllis belladona.  This tree literally had only 2 or 3 weeds under it this year. (edit, the following year it had 3 weeds,  so the weed suppression part is definitely working!)

More fruit tree understory experiments with amaryllis belladona.  This tree literally had only 2 or 3 weeds under it this year. (edit, the following year it had 3 weeds,  so the weed suppression part is definitely working!)

The same tree as above in the summer time showing dense mat of dead leaves protecting the soil.

The same tree as above in the summer time showing dense mat of dead leaves protecting the soil.

My neighbors hired me to turn this apple into a frankentree for them.  I think we put on about 30 varieties, all tested by me for this area.  It was dubbed !Bride of frankentree!

My neighbors hired me to turn this apple into a frankentree for them.  I think we put on about 30 varieties, all tested by me for this area.  It was dubbed !Bride of frankentree!

The tree prepared and ready to graft.  One section on the left was retained as the original variety.

The tree prepared and ready to graft.  One section on the left was retained as the original variety.

All the grafts finished and labeled

All the grafts finished and labeled

Some regrowth

Some regrowth

I carved some spoons and spatulas this year from maple and madrone.  When I come across some nice wood, I blank out billets with my hatchet and store them for later use.  The rough shape is made with the hatchet and finished with a knife, rasp and s…
I carved some spoons and spatulas this year from maple and madrone. When I come across some nice wood, I blank out billets with my hatchet and store them for later use. The rough shape is made with the hatchet and finished with a knife, rasp and sandpaper. They sold pretty well, but I don't really do it for the money, because it doesn't pay that well when using hand tools. A bandsaw would speed it up, but where's the fun in that?
this year I got it together to print all my seed pockets and post a how to video on Youtube.  I may redo the video at some point, as the quality is not so great, but it works.
this year I got it together to print all my seed pockets and post a how to video on Youtube. I may redo the video at some point, as the quality is not so great, but it works.
Seeds of Ruby Streaks, a red Mizuna type mustard green.  This hasn't turned out to be a very good market item, but I eat quite a bit of it sauteed in butter.
Seeds of Ruby Streaks, a red Mizuna type mustard green. This hasn't turned out to be a very good market item, but I eat quite a bit of it sauteed in butter.
Bulgarian Giant Leek seeds.
A nice batch of leeks on the way to market.
One of my best customers hamming it up.
I continue to be amused by frequent hits on my How to Grow Huge Ass Leeks post from people searching for huge ass porn, or how to grow a huge ass.  Hopefully some of those people have been edified somehow by running across this blog.
I continue to be amused by frequent hits on my How to Grow Huge Ass Leeks post from people searching for huge ass porn, or how to grow a huge ass. Hopefully some of those people have been edified somehow by running across this blog.
Possibly the funniest thing I've seen all year.
Newly dug bed for trialing red fleshed apple seedlings. The white color is from ashes and oyster shell.

Newly dug bed for trialing red fleshed apple seedlings. The white color is from ashes and oyster shell.

Beautiful healthy apple seedling from my red fleshed apple breeding experiments headed for the trial rows.

Beautiful healthy apple seedling from my red fleshed apple breeding experiments headed for the trial rows.

Planting the seedlings.  I went for a very close 12 inches apart.
Planting the seedlings. I went for a very close 12 inches apart.
the new crop of apple seedlings overgrown in the flats as usual.  These will be grafted onto dwarfing stock this year.  I just planted the seeds from last year's pollinating.  I'm not sure how many more batches I'll do.  I may just do one more year …
the new crop of apple seedlings overgrown in the flats as usual. These will be grafted onto dwarfing stock this year. I just planted the seeds from last year's pollinating. I'm not sure how many more batches I'll do. I may just do one more year and call it good. I've only got so much room and resources to grow out apple seedlings, but there are a few more crosses I'd like to make.
this was a tree planting site on which I did a charcoal burn. I dug a large pit, burned the charcoal in the pit, crushed it and re-buried it in the pit as it was refilled.

this was a tree planting site on which I did a charcoal burn. I dug a large pit, burned the charcoal in the pit, crushed it and re-buried it in the pit as it was refilled.

Reburying the pit with charcoal mixed in.  The tree has done very well in spite of a serious drought.  It was plump and flushed deep green all year.  I did mix in some urine as I went to charge up the charcoal.  otherwise, it will soak up all the ni…
Reburying the pit with charcoal mixed in. The tree has done very well in spite of a serious drought. It was plump and flushed deep green all year. I did mix in some urine as I went to charge up the charcoal. otherwise, it will soak up all the nitrogen during the first year leaving none for the tree.
More trench burning of charcoal from the youtube video I posted on the method. I'm stoked about it. It seems to work very well, and it's fun.

More trench burning of charcoal from the youtube video I posted on the method. I'm stoked about it. It seems to work very well, and it's fun.

People are often skeptical about the alleged durability of charcoal.  I've found charcoal buried deep in the ground and probably associated with artifacts thousands of years old.  Anyway, this seems to prove the point pretty well.  It's a fossil tha…
People are often skeptical about the alleged durability of charcoal. I've found charcoal buried deep in the ground and probably associated with artifacts thousands of years old. Anyway, this seems to prove the point pretty well. It's a fossil that my friend found with both petrified wood and pieces of charcoal embedded in a stone matrix.
Digging biochar into a bed. This bed performed very well compared to most of the rest of the garden. In fact, my other biochar amended bed and this one were the best performing beds. This one was done as an experiment. Half is 10% charcoal to 20 inc…

Digging biochar into a bed. This bed performed very well compared to most of the rest of the garden. In fact, my other biochar amended bed and this one were the best performing beds. This one was done as an experiment. Half is 10% charcoal to 20 inches deep and the other half is 20%, but only dug in 10 inches. In otherwords, same amount of charcoal in each end of the bed just mixed shallower or deeper. No observable differences so far. I have quite a bit of charcoal stockpiled and hope to get a couple more beds prepared this spring. I'm planning more char to greater depth on the next bed and it will be prepared all at once by digging everything out to at least two feet and re-assembling it in layers. That may seem like a lot of work, but given that it should result in a permanent improvement it doesn't seem so bad. Especially given the large amounts of organic matter that people dig into their beds yearly and which disappears yearly. Not that charcoal is a total replacement for organic matter, but it does have some important functional similarities and will probably ultimately either reduce needed inputs, or result in better use of them.

Carrots at the Farmer's Market
One year of growth on an apple tree after dis-budding and notching to select branches. This method appears so superior to what is commonly recommended that I am anxious to do an article or video on it. It may be a little hard to visualize in 3 dimen…

One year of growth on an apple tree after dis-budding and notching to select branches. This method appears so superior to what is commonly recommended that I am anxious to do an article or video on it. It may be a little hard to visualize in 3 dimensions from a 2 dimensional picture, but this tree gave me 4 branches in four different directions in just one year. I haven't taken a current picture, but the tree will be grafted over since the scion wood was mislabeled. It was supposed to be Golden Harvey, a super sweet long keeping cider/eating apple that I was all stoked up to find. It turned out to be some bitter foamy cider apple of no account.

This picture shows the more rapid progress of a bud which has been notched.  note that it is further along than the other buds.  Supposedly that is because the notch disrupts signals from the top of the tree which otherwise would inhibit it's growth…
This picture shows the more rapid progress of a bud which has been notched. note that it is further along than the other buds. Supposedly that is because the notch disrupts signals from the top of the tree which otherwise would inhibit it's growth, but also possibly because it directs nutrients into the bud instead of letting them pass up the tree. Whatever the physiological mechanism, it works. After taking this, I removed the buds I didn't want as scaffold branches. This is a sour cherry. Sweet cherry has not responded at all well to notching and dis-budding.
This jar of olives was about 4 years old when I opened it and took the olives to the Olive Odyssey festival.  They were very good.  This is one great advantage to fermenting and then storing in the fermenting jars.
This jar of olives was about 4 years old when I opened it and took the olives to the Olive Odyssey festival. They were very good. This is one great advantage to fermenting and then storing in the fermenting jars.
Said olives looking tasty.
Chicken broken down into potentially edible parts.  I was experimenting for a minute with eating as much of a chicken as possible.  Those two things on the table to the left of the chicken that look like dead salamanders taste awful.  Don't eat thos…
Chicken broken down into potentially edible parts. I was experimenting for a minute with eating as much of a chicken as possible. Those two things on the table to the left of the chicken that look like dead salamanders taste awful. Don't eat those. I don't know what they are, but they taste like chicken poop smells. I also made several attempts to process and eat the intestines , but they also taste like chicken poo. I gave up on them. The actual sphincter is quite tasty though. Ultimately, that still leave the great majority of the chicken imminently edible. A lot of chickens have been on death row for a while as they have grown beyond the carrying capacity of the land. Lucky for them I haven't had enough energy to get around to slaughtering very many of them. I accidentally shot one of the hens though, because a bout of uveitis had affected my vision to the point that I thought it was a similar looking rooster. A tragedy maybe, but a tasty one!
Have to have at least one picture of cute baby chicks.
Finishing some oak tanned leather that was started in 2013.  Here I'm scraping over the flesh side one last time to remove bits of tissue and oak bark.
Finishing some oak tanned leather that was started in 2013. Here I'm scraping over the flesh side one last time to remove bits of tissue and oak bark.
My friend Talcon oiling the flesh side of the leather with tallow before we paste it down to a piece of plywood for finishing and drying.
In this step, the leather is smoothed out with a rounded polished slate.  This removes wrinkles and dents.  It also sticks the hide to the board because of the tallow pasted over the flesh side.
In this step, the leather is smoothed out with a rounded polished slate. This removes wrinkles and dents. It also sticks the hide to the board because of the tallow pasted over the flesh side.
After setting the skin to dry up on saw horses, the chickens walked all over it, so I had to re-slick it with the slate to smooth it back out.  otherwise it would dry with these permanent marks, just like when leather is tooled to form patterns.
After setting the skin to dry up on saw horses, the chickens walked all over it, so I had to re-slick it with the slate to smooth it back out. otherwise it would dry with these permanent marks, just like when leather is tooled to form patterns.
The finished leather drying slowly in the winter sun.
I'itoi onions (pronounced E E toy) which I started selling on ebay this year.  They are exceedingly rare at this point, but the many packages I sent out this year should help change that.  It is a very small onion that was grown by the O'odam in the…
I'itoi onions (pronounced E E toy) which I started selling on ebay this year. They are exceedingly rare at this point, but the many packages I sent out this year should help change that. It is a very small onion that was grown by the O'odam in the southwest. Thought to be brought by the Spanish invaders, it is well adapted to the droughty South West. It quickly forms large clusters of very small shallot like onions which can grow perennially as chives or be harvested and replanted to make small onions. They are awful small, but they're pretty cool and very tasty.
I made quite a few batches of bay nut toffee this year.  about 50/50 pasture fed butter and sugar, a little salt and vanilla, and bay nuts.  I'm still refining recipes, but it has been declared very good by all tasters.
I made quite a few batches of bay nut toffee this year. about 50/50 pasture fed butter and sugar, a little salt and vanilla, and bay nuts. I'm still refining recipes, but it has been declared very good by all tasters.
Bay nut toffee
Bay nut toffee
These are not chocolate, they are ground roasted bay nuts with sugar and orange peel.  They look like chocolate and melt like chocolate.  They also taste more like chocolate than anything I've ever tried, but they are still very different.  These tu…
These are not chocolate, they are ground roasted bay nuts with sugar and orange peel. They look like chocolate and melt like chocolate. They also taste more like chocolate than anything I've ever tried, but they are still very different. These turned out great, but they undergo a process of degredation and separation the same as chocolate will when not subjected to certain processes of tempering, and usually with the addition of lecithin as an emulsifier. Eventually most of the fat coalesced together leaving the dry powder separate. I hope to work on experimenting with tempering it like chocolate, but I need access to a muller and hopefully a tempering machine, though I could do that by hand with enough patience.
Bean trellis in the morning.
Netted bed of lettuce and scallions going to seed.  I have to net most of the greens here.  This is mosquito netting, which is pretty cheap, but it hasn't held up that well in the sun.  Otherwise, I like it.
Netted bed of lettuce and scallions going to seed. I have to net most of the greens here. This is mosquito netting, which is pretty cheap, but it hasn't held up that well in the sun. Otherwise, I like it.
Montevideo Iris.  I thought these would do better at the market, but they were not that popular.
Montevideo Iris. I thought these would do better at the market, but they were not that popular.
Titan's Glory iris.  This iris does everything big.  It has large rhizomes that spread quickly and large flowers that bloom profusely.  All around an excellent variety.
Titan's Glory iris. This iris does everything big. It has large rhizomes that spread quickly and large flowers that bloom profusely. All around an excellent variety.
I don't recall the name of this iris, but it's awesome.  I wasn't too keen on it at first, but now it's become my favorite.
I don't recall the name of this iris, but it's awesome. I wasn't too keen on it at first, but now it's become my favorite.
Oriental Poppy.  I planted 3 varieties of these as experiments in tree understories.  They haven't performed that well in that capacity, but they are still very cool and extremely rugged.  I tried to kill some and the just keep coming back.
Oriental Poppy. I planted 3 varieties of these as experiments in tree understories. They haven't performed that well in that capacity, but they are still very cool and extremely rugged. I tried to kill some and the just keep coming back.
getting OCD with some artichokes.  These were made into canned artichoke hearts.
getting OCD with some artichokes. These were made into canned artichoke hearts.
William's Pride.  This is a very promising early apple.  Here photographed in July it is in eating late July and early august here.  It is surprisingly good for that early of an apple competing with chestnut crab for best early apple, though that is…
William's Pride. This is a very promising early apple. Here photographed in July it is in eating late July and early august here. It is surprisingly good for that early of an apple competing with chestnut crab for best early apple, though that isn't really a fair comparison since they are so different. It is quite large, very crunchy and crisp, has a surprising amount of tannin and pretty complex flavor. As you can see, it takes a high polish too.
Madrone billets for making stuff on the lathe.  I got my lathe up and running and managed to make a few awls and willow cleaves before the space it was in got repurposed as living space.  These madrone billets were split out of a neighbors fallen tr…
Madrone billets for making stuff on the lathe. I got my lathe up and running and managed to make a few awls and willow cleaves before the space it was in got repurposed as living space. These madrone billets were split out of a neighbors fallen tree, hewn into a rough shape with a hatchet, rough turned on the lathe and then oiled with tallow for seasoning. I stock up on wood like this when it's available.
This is a willow cleave made from the above madrone.  It is for splitting willow into 3 strands used in certain types of basketry.  Not a tool that many people need.  I wouldn't be surprised if I'm the only person making them in the states.  They ar…
This is a willow cleave made from the above madrone. It is for splitting willow into 3 strands used in certain types of basketry. Not a tool that many people need. I wouldn't be surprised if I'm the only person making them in the states. They are for sale on Etsy.
Madrone awl.  I started an Etsy account for Paleotechnics and listed my awls, willow cleaves and some jewelry type stuff.  These are ideal for buckskin and a lot of the type of leather work I do.
Madrone awl. I started an Etsy account for Paleotechnics and listed my awls, willow cleaves and some jewelry type stuff. These are ideal for buckskin and a lot of the type of leather work I do.
Strange moth in the garden taking flight from an artichoke leaf.
A bedragled dandelion.
Black Sage flower spike.  I like these, they have a cool architecture.  Bugs love them too.  The latin is Salvia mellifera, thousand flowers, and it lives up to the name.
Black Sage flower spike. I like these, they have a cool architecture. Bugs love them too. The latin is Salvia mellifera, thousand flowers, and it lives up to the name.
Diabrotica, or Cucumber Beetle, on Artichoke flower.
guess what?  Bee butt!
guess what? Bee butt!
Leezard.
Leezard.
chillin' in an apple tree
Baby fence lizard.  They start coming out in July.  They are born with large heads so they can start eating right away.
Baby fence lizard. They start coming out in July. They are born with large heads so they can start eating right away.
The ever productive and healthy English Morello cherry tree.
a miniature drum necklace, a little bigger than a quarter.  goat rawhide, elderberry wood and brain tanned buckskin.  More Etsy product
a miniature drum necklace, a little bigger than a quarter. goat rawhide, elderberry wood and brain tanned buckskin. More Etsy product
Reliance grape, which I'm increasingly impressed with.  Short video review HERE.
Reliance grape, which I'm increasingly impressed with. Short video review HERE.
large store egg v.s. small turkeysong egg.  I'm always shocked when I see how sallow and pathetic store eggs are.  Organic and "free range" account for very little in store eggs.  The yolks are undersized, pale and contain more inflammatory fatty ac…
large store egg v.s. small turkeysong egg. I'm always shocked when I see how sallow and pathetic store eggs are. Organic and "free range" account for very little in store eggs. The yolks are undersized, pale and contain more inflammatory fatty acids DHA, Arachidonic acid and omega 6 fats from a steady diet of grain. They probably aren't capable of supporting life, a chick's or ours. I was running low on eggs, so I bought a dozen, but I ended up just eating the whites and tossing the yolks. I set up a light on a timer to trick the hens into starting to lay again and got three eggs today and yesterday...whew!
Finally getting some pears.  The big red one is Souvenir Du Congres.  it was very good.  The others are bartletts grafted from an old homestead tree at the top of the driveway. I'm getting some asian pears too and a few winter pears the name of whic…
Finally getting some pears. The big red one is Souvenir Du Congres. it was very good. The others are bartletts grafted from an old homestead tree at the top of the driveway. I'm getting some asian pears too and a few winter pears the name of which escapes me just now.
The first soil enrichment, biochar, latrine, experimental pit/trench/hole is finally dug and slowly accumulating otherwise unused organic matter.  Yay, progress!  I had some help digging, thanks to Will and Gretchen.
The first soil enrichment, biochar, latrine, experimental pit/trench/hole is finally dug and slowly accumulating otherwise unused organic matter. Yay, progress! I had some help digging, thanks to Will and Gretchen.
Vulture hangin' around the compost pile on a convenient roost.
Another vulture taking flight.  He was sunning himself on the garden gate.  They scrounge through the food waste after the chickens are done.
Another vulture taking flight. He was sunning himself on the garden gate. They scrounge through the food waste after the chickens are done.
View from up the drive a bit, showing the type of country here, which is pretty diverse.
Dusk view toward the coast on the other side of the ridge about 300 feet out the back door.
Venison sushi, my new favorite way to eat venison.  The meat is previously frozen, which should take care of parasites.  I'll be cleaning my deer more carefully next year to maximize sashimi potential.  I'm making some for lunch in a few minutes, yu…
Venison sushi, my new favorite way to eat venison. The meat is previously frozen, which should take care of parasites. I'll be cleaning my deer more carefully next year to maximize sashimi potential. I'm making some for lunch in a few minutes, yum.
Honey mushroom detail.
Honey Mushrooms at a great stage for eating, which I of course did!
I scored some incredibly cheap saffron bulbs this year.  I sold some on ebay to pay for the order, planted some in random field plantings as an experiment to see how long it takes the gophers to eat them all, and put some in a garden bed to multiply…
I scored some incredibly cheap saffron bulbs this year. I sold some on ebay to pay for the order, planted some in random field plantings as an experiment to see how long it takes the gophers to eat them all, and put some in a garden bed to multiply for later. As you can see, I was a little tardy in planting them.
This is a knife that an intern/helper gave me.  I was already considering buying this exact knife for carving the flutes in my willow cleaves.  I've been geeking out on knife handles and had this idea for carving the handle for increased grip textur…
This is a knife that an intern/helper gave me. I was already considering buying this exact knife for carving the flutes in my willow cleaves. I've been geeking out on knife handles and had this idea for carving the handle for increased grip texture.
Detail of above
Detail of above
My friend brought over this knife to make a sheath.  I've got an outline made for a video on knife handle design and had to entirely reshape the handle first, which turned into a video segment.  The sheath is made from 4 different leathers, stiff ba…
My friend brought over this knife to make a sheath. I've got an outline made for a video on knife handle design and had to entirely reshape the handle first, which turned into a video segment. The sheath is made from 4 different leathers, stiff bark tanned wild boar on the inside, soft goat on the outside, a horse hide welt to protect the stitching and braintanned buckskin sewing thong. It turned out pretty sweet. I'm not a big fan of this mora style of blade for general purpose knives, but that puts me in a minority among the primitive skills crowd.
Barktanned bracelet, more Esty product

Some stuff I think is cool this year:

Gokhale method of posture.  This is different that any other kind of exercise, stretching, yoga etc... It is based on the idea that there is a basic correct type of posture for humans (which is probably a little different than what you've been told), and it really more to do with how you sit, lie, walk, live and move your body than exercises, though there are exercises.  It also requires an attitude adjustment.  Everyone I've turned on to it has been very enthusiastic and it has helped me a lot.  This is really for almost everyone, but certainly people with any kind of posture/pain/joint issues should check it out. Classes aren't cheap, but the book is excellent and a great place to start.

Ray Peat.  Ray peat might best be described as a renegade biologist and science historian.  He has his mind in all kinds of things, but with a focus on nutrition and hormones, with metabolism being at the center of the picture.  Peat is one smart cookie and possesses a vast store of knowledge that he can pull out on demand.  It he always right?  I doubt it, and I'm very unsure you should eat like him, but prepare to have a lot of things you assume to be given truths called into serious question by someone with a rare mind that thinks way outside the box.  Try on for size: CO2 is much more than a waste gas of metabolism and you should make and retain as much as possible, serotonin and estrogen are primarily destructive substances in the body and there is no such thing as estrogen deficiency, and essential fatty acids are not only not essential, but essentially toxic and more of an unfortunate natural occurrence that we have to adapt to.  Often includes the history of where science/medicine went wrong in adopting a certain dogma, and the influence of industry in corrupting scientific research and medical practice.  This is not light reading and listening, but he dumbs it down for us as much as possible.  Warning, Ray Peat can be a deep rabbit hole and lead to food neurosis and extreme self experimentation in a certain type of personality.

Michael Mews.  This stuff is absolutely fascinating.  There are several dominant theories on the prevalence of modern facial malformation and poor dental development, which has become nearly universal these days.  How many kids do you know that are not getting braces around age 13?  I can't think of any.  The genetic explanation is pretty much bullshit, but convenient to point to for medical professionals who don't know the answer.  Michael Mew's point of view deals with oral habits and environment.  The third common view is diet via Weston Price, which probably has considerable substance, but is clearly not the total answer.  Michael Mews is really putting out some amazing stuff about an issue that now affects nearly all modern people.  If you have kids under 18, this is a must watch before subjecting them to the mutilation and idiocy that is standard practice orthodontics.  It's also just plain interesting.

See you around homies!  Have a great and productive year!

Saffron Dreams: Musings and experiments in growing Saffron

I like to cook intuitively with what happens to be on hand, which means having a certain familiarity with my ingredients.  Recipes are just guidelines in my world and not to be taken at face value, ever.  I’ve never had enough Saffron around to become familiar with it to the point that I can use it with any confidence.  When my mom brought me a small box of quality saffron from Spain, I had a chance to become a little more familiar.  With Saffron now on my radar, I of course decided I should grow the stuff instead of buying it.  I mean if we can grow the stuff here, why import it at 80.00 an ounce?  Saffron seems to be capable of growing in a fairly wide variety of climates from England to Afghanistan.  Then I could sell the bulbs and promote the idea of growing it and start a local industry and.....

A laptop surfing safari turned up a few small scale growers focused on high quality Saffron for local consumption, but none of them in California.  Aside from these geeky boutique producers who have been bitten by the Saffron bug, saffron production seems to be left to areas where it has long been cultivated.

Saffron’s peculiarly unique flavor is subtle and pervasive at the same time.  A few threads too many and it goes from enhancing your dish to ruining it.  Fortunately, it’s intensity means that only a few threads are required and if it wasn’t so intense, no one would likely be able to afford to use it at all, nor probably bother to.  The part used is the intensely red stigma of a pretty little purple/blue flower named Crocus sativus, the stigma being the female part that receives the pollen.   The Latin name is probably pronounced like kroak-us sa-tee’-vus, or sat’-i-vus but no one really knows for sure because Latin is a dead language.  So just say it however you want to and if anyone flicks you shit for pronouncing it wrong, just follow Jepson’s advice of The Jepson Manual: Higher Plants of California:

"... practice what sounds good to your ear; conviction is important."    "When someone presumes to correct your pronunciation, a knowing smile is an appropriate response."

That's always worked for me :D

Interstem Grafted Apple Tree Update, Year Four


UPDATE:  See my video series on Interstem grafting apples here!

UPDATE: See my video series on Interstem grafting apples here!


It’s been 4 years since I grafted my first interstem apples.  They were in the nursery for a year, and have been in the ground in permanent locations for 3 years.  This is an update on my experience and thoughts so far.  (Read the original post here)

A couple paragraphs for those who aren’t familiar with interstem trees: An interstem (a.k.a. double worked, archaic) tree is one that has an extra stem grafted between the rootstock and the upper portion of the tree.  Sometimes the interstem (the stem between the roots and the tree) is there for the sake of compatibility and can be used when the fruit variety is not genetically compatible with the rootstock, but the interstem is compatible with both the top and the rootstock.... think of a kidney transplant, the donor and recipient have to be compatible or the graft will be rejected. Often though, and in my case, the technique is used to dwarf a tree. One problem with dwarf rootstocks is that they are weak.  Sure they are small, which is what we want, but so are the roots.  Interstem grafting allows us to select a large vigorous rootstock, that would normally grow a large vigorous tree, for the roots and a weak interstem to dwarf the tree... small tree big roots.  That means, no staking of the tree, which would be required for a weak dwarfing stock.  They also need less water.

b
b

Drought Tolerance:  My primary motivation for grafting interstem trees has been drought tolerance combined with dwarfing, a pairing which I don't know of any other means of attaining.  I’ve had a few of the trees get a little crispy in the end of summer, but over all, I think they are performing much better as m111 / bud 9 interstems than they would on any stand alone dwarfing stock.  I do water them occasionally, but not a lot.  I probably should ideally water a little more, but I want them to grow up tough and self sufficient, not expecting a drink whenever they want one... tough love.  There is a second row of interstem trees that I will probably move, or just remove, which are not cared for nearly as well as the main row along the driveway.  Most of these outliers have survived and, although they are not doing great, I doubt many would have survived the droughty conditions they are growing in if they were on a straight dwarfing stock like MM109 or bud 9.  I probably won't water any of the interstems this season since my spring is lower than it's ever been at this time.Understory:  The original vision for the main row of interstem trees was to establish an understory of flowering bulbs.  The trees are along about 100 feet of the driveway as you drive into the main area, and I had envisioned masses of narcissus in the spring that I could hopefully sell some of at the farmer's market.  I have an ongoing experiment using flowering bulbs to create fruit tree understories... specifically, plants that grow only in the winter and die back early in the summer leaving a mulch of dead leaves on the soil surface to prevent evaporation.  I call this a dying mulch, but it’s more like a living/dying mulch.  This plan was hatched specifically to deal with our seasonally dry climate which has virtually no summer rain.  Two of the intertstem trees are now planted to Hybrid Amaryllis on 12 inch centers, but it will be some years before I really know how well that system works.  Amaryllis is not as spectacular as narcissus and blooms in the late summer, but it is the plant that seems to be performing best in my trials and it’s probably more marketable as a cut flower than narcissus anyhow.  I may plant every other tree for now.  Having half of the trees as control subjects should show over time whether or not it works.

d
d
a
a

Root anchorage:  The superior root anchorage has proved to be very nice.  I’ve barely staked the trees and only to keep them growing straight, not because the roots weren't adequate.  Trees this size (8’ x 8’ is the target size) normally require staking because the small and sparse roots simply don’t hold the tree up. Precocity:  Interstem trees are precocious, most of mine bore some fruit the second year in the ground.  That is a whole lot faster than when using your average M111 or larger rootstocks.  Precocity is a great advantage.  The trees grow fast to size, but start bearing early and then quit growing for the most part.  Most would be nearly the size I want them already, if I hadn’t changed my mind and grafted most of them over to different varieties after the first year.  The fruit quality seems good so far, and I think with careful thinning, it would be easy to grow jumbo sized fruits if that matters to you.

no matter
no matter
f
f

Size:  One reason I got into this system is because I harvested some dwarfed apple trees and was so excited that I didn’t need a ladder!  No ladders for pruning or picking.  That’s pretty great.  If you’re around 50 or over, no ladders and early bearing should be lookin’ pretty good!  No one needs to fall off ladders, but for seniors, it's a big deal to break a hip, and coordination typically declines with age.  It’s pretty nice to have a tree where I can reach almost everything.  I might need to stand on a box once in a while, but not a ladder.  I don’t mind working on ladders too much, but moving them around gets old pretty fast.  Not that I would ever advocate planting only dwarfs.  Standard trees live longer making them a great legacy, and they are just cool to have around.  Still, there is a time for dwarfs, and for many of us, that might just be most of the time.  The tallest trees are probably over 8 feet now, but I think I can keep them down once heavy bearing commences and growth slows. Re-grafting:  Like I said, I changed my mind about the varieties I originally planted.  I put in mostly cider trees figuring that I’d test them and work over the ones I didn’t like to other varieties.  At some point, I realized that I have never had a single glass of cider made from swanky European varieties meant for cider only that was even good, let alone great.  However, I’ve had a number of excellent ciders from blends and dual purpose varieties like Gravenstein, Ashmead's Kernel and Rome.  I’m not saying I think you can’t make good cider with those fancy english apples, nor that they aren’t capable of making superior cider, just that I have to look at the big picture and go with my personal experience.  If I can make very good cider from varieties that also make great eating, I've got versatility which is a great advantage.  My last batch of natural yeast cider from Rome Beauty was freakin’ awesome (I haven’t planted Rome Beauty, and probably won’t, so this isn’t a recommendation.  It’s not really a very good eating apple.).  I think that the quality of fruit (hint, dry farmed= lots of sugar, flavor and tannin) and what is done with it, are probably more important aspects of cider making than using cider dedicated apples only.  Sure, you can’t make a great wine from a concord grape, but you can make very good cider from many dual purpose apples and blends.  I also have been drinking less as I went on various health pursuits :-/. So, I grafted all the cider-only varieties to dual purpose and dessert varieties, an approach which gives me a lot more versatility.  If I want to make cider I can, or I can eat them, or sell them, or just press them for juice.  I left the King David and Wickson trees, both excellent dessert/cider apples, but everything else got worked over to varieties that I’m excited about- Sweet 16, Katherine (Etter), Newton Pippin, Gold Rush, Kerry Pippin, Golden Harvey (turned out to be mislabeled), and a couple of the Etter red fleshed varieties.  The grafts did great, with 100% success rate.  Many are bearing fruit this year.  This experience highlights the main reason that orchard owners should know how to graft, VERSATILITY.  More on that in the future.

c
c
a
a
a
a

Suckering:  The one big drawback I can see to interstem trees so far is that suckering is definitely increased.  Suckers are a pain in the ass.  Most of my other apples are on MM111 stocks and they have suckered very little.  But over half of the interstem trees are producing suckers.  It is generally better to tear suckers off the tree, because that removes the buds near the base of the shoot, improving the chance that it will not grow back.  But many of these suckers are deep and have to be cut off, and they just keep growing back.  Burying the union of the rootstock and interstem so that the interstem also grows roots is said to help reduce suckering.  I didn’t do that, because the bud 9 I used as an interstem is susceptible to woolly aphid and M111 is not.  I wish I had now though.  I doubt the risk of major woolly aphid damage is outweighed by the bane of suckering.  Besides, I’ve never seen woolly aphid here, although I am constantly told it is a major problem in the area.  Even with some aphids on the bud 9 roots near the surface, the great majority to the root system will still be immune to them.  Lesson learned.  I should not have let fear stop me from planting at least half of them deeply.  If done over, I would plant the MM111/Bud 9 unions a good 3 or 4 inches below the soil surface, and will if I plant any more of them. Interstem length:  The foregoing brings up the point of interstem length.  I was very sloppy when choosing the length of interstems.  In fact, choose would be a strong word!  They varied in length quite a bit.  A cursory examination reveals that there is some noticeable effect on tree size, a longer dwarfing interstem creating more dwarfing effect.  I would say though, that none of the trees look like they will end up too small.  Given that fact, and that one would need adequate length to bury several inches of the interstem if planting deep to minimize suckers, I would probably tend to make them on the long side.  You can get away with planting the interstem/rootstock graft below ground, but you definitely will lose much, if not all, dwarfing if the second graft, the interstem/varietal one, is buried and the varietal allowed to root.  I scarcely remember how long my longest interstems were, but I’m thinking that 8 to 10 inches is probably about what I’d shoot for next time, planning to bury 2 or 3 inches of it in the ground.  I don’t know that those numbers are best mind you, it’s just what I will probably try next time around The future:  Aside from the suckering thing, which is a pain not to be underestimated, things are going smashingly.  Right now it's more than enough to keep up with what I have planted, but if my health improves soon, I may plant some more interstem trees using my recently posted biochar pit latrine system to prepare the ground ahead of time.  People are digging my apples at the farmers market, because I have done enough experimental work to be able to bring really unique and excellent fruit.  I also think my growing conditions, basically scant on water, really improves the quality of some varieties.  I have confidence in my ability to grow outstanding apples now, though I’m still refining culture and varietals.  I feel pretty sure some of these interstem trees will be grafted over yet again as I hone in on the apples that really perform well in all areas, flavor, texture, cultural traits, disease, drought tolerance, sun tolerance and so on... oh yeah, maybe consumer preference, though I truly hope that I can sway market goers to buy any outstanding apple, regardless of size or external appearance. Summary:  So, to summarize, I think interstem apples are great.  Ease of maintenance is not to be smirked at, large fruit size is neat, drought tolerance seems very reasonable so far, precocity (early bearing) is extremely valuable, fruit quality seems very good so far, anchorage is awesome for a dwarfed tree.  What’s not to like?...  Well, suckering is not to like.  In fact, suckering sucks.  Thorns in paradise.  So, I guess I'm recommending this technique based on experience.  If you want a small tree, but with a wide foraging root system, drought tolerance and anchorage, interstem trees look pretty good so far.  Interstem trees are hard to find.  You might get someone to custom graft them for you, but my recommendation, as always, is to learn to graft them yourself. Grafting in one year:  BTW, you can read my previous post on interstems for details, but all of these were grafted in one year, making both grafts at once with dormant wood on dormant stock. I did the same thing again this year, and again with 100% take.   It does not take two years to make an interstem tree as is often asserted.  You may not want to tackle two grafts on one tree when just learning, but you could always do the interstem graft the first year, and the varietal graft the second.  Or you could just go for it and do them both at once.  If one doesn't take, you might still be able to salvage it and regraft the following year.

Part One: Interstem Grafting of Apples

Interstem Grafting videos

Turkeysong Origami Seed Pockets Video Goes Live!

seed pocket header
seed pocket header

At some point a year or two ago, I had to come up with a folded packet/envelope design so I could give away the seeds that I save at farmer's markets, scion exchanges and places like that.  I like giving away seeds.  I often give away too many and end up kicking myself, but it is so compelling for some reason!  The first thing that came to mind was those little paper packets called bindles that cocaine used to come in back in the 80's.  Learning to fold bindles was about the only real good I ever got out the stuff.  Cocaine was around a lot back then, but I had little use for it.  I think I was more interested in the bindles than the coke. I did so little of it that I couldn't remember how to make those little folded paper bindles almost 30 years later.  So, anyway, no bindles.  I had to improvise.  I'm not sure why I didn't just look for instructions on the internet, but I'm glad I didn't.

I had recently come up with an origami container for roasted baynuts that was pretty nifty, so I was emboldened to the task and began folding away fearlessly.  I already knew I wanted it to be a quarter sheet or smaller.  The result after a few minor adjustments is this origami dubbed "seed pocket" for obvious reasons.  It came out with some neat unexpected features.  The back tabs lock together in a really neat way to keep the packet closed.  If stuffed super full it may open at the back (though it's still unlikely to spill seeds) but then you can just make a larger one out of a full sheet instead of a quarter sheet.  I prefer to tear the paper after creasing, because the torn edges appear under the title, which looks cool and more handcrafted-like.  there are also a lot of squares and half square triangles formed, so the proportions are pleasing to an OCDish person fixated on symmetry, like me.  These are very seed tight and unlikely to leak even small seeds like poppy.  In fact, I just packed up some tiny shirlie poppy seeds last night.  I'm not so sure about super teeny weeny tiny seeds like tobacco and lobelia, but otherwise, they're pretty dang tight!

seed pockets front and back

I've got one laid out in adobe illustrator for each of the seed varieties that I save regularly, with names, short descriptions and a nudge in the direction of my blog to pick up web traffic.  They serve a little like business cards and are very popular.  It's a lot of folding, but I actually like folding them while watching a movie or just thinking about stuff.  It's sort of addictive.  I've probably folded thousands by now.

I'm making the Adobe Illustrator template available as a downloadable file, so if you have access to adobe illustrator, you can leave the layout (which took a helluva long time to get right, so be careful messing with it!) and just change the text and fonts to suit your own farm name, variety names, descriptions and such.  You may need to download the fonts I used if you want to keep them (Copperplate gothic light, Century old style standard, Cambria and Chalkduster).  Putting some text on the inside of the packet is a possibility too, and I may add seed saving instructions for each vegetable eventually if I can get my stupid printer to stop eating so much paper.  I kept it pretty simple, but one could add all kinds of things- colors, pictures, gardening quotes, fold lines...

This template is for four small seed pockets per 8.5 x 11 inch sheet.  I haven't made a full sheet template, but I do use the same origami design for making an occasional large seed packet.  If you use the template, I'd appreciate the small favor of leaving the blip on the underside of the flap so people can find the template and this post and my blog.  Thanks!

seed pockets side
seed pockets side

So, save some seeds this year!  If you haven't saved seed before, tomatoes are an easy place to start.  They rarely cross with each other.  Just take a non-hybrid tomato that you like, squish the seeds into a bowl, let it ferment for a day or two to dissolve the pulp, wash and drain several times to clean the seeds, and dry on a piece of paper in the shade until thoroughly dry.

This is the first video of what I hope will be many.  Big thanks to blog reader lars for hooking me up with a video camera!  Thanks dude!

http://www.youtube.com/watch?v=Ioub3uAsfSU

And don't miss my one other youtube video ever, the epic guinea pig munch off!


http://www.youtube.com/watch?v=vGqF63c6LZw

Making Sicilian Style Fermented Green Olives

big, lively, acidic, rich tasting olives, oh yeah!

I'm going to tell you how to make delicious fermented green olives by the easiest curing method I know of.  One of my many long term projects has been curing olives.  I started because I love them and because they were too expensive for me to eat in the quantities I wanted to.  I figured I could turn those olives growing all over California into something tasty.  Some 20 plus years later, I have a pretty good grasp on the subject.  I'm headed to an olive tasting event this weekend, the Olive Odyssey organized by olive curing champion Don Landis.  I was going to print up recipe cards for sicilian style olives, but thought I'd just save paper and send people here instead.  Besides, now people can bump into this awesome recipe on the web!

What's so cool about this recipe?  Lotsa stuff.  It is perhaps the easiest curing recipe I know for olives.  There is no maintenance to speak of.  There is no leaching with lye, or water, nor anything else.  You stick 'em in a jar with brine, seal it up, leave it for months and open one when you are ready to eat them.  And of course they taste hella good homeslice!  Big fat juicy, lively, acidic, rich tasting olives... oh yeah.

The downside?  You have to be patient!  Wait, that's good for you, so get over it!  Oh, and I only know one olive common in California that is really good for this process.  If you're lucky enough to have access to this olive though, you've got a gold mine of potential hanging on those trees in the fall.

That olive is the Sevillano.  It is also known as Queen olive in California, but Sevillano it is and should be.  The Sevillano has been a very popular commercial cultivar, so it is pretty common.  It is also easy to identify.  If you find a tree with many sizes of olives on it, but some of them very large, it is very likely a Sevillano.  If it also has some bunches of very tiny olives, like BB's, known as shot fruit, it is almost surely a a Sevillano.  The olives are generally oval, but become rounder and plumper as they ripen, turning from a brighter grassier green to a more rich yellow tending toward straw color.  It is okay to use them when they are just beginning to blush red too as in the picture below.    The reason that these work well are several, but the key is the fact that they have a low degree of bitterness.  The finished olives will have some bitterness for sure, but if made with most other varieties of olives, they would be inedible.  The texture and flavor are also outstanding and they seem to have plenty of fermentable sugars.  They also make very good lye cured olives in brine, kind of like the black olives in cans, but many times better.  Yummy like sweet candy is to the unfortunate child of a staunch health food slingin', kale juicing mother.  Seriously, and that lye ain't gonna kill ya, I promise.  If I remember right they are ripe in mid November around here, probably earlier at lower elevations with warmer nights.

Sevillano olives are huge!

You want to harvest the fruits when they reach what is called the milk stage.  When the olives are unripe, they are hard and green.  The unripe olives just scream unripe.  The light green color, the slightly bumpy, hard surface texture, the shape and the bony look they have.  When they enter the straw/milk stage before turning black, the olives really plump up and become voluptuous with oil.  The skin glows and smooths out and the color softens.  The best test though is to pick one, stab into it with your thumbnail, and squish out some juice.  if the olive is ripe enough, it will exude a milky liquor.

Pick the olives carefully to avoid bruising.

Wash the olives and sort over to remove those with olive fly damage.  The olive fly lays it's eggs in the olive and the larvae eat it from the inside.  Look for small holes and "pricks" in the skin.  If in doubt, sacrifice some by cutting them open to see if there are larvae inside.

If you have a lot of olives, sort them by size and process the various sizes separately.  The smallest ones should finish curing a little sooner than the large ones.  Otherwise, it's okay to mix sizes.

Wash the olives and pack into scalded mason jars within one inch of the top.  By scalded I mean pour in boiling water, put the lid on the shake it up a bit.  Turn the jar upside down for a minute to cook the lid real good too.  The jars can be any size.  I think you could ferment a single olive in a tiny jar if you could find a suitable jar that small!  Fill jars to the rim with brine made of 1 quart water, to 1/4 cup salt, with 1/4 cup of white wine vinegar, rice vinegar or distilled vinegar. (The vinegar is optional, but it helps shift the ph well into the acid zone, which is safer and seems to kick off fermentation.)   I don't think I've ever added any starter cultures to my olives.  The proper bacteria and yeast seem to be prevalent enough on, or in, the olives.  If you want to though, a splash of whey from the top of a newly opened container of yogurt, or a little juice from a lactofermented batch of vegetables shouldn't hurt, as long as the quality of the fermented food you get the culture from is high and the culture seems clean.

olive supplies

You can use a new jar seal, or a used one, but used seals should be in very good condition with absolutely no scratches.  You can use a canning ring to seal the jar if that's what you have, but I much prefer to use a plastic lid and you should too if you have one.  I  buy these white plastic mason jar lids just for fermenting food in jars.  They are fairly useless for most purposes, are not air tight and won't hold liquids, but they don't rust, so with a seal underneath, they are a better choice than a ring when it comes to fermentation.  I use this system of: mason jar/seal/plastic lid for almost all of my fermenting now.  It is simple, accessible and it just works for various reasons, which I'm sure I'll be writing about more sooner or later.  If all you have is canning jar rings, just use them, but the salt and acids will eat them up.  When you put the seal and lid on, the liquid should spill over a bit.  You want to leave very little or no air in the jar.  Screw the lid on firmly, but not super hard.  It is possible to tighten the jar so much that pressure cannot escape, which is not good.  I've been doing this for many years now and have never once had a jar break from built up pressure.  It has to be tight enough to keep air from entering back in, but the pressure created by fermentation must be able to escape.  Fortunately, there is a lot of leeway in how tight you make the lid.

s

Ok, now you're going to put that jar of pretty olives drowning in brine on a dish, because it's going to ferment and spill over.  Leave it at room temperature for a month or so.  Don't open it!  The carbon dioxide formed during the ferment will push any remaining oxygen out of the jar leaving a blanket of  inert carbon dioxide over the olives.  The liquid level will diminish somewhat and the olives at the top will be left above the liquid.  They are not sitting in air though, but in carbon dioxide.  If you open the jar, you let in air, and most importantly oxygen.  Organisms requiring oxygen will begin to grow in the jar and form a colony on the surface of the brine and on the olives.  If you see that happening, usually as a white scum or film, you have air in the jar and you'll have to toss the olives.  There is no really good reason to open the jar until the olives are done and you want to eat them, and plenty reason not to.

After about a month or so, the most active fermentation should be done with.  Check the jars for any kind of scum growing on the surface of the olives/brine, rinse the jars clean, tighten the lids pretty hard, and put them away in a dark cool cupboard for another 2 months or more.

I think these olives really develop pretty quality pretty well by 6 months, but I have some that must be around three years old now and they are still excellent!  They are not sterilized, they are not treated with preservatives, they are alive and kicking and full of beneficial bacteria.  The reason the whole thing works is that they have been maintained in an anaerobic (oxygen free) environment with good bacteria and yeasts dominating the acidic salty culture.  Pretty awesome if you ask me.  Certainly don't open them sooner than 3 months after putting them in the jar.

a

I'm sure there is a lifespan to these tasty morsels, but I haven't encountered it yet.  Eventually the lids will rust through, so that is something to think about.  When you open the jar, be extremely careful not to get any bits of rust from the lid into the olives.  Remove the lid carefully and then gently wipe the rim off well with a damp cloth.

The surface of the brine should not be covered in scum or white film, which would indicate air infiltration and potential spoilage.  The olives and brine should smell, look and taste, bright and appetizing.  The olives floating above the brine might be somewhat darker, but that's okay as long there is nothing else wrong with them.  After passing the visual and smell tests, the olives should taste sharp, lively, and clean.  The feel and the bite can be tender, but should not be mushy or soft or slimy.  Trust your senses.  If the olives failed to ferment at all, they will not taste acidic and probably will not look very good either.  The fermentation is essential to out compete spoilage bacteria and create preservative acids, so if they aren't acidic, they should be thrown out, period.

Refrigerate uneaten olives, but use within a few weeks to a month or so.  You don't want them sitting around long enough that you start seeing white scum forming on the brine surface.  Adding some vinegar, or just replacing half the brine with a light colored vinegar, like distilled, white wine or rice vinegar will allow them to keep much longer because vinegar is just much more preservative than the lactic acid which dominates the brine.  But I dont' think you'll need to, because they'll be so good, you'll eat them all.  If you must save them for special guests or because they are just too damn good and special to eat, add some vinegar before storing int the fridge for a long time.

That's it.  That seems like a lot of words for the simplest olive process I know, but I hope you learned a little more about fermentation options too.  Fermenting in jars has the advantage of long storage in those jars, and means that you can put food up in small amounts that you can finish before the stuff goes bad.  That is always my main message to people about fermentation, mason jars are the cat's knees.

I wrote this post in a hurry, so please let me know if I forgot anything important, or if you have any questions leave them in the comments below.

These olives are richly flavored, zesty and alive.  Someone get me a loaf of chiabatta and some olive oil quick!

And a Frankentree in Every Garage


If I were president, the essay assignment goes when you’re in grade school.  I remember thinking “but I don’t want to be president!”  But... if I was, I don't think I'd promise a car in every garage, though I'd probably keep the chicken in every pot.  When I moved here to Turkeysong, I had to decide what fruit varieties to grow.  Inspired by friend and apple guru Freddy Menge, a scrappy young tree that was already here, was used as a framework to test out apple varieties.  Before that it produced hard green apples.  What started as an interest, grew into something like an obsession and the tree became more diverse every year starting with 25 or so varieties and ending now with about 140.  My friend Spring dubbed it Frankentree because, at her house, that’s what they call anything cobbed together from odd parts.  The name stuck.  The term frankentree is also used for genetically modified tree varieties, but it has already taken off among apple collectors, so we'll just have to see who wins.  And maybe someone searching for info about GMO fruit will run across our frankentrees and be ignited into constructive action instead of plunged into despair at how the world can be dumb enough that we take the risk of genetically engineering an apple just so it won't brown when cut.

Frankentrees are awesome!  They may take a little attention to maintain, but the advantages are many.  There are so many trees out there that provide too much fruit of one variety in too brief a period for the people that use them.  Other trees just produce fruit that no one likes.   These trees, if they are healthy enough and the form is not too wacky, are very valuable as a base to work from.  A reasonably well formed healthy tree can come to yield nourishment in abundance, interest, variety, valuable information, and even self confidence and self reliance, over a long season.

This isn’t going to be a how to article, it’s more to kick you in the butt and get you started thinking and experimenting this year article.  If you have a tree, or access to a tree that is not very exciting in the fruit department, why not try grafting on something new?  Well, I’ll tell you why you should graft on something new, or actually more like somethings.

Apple trees are an ideal format in which to learn grafting and begin fruit collecting.  Pears are a close second, and then plums.  Apples are easy to graft, very useful, widely appreciated and there are many varieties to be had, thousands actually.  They also are hard to beat in terms of seasonal length.  I have very good to excellent eating apples from August to early February, and that is straight off the tree, not accounting for storage.  You may not be able to get that in a very cold climate, but the season can still be quite long.  The ability to have a long fruiting season is reason enough to make a frankentree, but there are many more motivations.

a riot of variety
a riot of variety

Frankentreeing will teach you something, and you can teach that to someone else.  You’ll learn about different varieties of fruit, what their seasons are, what they taste like, whether they keep or not, and very probably their histories.  You’ll learn the art of grafting, without which we would not have all these varieties of fruits in the first place.  And you’ll learn what varieties do well in your area, which is extremely valuable.

You'll also end up as a keeper and preserver of variety, a sort of seed bank or scion repository that you can share out or trade from.  No doubt some of those varieties will be very old.  And old or not, more diversity in more places is assurance not only against permanent genetic loss, but also that diversity has a real place in our daily lives.  We have to live our appreciation of variety and the romance of diversity in crops for it to be real and not just an abstract idea we picked up from a foodie book.

Multi-grafted trees are not only ornamental in their own strange way, but they’re also a great conversation piece, and a frankentree will make you look cool!  Wait, screw that, if you make a frankentree, you are cool!  Everyone who visits here loves frankentree!

You’ll very likely have more fruit on a frankentree.  First of all, pollination will be great.  Apples can self pollinate to a very small extent, but they really need pollen from other varieties in order to fruit.  Your frankentree will be downright indecent in it’s public orgy of bees and pollen!  But wait, there’s more!  You’ll also get more fruit in the long run because you’ll inevitably end up with some that set fruit very readily and consistently, and some that avoid spring frost because they bloom late.

Your new skill is marketable as I’m finding out.  How many people will pay you to make them a fruit tree that gives them four to six months of the most delicious apples adapted to your region?  Let’s find out!  I just did my first paying frankentree job (bride of frankentree) for my neighbors Dan and Leslie and they seem very pleased to try giving an old apple tree a makeover.  It made good apples before, but it will make lots of different good apples now.  I have another such job scheduled this spring too.

Preparing the bride.  I prefer to prep the whole tree at once so that grafting proceeds quickly.

Preparing the bride.  I prefer to prep the whole tree at once so that grafting proceeds quickly.

bride of frankentree all grafted up and no place to grow.  Note the one branch left to the original variety on the left hand side.

bride of frankentree all grafted up and no place to grow.  Note the one branch left to the original variety on the left hand side.

I’m a problem solver.  I not only solve them, it order to be a good problem solver, I have to look for them constantly in everything.  Just ask anyone who has had to live with me.  So what’s the downside to a frankentree?  There are very few really.

If the tree is too old and you have to cut down to large stubs, you could get some rot that will shorten the life of the tree.  In many cases, that is not necessary though.  I prefer to stay within cuts that are 3/4 inches and down, but you just have to weigh the value of the tree as it is and the value of it as a frankentree, or more usually the value of a certain form of the tree, because if it’s very overgrown, you’ll want to simplify the framework and probably bring the head down.  That’s will make it easier to graft, maintain and harvest.

It takes time and energy.  Sorry, but I see that as a good thing over all.  It’s like saying it’s a lot of work.  If you’re not totally stoked about making it happen, do something else.  Otherwise, activity that gets you outside feeling interested, taking care of your own needs and building self reliance... that’s all up side!

You’ll have to maintain the tree a little more closely.  Some varieties are really vigorous and grow large and some are small and weak, so you can sort of keep an eye out to check the big ones and maintain a little light for the weak.  I lost sleep over that when I first started, but I didn’t need to, because it’s no big deal.  You’ll also have to prune off some suckers here and there as the base tree sprouts a shoot once in a while.  sometimes those shoots will be more vigorous than the grafts, almost like the tree would rather grow itself than be a frankentree, which makes sense.  My guess is that the investment you have in the project will make you more interested in maintaining the tree well.  Your personal investment means value to you.  It’s.... well, personal.

You can introduce disease.  The one that is most common is virus.  It will cause the leaves of some varieties to turn into a mosaic of light and dark areas.  It's not fatal and doesn't seem to affect most varieties here.  I basically don't worry about it anymore.  The affected leaves can become sun burned easily.  Frankentree is infected and so are many of my other varieties.  Probably many more than I know, since most show minimal to no symptoms.

That’s all I can think of.  I may sound like a propaganda machine, but I want to be!  That’s how stoked I am about the idea and my enthusiasm comes from the pleasure, interest and knowledge I’ve reaped from me experience in this realm, and the way I see people respond when they find out you can do this, or take the walk to the orchard to meet “frank”.  I’ll hopefully be giving you more specific detailed resources for frankentreeing in the future.  In the meantime, go to a scion exchange if there is one near you, or join the North American Scion exchange and trade by mail.  You may not have much to trade now, but there are quite a few generous collectors out there, and once you get a few varieties, you can start trading.  If you don’t know how to graft, check out the many youtube videos, and hopefully I’ll add one sometime as well.  I’d even like to do a detailed video just on frankentrees to give you more specific information and tricks to increase your success rates in grafting.  In the meantime, here are some basic ideas to keep in mind.  And for you locals, remember, the Mendocino Permaculture group's scion and seed exchange is this weekend Feb 1st Saturday 9:00 am to 4:00 pm.  It's free with free grafting classes and rootstock for sale.  I'm teaching hands on grafting coaching after the main grafting lectures.

Keep the framework of the tree, but thin it out and bring it down in height and in toward the framework, especially if it’s poorly trained, neglected and rangy.

Try to make smaller cuts and graft into wood 3/4 inch and down when possible, but don’t graft to the outside of the tree.  Try to graft in closer to large limbs.  If you graft only to small outside wood, you’ll end up with a tree that grows out and out and the inside of the tree will all still be the original variety.

Note long scions.

Note long scions.

Learn cleft grafts.  They are easy and good for grafting small sticks to large stubs, which is usually what you end up doing when reworking a tree.

Wrap tightly in multiple layers

Wrap tightly in multiple layers

Two views of the wedge cut and the scion fitted into the cleft stock.  Note again the flat cuts make a tight fit
Two views of the wedge cut and the scion fitted into the cleft stock. Note again the flat cuts make a tight fit

Use grafting paint (“wax”) liberally (I use doc farwell's, hopefully it’s not too toxic :/).  Use it to really seal the clefts left open after grafting, but also to paint the whole scion lightly.  Painting the scion is helpful to keep moisture in until the graft heals and the tree can start sending moisture and food to the scion.  You might have to paint the open ends of the clefts twice to make sure they are sealed well against rain infiltration.  It's ok if a little wax gets into the cleft.

Keep your grafting knife sharp!

Use long scions of 6 to 9 buds or so.  This will give you fruit sooner.

Thin the area near the graft of other shoots if possible.  You want to direct growth energy into the new graft.

If apples form the first year, leave them!  You don’t usually have to pull them off to favor growth like you do with a young tree, because the tree is driven by an established root system.

Don’t unwrap the grafts too early.  The leafy shoot will act like a sail and can break the graft.  Unwrap before the wood becomes constricted.  If you are concerned, just re-wrap it till the end of the season.

When you unwrap them for good in the fall, paint the graft union with a thick coat of grafting paint so you can keep track of its location.

Always label!  I use aluminum tags with copper, aluminum, or at least galvanized wire.  soda cans cut with scissors work fine and sections of aluminum venetian blind strips and old aluminum printing press plates work great.  Scratch the name in and write with pencil too.

So, if I’ve sparked your interest, just bust a move this year, even if it’s a small one.  Get some scions from a neighbor or a local apple orchard and make a few grafts.  You can wrap them tight with cut rubber band strips and paint them with thick latex paint so you don't have to invest in grafting supplies.  You can use a utility (razor) knife or pocket knife if you don’t have a grafting knife.  Practice on prunings a little until you can make flat cuts and grafts seem to fit pretty well.  You’ll learn something and if your few grafts take, you’ll have confidence to move forward.  Maybe I need to start a career as a motivational speaker.  Are you stoked yet!

http://www.youtube.com/watch?v=QgXObaM9i2Q

Turkeysong, the Year in Pictures 2013, Summer, Fall and Early Winter.

solstice moon
solstice moon
scallions for market, Scallions and carrots are my market mainstays.  They hold in the ground for a while, so I don’t miss the crop window if I can’t make it to the market.

scallions for market, Scallions and carrots are my market mainstays.  They hold in the ground for a while, so I don’t miss the crop window if I can’t make it to the market.

They just kept hatching more all summer.  Probably just because they’re happy free range chickens driven to fulfill their biological purpose.  These two chicks made it.  Mom moved them into the coop after most of their siblings were k…

They just kept hatching more all summer.  Probably just because they’re happy free range chickens driven to fulfill their biological purpose.  These two chicks made it.  Mom moved them into the coop after most of their siblings were killed in a raccoon attack one night.  The price of freedom

Alligator lizard foreplay.  They’d probably be less than thrilled to know they were modeling for exhibition on the web.  They’ll run around like this for a while before they can get it up (cold blooded low metabolism at work I guess :).&nb…

Alligator lizard foreplay.  They’d probably be less than thrilled to know they were modeling for exhibition on the web.  They’ll run around like this for a while before they can get it up (cold blooded low metabolism at work I guess :).  I’m sure it’s totally hot to be bitten on the head if you’re an alligator lizard chick.  She looks stoked.

William’s Pride, half polished.  This apple ripens in August and seems promising for an early apple, but it has stiff competition in chestnut crab ripening in the same season.

William’s Pride, half polished.  This apple ripens in August and seems promising for an early apple, but it has stiff competition in chestnut crab ripening in the same season.

Tomatillos roasting for salsa.  Roasting really adds some great flavor!

Tomatillos roasting for salsa.  Roasting really adds some great flavor!

Zapotec tomato is a good eating and salsa tomato.  It didn’t turn out to be the great canner I hoped it would though, so it’s back to blue beech to fill that niche for now.  Paul Robeson was a great slicer and is probably here to stay (tha…

Zapotec tomato is a good eating and salsa tomato.  It didn’t turn out to be the great canner I hoped it would though, so it’s back to blue beech to fill that niche for now.  Paul Robeson was a great slicer and is probably here to stay (thanks mom for introducing me to both of those varieties!).  I usually have free seeds of my favorite tomatoes and vegetables at the farmer’s market in Ukiah, and at the winter scion exchange in Boonville.  I have a huge basket full of folded seed pockets ready to go.  They are almost like business cards.

Where the magic happens?  Grapefruits gleaned from town with lots of sugar.  According to the owners of this grapefruit tree, it produces fruit for about 11 months of the year.  Yet there is really not that much citrus planted in Ukia…

Where the magic happens?  Grapefruits gleaned from town with lots of sugar.  According to the owners of this grapefruit tree, it produces fruit for about 11 months of the year.  Yet there is really not that much citrus planted in Ukiah.  Citrus trees are ornamental, easy to care for (usually needing very little if any care), the flowers smell good and they produce food that most people like, but which is relatively expensive to buy and is currently shipped in, often from long distances.  WTF homeowners?

Curing potato onions.  Selling potato onion starts on ebay has been a helpful income boost since fall.

Curing potato onions.  Selling potato onion starts on ebay has been a helpful income boost since fall.

potato onion slice showing the "eyes" or growing points that become new bulbs

potato onion slice showing the "eyes" or growing points that become new bulbs

Grinding charcoal sifted out of the wood stove and fire pit ashes.  Every time I start a fire, I shovel out the cold ashes and charcoal from the last fire.  As you can see, it adds up!  I’ve pretty much abandoned this grinder for now,…

Grinding charcoal sifted out of the wood stove and fire pit ashes.  Every time I start a fire, I shovel out the cold ashes and charcoal from the last fire.  As you can see, it adds up!  I’ve pretty much abandoned this grinder for now, until I can restore it and set it to finer grind setting than the one it’s stuck on now, which is pea sized and down.  Now I’m using a garbage disposal unit that was set up a few years ago for grinding apples for the juice press.  It is much faster and makes a finer grind, though I sort of miss the meditative spinning of the wheel and knowing I was doing it with my own motive power.

The interstem trees that I did not graft over have come into pretty decent bearing.  Being young, I had to thin them quite a bit this year to prevent limb breakage.  They are tending to be suckery, but otherwise, I’d say this system i…

The interstem trees that I did not graft over have come into pretty decent bearing.  Being young, I had to thin them quite a bit this year to prevent limb breakage.  They are tending to be suckery, but otherwise, I’d say this system is a success.  They seem fairly self sufficient, grow fast and fruit early.  The fruit quality is high so far.

Onion braids and chili ristras at turkeysong, the romantic version.  Yellow of Parma Onion seems to be holding up pretty well in storage, but I’m not sure it’s my favorite flavor wise.

Onion braids and chili ristras at turkeysong, the romantic version.  Yellow of Parma Onion seems to be holding up pretty well in storage, but I’m not sure it’s my favorite flavor wise.

The Hall apple has an interesting story.  It was very highly respected at one time, but was nearly lost to cultivation because it was too small to compete in the markets as food shifted increasingly toward larger scale production and peopl…

The Hall apple has an interesting story.  It was very highly respected at one time, but was nearly lost to cultivation because it was too small to compete in the markets as food shifted increasingly toward larger scale production and people purchased more and grew less.  It was rediscovered by apple hunter Tom Brown (no, not the survival guy) who deserves major props for sleuthing out many old apples that would otherwise be lost forever.  Go Tom!  Hall was also grown in California at one time, and was of commercial interest, though it probably fell out of favor here for the same reasons.  Being a southern apple, it was resistant to our hot summers.  My few specimens this year were badly watercored, but that is likely to clear up as the tree matures.  The flavor was intense, even early in the season, so I’m hopeful it will stand up to the benchmarks already set by other great apples grown here.  This specimen is larger than average since it was grown on a cordon.

It was a good year for apples!  Some gigantic and some tiny.  Some delicious and some spitters.  The cordon trees have really started to produce.  They grow enormous apples.  My only complaint is that the apples seem somewha…

It was a good year for apples!  Some gigantic and some tiny.  Some delicious and some spitters.  The cordon trees have really started to produce.  They grow enormous apples.  My only complaint is that the apples seem somewhat watered down compared to those off of my other apple trees, no doubt because of watering.  I have to water them since they have small root systems and are crowded together, but I may cut back a little to see if I can get closer to the dry farmed taste intensity and sweetness of my other apples.  I got to taste a lot of new apples this year and have lost count of how many are fruiting.  I sold apples at the market and did a lot of impromptu tastings with people.  I’ve gotten some good input and insights now and feel confident to move forward with planting a few more trees for market.  I won’t be going large scale or anything.  I like keeping a diversified farm economy, it’s safe and resilient, and way more fun!  But I would like to be able to take more than a couple of boxes to market.  I’m consistently impressed by my apples and disappointed in everyone else’s.  I simply don’t take lame apples to market.  Those are for the chickens or the juice press.  All these years of research and trial testing varieties is paying off.  I’m not sure if I’ll do an apple variety blog report this year, but you’ll certainly be hearing more about worthy and unworthy apple varieties sometime in the future.  I’ve occasionally had my doubts about sinking so much time, thought and energy into the whole apple project, but tasting some great apples this year, and seeing people’s faces when trying them was very gratifying and has confirmed what my enthusiasm already knew.  That should be no surprise since it was all done out of passion and usually the thing you are most compelled to do will bear fruit in some way eventually.  That at least is how I’ve always lived.

Drying strawberries.  This was in the spring.  I just forgot to put it in the last post.  Dried strawberries are intensely flavored, but I can’t say they are super fun to just eat.  I haven’t really figured out what to do with th…

Drying strawberries.  This was in the spring.  I just forgot to put it in the last post.  Dried strawberries are intensely flavored, but I can’t say they are super fun to just eat.  I haven’t really figured out what to do with them yet.  I’ll be sure to let you know if I break the dried strawberry code, and let us know if you already have.

Red fleshed apples for making jelly

Red fleshed apples for making jelly

jelly making and madrone berries for stringing

jelly making and madrone berries for stringing

Red fleshed apple jelly with saffron.  I grow the saffron too.  Why yes, that is bad ass of me :)

Red fleshed apple jelly with saffron.  I grow the saffron too.  Why yes, that is bad ass of me :)

Leek seed heads.  These represent the third or fourth generation of seed selected from Bulgarian Giant for height, girth, uprightness, cold hardiness and long smooth stalks.  The gene pool is somewhat limited as I usually only save 8 plant…

Leek seed heads.  These represent the third or fourth generation of seed selected from Bulgarian Giant for height, girth, uprightness, cold hardiness and long smooth stalks.  The gene pool is somewhat limited as I usually only save 8 plants or so, but I’m hoping to trade for some seed from Bulgaria this year to freshen up the gene pool!  Lot’s of seed to give away this year.  You might be surprised how much seed is produced by 8 leek seed heads!  If you have been thinking about saving seed, but haven’t done it yet, my advice is to just start.  Tomatoes are easy and don’t inter-cross.  Lettuce is easy and also doesn’t cross out, so you can just let your best one or two plants go to seed.  It gets more complicated from there, but you can worry about that later!  Find the easy stuff and just start.  Our seed supply and genetic diversity are seriously threatened by current trends.  This is a real problem that we can all solve by taking control of our own seed supplies.  We don’t have to save everything either.  We can divide always trade too.

A few potato onion seedlings showing some diversity of color and size.  Maybe one of these will be the next best potato onion ever.

A few potato onion seedlings showing some diversity of color and size.  Maybe one of these will be the next best potato onion ever.

Fall colors in red fleshed apple seedlings.  Some clearly show much more red than others.

Fall colors in red fleshed apple seedlings.  Some clearly show much more red than others.

Red fleshed apple seedling in fall.

Red fleshed apple seedling in fall.

This apple, labeled Vin de St Maurice, is huge.  More huger than it actually looks in this picture.  It wasn’t super exciting to eat, but maybe it will improve.

This apple, labeled Vin de St Maurice, is huge.  More huger than it actually looks in this picture.  It wasn’t super exciting to eat, but maybe it will improve.

Winterstein.  Allegedly the only apple bred by famous plant breeder Luther Burbank

Winterstein.  Allegedly the only apple bred by famous plant breeder Luther Burbank

Saffron bulbs begining to sprout in fall.  Each of those little shoots coming out the side will become a new bulb.  I had them multiplied up to probably 800 to 1000 bulbs after starting with just 35 or so.  Then a gopher discovered my…

Saffron bulbs begining to sprout in fall.  Each of those little shoots coming out the side will become a new bulb.  I had them multiplied up to probably 800 to 1000 bulbs after starting with just 35 or so.  Then a gopher discovered my nursery bed and kicked by butt.  I lost about 2/3 of them, which at around 50 cents piece to replace them is a pretty big loss.  The remaining were replanted in a new bed which was also discovered and the plants started disappearing underground one by one.  I dug up all the plants, lined the bed with wire, and replanted.  Take that suckas!  I’m on a mission to grow saffron here.  Obviously gophers and voles are going to be a major issue, but my gears have been spinning for several years to come up with possible solutions.  Like so many things, there should be a local saffron industry in California, at least to cover local use.  It is very easy to grow aside from the rodent issue.

Saffron root growing through a piece of “the pet”, a clay charcoal kiln that was pulverized and used to amend the saffron crocus bed.  Burnt clay is supposed to be a good soil amendment.  did this root find that hole in the fired clay and …

Saffron root growing through a piece of “the pet”, a clay charcoal kiln that was pulverized and used to amend the saffron crocus bed.  Burnt clay is supposed to be a good soil amendment.  did this root find that hole in the fired clay and dive in?  Or did it just bump into it and end up in there?

Dressing a piece of lat year’s bull hide.  This piece of leather went to shoe maker Holly Embree and was used to make a pair of shoes for the fiber shed fashion gala.  She was able  to work with the chicken tracks that I couldn’t…

Dressing a piece of lat year’s bull hide.  This piece of leather went to shoe maker Holly Embree and was used to make a pair of shoes for the fiber shed fashion gala.  She was able  to work with the chicken tracks that I couldn’t manage to dress out :/

Bay nuts galore this year!  This picture shows the genetic diversity of the bay nut.  I suspect that indicates a high potential for breeding for improvements in size, form, oil content, etc… After all, it’s relative the avocado was bred fr…

Bay nuts galore this year!  This picture shows the genetic diversity of the bay nut.  I suspect that indicates a high potential for breeding for improvements in size, form, oil content, etc… After all, it’s relative the avocado was bred from a small, barely edible fruit.  Look for a book from paleotechnics on bay trees and bay nuts this fall (you might not find it, but look anyway:)

The best drier.  The car dashboards are in constant use every fall and much of the summer for drying stuff.   There are more trays and boxes in the background.  They haven’t all been weighed yet, but probably around 150 pounds total t…

The best drier.  The car dashboards are in constant use every fall and much of the summer for drying stuff.   There are more trays and boxes in the background.  They haven’t all been weighed yet, but probably around 150 pounds total this year.  I’ll be selling them on ebay and elsewhere.

Bay nuts in a mesh bag.  Just a cool picture.

Bay nuts in a mesh bag.  Just a cool picture.

Roating bay nuts in a popcorn popper, my new preferred method until I invent and build a better roaster.

Roating bay nuts in a popcorn popper, my new preferred method until I invent and build a better roaster.

Cracking bay nuts in the Davebilt nutcracker.  This machine is manufactured and sold by a very nice old couple in Lake County.  It can be set for any size of nut.  It sure beats tapping each one with a rock!  An investment, but a…

Cracking bay nuts in the Davebilt nutcracker.  This machine is manufactured and sold by a very nice old couple in Lake County.  It can be set for any size of nut.  It sure beats tapping each one with a rock!  An investment, but a solid one if you crack nuts every year.  It’s built like a tank.

Roasted bay nuts, mmmmm….

Roasted bay nuts, mmmmm….

bagged and ready for market

bagged and ready for market

Bay nut candy ingredients- chili powders, hand gathered sea salt and maple sugar

Bay nut candy ingredients- chili powders, hand gathered sea salt and maple sugar

Bay nut paste ground find for making candy.  Bay nuts contain 60% of almost entirely saturated oils, much like coconut and chocolate do.  When ground, the oils melt and the paste can be shaped to cool into chocolate like confections. &nbsp…

Bay nut paste ground find for making candy.  Bay nuts contain 60% of almost entirely saturated oils, much like coconut and chocolate do.  When ground, the oils melt and the paste can be shaped to cool into chocolate like confections.  Isn’t that cool?!

Paleotechnics cofounder and Turkeysong partner and veteran bay nut pusher Tamara Wilder rolling out bay nut paste.

Paleotechnics cofounder and Turkeysong partner and veteran bay nut pusher Tamara Wilder rolling out bay nut paste.

Cuttting

Cuttting

Cooling bay nut candies to harden.  They are hard at room temperature and melt in your mouth or hand just like chocolate.  You know you want one, but so far they are only for sale sporadically at random paleotechnics events.

Cooling bay nut candies to harden.  They are hard at room temperature and melt in your mouth or hand just like chocolate.  You know you want one, but so far they are only for sale sporadically at random paleotechnics events.

Happiness is a full woodshed, but this shed is less than full.  At least it’s half full and not half empty this year!  It does have a nice stack of fat slabs of fir bark for lime burning projects!  This bark is from 60 year old stumps…

Happiness is a full woodshed, but this shed is less than full.  At least it’s half full and not half empty this year!  It does have a nice stack of fat slabs of fir bark for lime burning projects!  This bark is from 60 year old stumps, still solid and dense with a high fuel value.  I like the florist sighn with half the F eaten off by a horse.  That’s going to market this year.  Very country chic.

Persimmons peeled for drying.

Persimmons peeled for drying.

Drying persimmons hung from the building eaves.  This is how they do it in Japan.

Drying persimmons hung from the building eaves.  This is how they do it in Japan.

Drying hachiya persimmons.  These are so good!  Persimmons are dried and eaten all over temperate asia, but are just being discovered by other-than-Asian Americans.  I’m planning to plant more, but still deciding what varieties. &nbsp…

Drying hachiya persimmons.  These are so good!  Persimmons are dried and eaten all over temperate asia, but are just being discovered by other-than-Asian Americans.  I’m planning to plant more, but still deciding what varieties.  The plants are productive, disease resistant, almost pest free and require little pruning.  My neighbors let me pick about 150 fruits off of their 30 year old tree after they had already picked 550 large fruits!  I never knew what to do with that many persimmons until I found out about drying them whole a few years ago.  Early experiments went okay, but when tonia brought some back from chinatown, I realized the true potential and I’m all over it now.  They’re like a giant natural gummy bear that’s been deboned, had it’s limbs and head removed and was given a hat and squished flat.. sort of.  Persimmons are a great example of the latent resource potential concept I’m so into since moving here.  After establishment, the long lived trees will produce persimmons whether they get used or not.  They could be eaten, sold fresh, dried and sold, traded, gifted (part of any truly stable economy), fed to animals or just left to look pretty on the tree.  Awesome.  I’ll be learning more about persimmons and figuring out how to graft them.  There is a great persimmon collection at Winters here in California with varieties from all over the world.

Happy birthday to you!  The daughters of young love on their second birthday.  Yay!  Coming out party in a few years!  And many mooore…

Happy birthday to you!  The daughters of young love on their second birthday.  Yay!  Coming out party in a few years!  And many mooore…

Hopefully the last smokey lime burn ever here at turkeysong.  I only did it for pictures to finish off the lime burning in drums era with a blog post.  All kinda plans for lime burning experimentation rattling around in here.

Hopefully the last smokey lime burn ever here at turkeysong.  I only did it for pictures to finish off the lime burning in drums era with a blog post.  All kinda plans for lime burning experimentation rattling around in here.

Slaking shell lime boiling like crazy.  Still exciting every time!

Slaking shell lime boiling like crazy.  Still exciting every time!

Lots of charcoal making experiments brewing in my head.  The cone kiln concept using a pit is especially exciting.  This guy is doing something similar in hawaii, though his burn strategy is a little different.  I think there is …

Lots of charcoal making experiments brewing in my head.  The cone kiln concept using a pit is especially exciting.  This guy is doing something similar in hawaii, though his burn strategy is a little different.  I think there is huge potential here and will be experimenting if it ever rains around here.  Thanks to reader Lars for pointing me in this direction.

A 60 year old lump of ossified douglas fir pitch.  What could that possibly be used for?  All kinds of stuff!  In this case, making soot for use in manufacturing ink.  I hope to illustrate all publications from here out with home…

A 60 year old lump of ossified douglas fir pitch.  What could that possibly be used for?  All kinds of stuff!  In this case, making soot for use in manufacturing ink.  I hope to illustrate all publications from here out with home made artist materials, the mainstay of which will be Asian style lampblack ink and turkey quill pens.

Collecting fir pitch soot (aka lampblack) off of a flat rock for use in ink making.

Collecting fir pitch soot (aka lampblack) off of a flat rock for use in ink making.

Hybrid amaryllis coming up under the interstem trees.  I’ve got quite a few trees planted to these bulb as an understory, now and will start seeing some results (or lack of) soon.  Unfortunately, these ones go beat pretty hard in an e…

Hybrid amaryllis coming up under the interstem trees.  I’ve got quite a few trees planted to these bulb as an understory, now and will start seeing some results (or lack of) soon.  Unfortunately, these ones go beat pretty hard in an extended freeze just after this was taken.  Most of them seem like they’re recovering.  I’m probably right about at the limit of what they’ll tolerate weather wise.

Black Sage bundles tied with agave fiber.

Black Sage bundles tied with agave fiber.

pink-apple.jpg

This is the apple that Greenmantle nursery trademarked under the name Pink Parfait™.  My apple guru says it’s the best of the Etter blood apples, and I’m becoming inclined to agree.  It is not as red or as intensely flavored, but it does have some of the same fruit punch/berry aromatics and it is a very pleasant eating experience with an outstanding juicy open texture.  The flesh seems to disappear as you chew it.  It also ripened very late for me (later than anything but lady williams!), hung very tight to the tree and survived an extended hard freeze in stellar condition.  But wait, there’s more!  It’s quite beautiful and sweeter than many of them as well.  All in all an excellent apple (at least this year here in California.  Our mileage will probably vary).  Now if we can only get this kind of quality with more pigmentation and more red flavor.  Thanks Albert! I wish you could have lived long enough to see your work really appreciated.

Thanks for tuning in this year!  The Turkeysong blog had 24,000 views in 2013, many of them from people searching the web for relevant information of some kind, which I hope they found (although searches for "How to grow a big ass" and "leek in ass" continue to trickle in as well and I hope those people weren't too disappointed).  Subscriptions continue to grow and I've got plenty more to say!

I'm hoping, if I can, to start an income stream from writing and blogging, so that I can keep doing this.  That will mean more books published and probably affiliate links to amazon on the blogs (Don't worry, I'm not going to try to sell you anything you don't need.  I'm all about people buying less physical stuff and doing things for themselves.  That's practically a mission for me.  Most of them will be to books I write and maybe other books or products that I review, like the gophinator trap.)  I'll probably stay away from advertising altogether, because it's just so annoying, and again, I don't want to sell people anything they don't need, because that's half of the worlds problems in a nutshell.  Or if so, they will be extremely select.  I should be moving to a domain too so I can get rid of the ads that come up on these free wordpress domains.

I really like blogging.  Exploring new and old ideas and techniques, and sharing relevant information, are at the core of my being and always have been.  I'm at something of a cross roads with the blogs and plans for other projects.  I have some other blog ideas, but don't want to get spread too far out, or over-complicate things.  When I started this blog, I thought it would cover all of my interests and ideas, representing the diverse enigma that I am.  Since I was so immersed in homestead stuff at the time, and realized that I had built a small audience around that interest, I decided to branch off and put primitive tech stuff on the Paleotechnics site.  I feel a little disjointed though, because I'm all about the integration of ideas, old and new.  Being intensely immersed in paleotechnology stuff for a long time in my 20's gave me a valuable insight into environments and of the potential for all kinds of materials to be turned to use.  That has been invaluable in helping me see the land, and basically everything, as a resource-scape full of potential, as well as being a sort of organism that I play a part in.  Part of my philosophy is that we should aim not to reject ideas and practices categorically, but rather that it behooves us to view things for what they are and what they do and don't have to offer in the view of a larger context, and integrate or reject them accordingly.  Sounds reasonable I know, but we have a strong tendency to think in black and white categories and build identities around what we are and aren't, what we do and don't do and what is and isn't too new, too old, too whatever.  I'm sorely tempted to throw all my ideas and projects, new and old, together in one place and let everyone sort it out.  While I don't want to alienate a specific audience either, it occurs to me sometimes that I should just write for an audience of diverse interests.  On the other hand, I respect that everyone doesn't want to hear what I think about The politics and social ills of the marijuana black market economy in Northern California, or Rife machines, or how to make a stone bowl using just rocks, or a pimped out chicken powered composting system.

I also can't always find my voice when writing for different audiences.  In some ways, I can best reach my generation and younger people, because we've lived in the same times and speak, to some extent, the same language.  My generation is coming into positions of power and greater influence now and could use a little shaking up. (If you were to ask me, which apparently you don't have to :D.

One thought is to have a central blog that covers everything I do and will serve as a sort of news feed.  That site could have just links to my other blogs and projects, or entire posts replicated.  Also, anything that didn't really fit in on a another blog would go there.   That is appealing in some ways, and may be the best solution, but also sounds complicated and will increase computing time and thereby decrease working time.

I'd appreciate anyone's input on these ideas and thoughts and perspectives on this blog and/or the paleotechnics blog.  What you do and don't want to hear about, what you appreciate or could do without and ideas about structuring content in one place or across multiple sites, or just whatever.

Oh yeah, and once I scrounge up enough money to get a decent video camera, I'm hoping to start a TOTALLY BAD ASS YOU TUBE CHANNEL.  Or is it two channels?  or three?  See, more spreading out :/

Turkeysong, the Year in Pictures 2013 Late Winter and Spring

collecting red fleshed apple pollen header

It's been a challenging year.  My love and best friend moved away in the spring, leaving a hole in my life that still feels like it will never close all the way.  In classic bad timing, I was also embarking on diet and lifestyle changes in yet another attempt to improve my crappy health which I had made worse the previous season by going on a very restricted low carbohydrate diet called GAPS (shudder).  My new approach included, as importantly as anything, stress reduction, but with a broken heart, very little money, no energy and pretty much on my own for the first time in forever without anything resembling a reliable income, that didn't happen so much.  I got pretty low functioning for a while but managed to squeak through the worst of it.

I was only able to make the farmer's market, my main source of income, about once a month where I average less than 100.00.  I was as chubby as I've ever been in my life and pretty damn weak.  I remember killing a chicken to eat and having to rest 3 times in order to finish processing it.  I started plucking it, but it was too much work so I just tore the skin off.  Another time I prepped for the market the night before, and finished washing carrots in the morning.  By the time I was ready, I was too exhausted to make the trip, so I had to blow it off.  A bunch of produce, including a cooler full of amazing carrots, the best crop of the year, went to the chickens.  That sort of thing was not unusual for me unfortunately, but doing it alone was.  I almost never slept more than 5 hours consecutively,usually less, and often only managed to get 4 or 6 hours of sleep total over 24 hours.

Fortunately this nutcase/genius,

Matt-Stone-author-pic

Matt Stone's advice on improving my metabolic rate has paid off in the long run, in spite of some circumstantial bumps in the road.  Regardless of all of the difficulties, my mood was greatly moderated throughout by listening to my body and eating whatever I felt like, whenever I wanted, and then some.  I also stopped working unless I felt really up to it and drastically cut my consumption of liquids, especially the holy elixir of eternal youth, plain water.  Over the last couple months I've lost fat and gained muscle while continuing to follow that basic approach and adding a very small amount of body weight exercise..  I still have some way to go to be really high functioning, but I have a pretty normal body temperature for the first time in ages, and I feel good with increasing frequency, not just not bad, but actually good, always a great rarity for me and valuable beyond words.  On new years eve I wore a t-shirt outside until about 11:00 pm because my metabolism was so jacked up that it felt like I was pushing the cold air away by radiating heat.  My personality has definitely changed for the better, and I'm more convinced than ever that the severity of peoples emotional and phychological issues is often, if not usually, rooted in physiological dysfunction.  A resilient physiology makes for a resilient person.

Other things have helped me along the way, but this is the ONLY approach that has ever felt like it's given me a real foundation on which to potentially build back true health after 15 years of lyme related issues, as well as being kind of messed up for most of the rest of my adult life.  Throwing supplements, exercises, superfoods or whatever at health problems is largely a waste of time if the baseline of the organism, the production of cellular energy, is compromised and replaced (as it always is when compromised) by a stress response chemistry.  Metabolism is where it's at folks.  Low body temperature = an unhappy body.

At this point, I'm pretty much letting my body do the driving, doing my best to make it feel safe, well nourished and well rested, and trusting it to sort out what to do with the resources I give it.  I'm pretty sure now that it's smarter than me.  I'm hoping that I will continue to improve so I can more fully realize my potential to kick some serious experimental/educational butt in 2014, but everything will take a back seat to gaining and retaining a healthy state, whether I get there or not.

Even with all the challenges and a major lag during the summer, I still managed to do some cool stuff and take a bunch of pictures.  I've broken the year in pictures up into two parts of which this is number one.  Hopefully next year it will be in 4 parts!

Erlicheer at the Ukiah Farmer's Market.  This smelly small double narcissus, was a big hit. It looks like little roses. It doesn't seem like a good candidate for my tree understory system, but it's very popular as a cut flower.
Erlicheer at the Ukiah Farmer's Market. This smelly small double narcissus, was a big hit. It looks like little roses. It doesn't seem like a good candidate for my tree understory system, but it's very popular as a cut flower.
girl smelling narcissus
Mowgli's Favorite, one of Bill Welch's creations
A Collet Vert rutabagas.  This is the best rutabaga I've grown.
A Collet Vert rutabagas. This is the best rutabaga I've grown.
coagulated goat's blood being wrapped for freezing.  Incredibly nutritious and surprisingly tasty fried.
coagulated goat's blood being wrapped for freezing. Incredibly nutritious and surprisingly tasty fried.
Many of the inter-stem apples that I planted a couple of years ago were re-grafted to new varieties.  Most are dessert or dual purpose dessert/cider apples.  All the grafts took and they grew very nicely, aside from a couple of g…

Many of the inter-stem apples that I planted a couple of years ago were re-grafted to new varieties.  Most are dessert or dual purpose dessert/cider apples.  All the grafts took and they grew very nicely, aside from a couple of grafts breaking in the wind when I unwrapped them too early. One broke at about 12 inches long. It still looked plump and healthy, so I trimmed off the leaves and re-grafted a section of it back into a fresh split immediately. It took. That supports the idea that you can get away with grafting at many different times of the year. In a low risk situation like that one, why not try?  Note also crops being grown under the trees.  It benefits the trees with extra water and nutrients they otherwise probably would not get, and the roots help condition the soil and inject organic matter.  I’m hoping this whole strip will eventually have an understory of winter growing flowers ala my winter bulbs under fruit trees project.

The cuttings from my first batch of red fleshed apple seedlings pollinated in spring 2011, ready for grafting.  Each has a tag with a unique code, so I can keep track and take notes from here out.  The roots were planted in a block somewhe…

The cuttings from my first batch of red fleshed apple seedlings pollinated in spring 2011, ready for grafting.  Each has a tag with a unique code, so I can keep track and take notes from here out.  The roots were planted in a block somewhere as a sort of backup.

Red fleshed apple seedling nursery.  They are grafted onto dwarfing rootstocks. In a somewhat bold move, I grafted the entire length of most of the scions instead of the usual 2 or 3 buds on a short stick.  Some of them were a couple feet …

Red fleshed apple seedling nursery.  They are grafted onto dwarfing rootstocks. In a somewhat bold move, I grafted the entire length of most of the scions instead of the usual 2 or 3 buds on a short stick.  Some of them were a couple feet long. I had 100% take on these grafts.  Apparently, the more buds they have, the sooner they’ll fruit, so I’ll do virtually no pruning from here out.  All are staked, and completely painted with grafting wax to prevent drying until the graft can heal. Note also the shade cloth. Overall, it was a good year for grafting. Various experiments I’ve done indicate that the conservative way most of us usually approach grafting is not always necessary, and probably very limiting. I’ll be experimenting more, so hold your breath for EXTREME GRAFTING!!! (THE MOVIE!?)

I’m increasingly impressed by notching.  Notching above a bud encourages it to grow out, or to grow longer and stronger.  This tree was trained by a combination of dis-budding and notching.  By so doing, I got scaffold branches exactl…

I’m increasingly impressed by notching.  Notching above a bud encourages it to grow out, or to grow longer and stronger.  This tree was trained by a combination of dis-budding and notching.  By so doing, I got scaffold branches exactly where I wanted them and therefore the basic shape of the tree in one year from a single stem!  I’m sure you’ll be hearing more about this cool technique I picked up from a very old tree training study, but for now, it’s really this simple- leave 3 buds grouped together along the whip wherever you want a scaffold, removing all other buds except a couple at the top, notch one bud in each group to grow out the direction you want that scaffold to point in (one in each direction for open center or delayed open center). Let all growth except basal suckers grow through the season. Trim off anything you don’t want next winter. Why doesn’t everyone do this instead of the usual slower training methods? That’s a good question and I think the answer is key to making progress in gardening and farming. The approach to gardening and farming seems to be conservative by our nature, but it is often based on baseless common knowledge that is not infrequently short sighted, overly conservative, or just plain wrong. This method of notching combined with disbudding was proven out starting in 1926, but seems to have had little influence as far as I’ve encountered.

bee on red fleshed apple flower.  The red pigment can infuse the flowers, leaves, bark and wood as well as the fruit. It was an excellent spring for setting fruit.

bee on red fleshed apple flower.  The red pigment can infuse the flowers, leaves, bark and wood as well as the fruit. It was an excellent spring for setting fruit.

Collecting pollen of Red Fleshed apple for breeding effort

Collecting pollen of Red Fleshed apple for breeding effort

Mr. Beethead.  Just a surplus beet from the garden that ended up amusing a lot of people at the local hot springs where it resided in a bowl of water for a few weeks.

Mr. Beethead.  Just a surplus beet from the garden that ended up amusing a lot of people at the local hot springs where it resided in a bowl of water for a few weeks.

Gratuitous cute chick pic
Chicks eating an unwanted turnip.
chicken poo.  A common sight at turkeysong.  Good stuff when it's not on your shoe.
chicken poo. A common sight at turkeysong. Good stuff when it's not on your shoe.
The new chicken coop.  The floor is 1"x2" screen allowing most of the poop to fall through and dry on the floor below for easy collection.  Very convenient and more pleasant for the chickens than most designs.
The new chicken coop. The floor is 1"x2" screen allowing most of the poop to fall through and dry on the floor below for easy collection. Very convenient and more pleasant for the chickens than most designs.
Chicks and mom drinking at the watering hole.  With mom at the watering hole.  It was an epic chick year with probably over 11 hens going broody.  Finding the balance between being over the carrying capacity of the land, and maintaining a surplus la…
Chicks and mom drinking at the watering hole. With mom at the watering hole. It was an epic chick year with probably over 11 hens going broody. Finding the balance between being over the carrying capacity of the land, and maintaining a surplus large enough to offset depredation is proving to be tricky. Over 20 is too many. They're tearing the place up pretty good. I'm working my way through them one Tom Kha Gai and Yakitori skewer at a time. The meat quality is really outstanding. So are the eggs. These chicks are laying now.
What happens when you don't perform here at turkeysong.  The batch of Buckeye chickens didn't work out for eggs and in general.  Buckeye fail.  however, they are really excellent meat birds I have to say.
What happens when you don't perform here at turkeysong. The batch of Buckeye chickens didn't work out for eggs and in general. Buckeye fail. however, they are really excellent meat birds I have to say.
Bull hide on tanning beam.  This bull hide from the neighbors turned out to be cut up pretty bad which is typical when anyone but a tanner skins an animal.  I made a little leather and some glue and some compost.
Bull hide on tanning beam. This bull hide from the neighbors turned out to be cut up pretty bad which is typical when anyone but a tanner skins an animal. I made a little leather and some glue and some compost.
an experimental piece of skin from the bull hide above that was soaked in hen dung tea.  The enzymes from bacteria and the poop itself probably, condition the skin, relax it and take out the remaining lime.  This test shows that the "bate" as it's c…
an experimental piece of skin from the bull hide above that was soaked in hen dung tea. The enzymes from bacteria and the poop itself probably, condition the skin, relax it and take out the remaining lime. This test shows that the "bate" as it's called, has acted on the skin enough to be very pliable and impressionable. Now it's ready for the bark liquor.
Bull hide scraps cleaned and dried for making hide glue.  These were limed, and then rinsed and scraped like crazy to remove unwanted impurities and leave (as much as possible) just collagen, the stuff that glue is made of.

Bull hide scraps cleaned and dried for making hide glue.  These were limed, and then rinsed and scraped like crazy to remove unwanted impurities and leave (as much as possible) just collagen, the stuff that glue is made of.

Cooled hide glue gelatin slab made by boiling skin scraps, ready to be cut into cubes
Dried hide glue squares ready for storage and glue making.  Glue is made up by soaking in water till swelled and then heating to dissolve.
Dried hide glue squares ready for storage and glue making. Glue is made up by soaking in water till swelled and then heating to dissolve.
Just because it's a cool picture.
goat hide stretched in frame to dry.  This is mostly for making miniature drums, but also any other crafty things that come up.
goat hide stretched in frame to dry. This is mostly for making miniature drums, but also any other crafty things that come up.
wittle wawhide drums.  Popular at farmers market and paleotechnics events.
wittle wawhide drums. Popular at farmers market and paleotechnics events.
Bracelets of bark tanned goat skin.  I made a big 'ol pile of them in the spring. I think my design is pretty cool.
Bracelets of bark tanned goat skin. I made a big 'ol pile of them in the spring. I think my design is pretty cool.
Fallen giant. This spring marked the sad beginning of felling trees infected with Phytopthera ramorum, the organism that causes sudden oak death syndrome. :( If I get them early enough, before they go into the sudden death phase, I can still peel th…

Fallen giant. This spring marked the sad beginning of felling trees infected with Phytopthera ramorum, the organism that causes sudden oak death syndrome. :( If I get them early enough, before they go into the sudden death phase, I can still peel the bark and use it for bark tanning skins. Sadly tanoak is sort of a hinge pin species in this environment. It is the most reliable mast producer for squirrels, deer, birds and more, and of course ultimately for the things that eat them. It is also a symbiotic partner to most of the edible mushrooms that grow here. It’s loss will be devastating to the ecology and me, since I interact with the land I live on here. I may do some experiments planting chestnuts as a potentiall replacement, but they’ll be a long time in growing to fruiting size.  I expect to lose 90% of our tanoaks in the next 5 to 6 years, which is a lot since it’s a major species here. I totally just pulled those numbers out of my butt, I have no idea what it will really be like except for seeing other areas that have been hit. Fortunately other oaks and tree species are not nearly as susceptible.

tonia peeling tan bark with a spud. In this case the spud is just a wooden pole sharpened to a wedge shape.

tonia peeling tan bark with a spud. In this case the spud is just a wooden pole sharpened to a wedge shape.

The bark from the tanoak tree above peeled and drying.  Some has already been used, but this is most of it.
The bark from the tanoak tree above peeled and drying. Some has already been used, but this is most of it.
Chopping bark for boiling.  After drying in the sun, the bark was further crushed and boiled to extract the tannic acid.
Chopping bark for boiling. After drying in the sun, the bark was further crushed and boiled to extract the tannic acid.
Planting out a batch of potato onion seedlings. These were allowed to cross with other onions in the garden to introduce potentially useful, and refreshing, genes.  Or maybe that will just screw them up.  Stay tuned for a few years fo…

Planting out a batch of potato onion seedlings. These were allowed to cross with other onions in the garden to introduce potentially useful, and refreshing, genes.  Or maybe that will just screw them up.  Stay tuned for a few years for the results of that project.

A spring harvest.  fortunately, the garden was largely put in and running before I declined too far to deal with it.

A spring harvest.  fortunately, the garden was largely put in and running before I declined too far to deal with it.

prepping artichokes for canned artichoke hearts.  It was a big artichoke year, mostly because I was on top of controlling the voles who like to munch on the plant bases.  They aren’t hard to control with apple slices in mouse traps, it jus…

prepping artichokes for canned artichoke hearts.  It was a big artichoke year, mostly because I was on top of controlling the voles who like to munch on the plant bases.  They aren’t hard to control with apple slices in mouse traps, it just has to get done.

Onion Braids: functional, symbolic, marketing ploy.

onion braid headers I often braid my onions, but my braids aren’t all neat and pretty-like.  Stylish onion and garlic braids are nice, but I don’t have the time, energy and patience to sit around making something that I produce essentially for functional reasons look like I bought it at a country chic boutique.  Last year though, we braided onions for the market.  I spent a lot of time trimming the bulbs and making them look presentable, then dipping the dried leaves in water to re-soften so tonia could braid them neatly.  We added dried lavender and stuff to spiff them up a bit.  they turned out pretty nice and It was kind of fun, but it was also time consuming.  A major motivator was that it allowed us to sell our onions for a lot more.  If you really added up our time though, it was more like having another mediocre paying job to our lives, which is actually okay, but not high incentive.  I liked our onions braids, but something never quite sat right about the whole thing.  I think in a way we were diminishing the value of the food we grew by making it into something that may be viewed as art first and food second.  Also, I couldn’t help thinking that we could have spent that time growing more food or making something more lasting.

Onion braid for market

Braiding onions is actually more fun when I’m doing it for functional reasons.  I just start slapping them together and it usually works out good enough ("Good enough", a lot of jokes have been made that this is the Turkeysong motto.)  The braids are kind of messy, more like onion dreadlocks, but I’m looking at some of them hanging in my room right now and they’re pretty neat looking after they cure well enough to knock off some of the dirty outer skins.  Once you give up on making them all perfect looking, curing and storing braided onions is very practical.   It doesn’t take very long to whip out a 15 or 20 onion braid when you have no significant commitment to cosmetics.  Functionally speaking, the bulbs in a braid have good air circulation for curing, and they don’t take up a lot of space like loose onions do when spread out somewhere to dry.  You can easily move a braid in or out of the shade, and move them inside when it gets damp out.  There is no picking up of numerous loose onions one at a time and finding another place to spread them out flat, or looking for a container with good air circulation to put them in.  You can store the braids in a cool dry place, and maybe bring in one at a time to hang in the kitchen, pulling onions off as you need them.  Some say the onions keep better because the necks are sealed and less likely to be infected with rot.  If an onion does rot, it's less likely to infect others if it's not piled in with them several onions deep in a crate or bag, and they are much easier to inspect.  Onion braiding is a great system and that’s why people started doing it.  And yeah, it does look neat.

But it doesn't just look neat.  To me it is also symbolic of my choices and my lifestyle.  Each year, the sight of onion braids reinforces my sentiments about them and what they represent to me; my efforts of the past seasons carrying me through the coming ones.

Making pretty braids is much less functional.  It takes a lot of time to clean up the bulbs so that they look good, and unless they've cured for a while, that process often leaves very little protective skin on the onions.  There are also a certain number of losses when curing onions that are just inevitable.  I’m sure that more than one person took one of our nice market braids home, at a cost of like 5 onions for 8.00 dollars, or whatever, and hung them up to look at them for so long that some of the onions rotted.  I mean, that’s why you really buy a pretty onion braid, to look at it.  And that’s kind of sad.  Ideally, people would make the food I grow into art and eat it, not just look at it as art until it goes bad.

I’m not totally anti-pretty-onion-braid.  For most people though, onions are a staple food, and braids are a great way to store onions.  I remember thinking last year how cool it would be to sell more strictly functional onions braids.  I don't think that quick braiding is at all cost prohibitive for me as a way to cure, store and market onions, and may in fact be more efficient for the reasons I already outlined.  I just need enough onions to bother doing it.  If I can find a solid keeper that looks and tastes good, with good cultural traits and all that stuff, and grow a big mess of them, I could sell people braids of 8 to 20 onions at an affordable per-pound price.

Many things and acts are symbolic, but not always of what we want them to be.  I think we would do well to step sideways and try to look at what we want things to mean and to say about us, v.s. what they actually do.  A nice onion braid can mean a lot of things.  For us here, it was a chance to turn something we manifested from the soil into art of sorts.  To give it more life.  But another part of it, is that we were just profiting off people grasping at something that we have that they don’t, yet which they recognize as somehow valuable.  They want to buy a polished up phenomenon of rural life and I'm pimping myself and my precious onions to sell it to them (okay, wait, that's an awesome image, the onion pimp.  Gold chains, platform shoes...)  I’m actually all for romanticizing country life a little.  I just think that we would do well to extract and celebrate the best and most real parts of it, and not just a dressed up aesthetic.  If someone hangs one of those braids up and thinks it's too cool and expensive to actually use, then that disrespects the food I've grown by placing the aesthetic above it's potential to nourish and enrich someones life in a more real way.  But then, if my braid is all that nice, I'm just asking for it.

Depending on how my onions cure out this year, I may invest more in growing onions for market next year. They are a good crop in that they will keep between markets and can be sold all winter.  That’s good. I need crops that hold and store well since I can’t make it down the hill to market every week.  I sort of blew it this past season by getting my onions in too late, but some still did well (*see footnote on varieties and stuff below).  I think it would be cool as hell to show up at the market with a pile of somewhat knobby functional onion braids; braids that aren’t so pretty that people won’t actually use the onions.  You see what I’m getting at here?  The symbol was real before, but now it means something different.  It is symbolic of something more tangible and close to home; something that is not just playing at a fantasy of real food and farm, so much as participating in it as part of a rhythm of daily life.   I grow onions.  I braid them.  You hang them in your kitchen and pluck them off to nourish your family.  I see you at the market next year.  And while you use them they visually reinforce the choices you’ve made and remind that food is maybe something more than a thing that shows up magically at the store and which you trade money for.  I think that’s a pretty cool relationship.

I have a lot of stuff I’d like to do, and I don’t have the energy, space, fertilizer and water to make a real dent in the onion consumption of Ukiah residents, but I can make a tiny dent, and do it in a way that allows people to take home a more real, and more meaningful, piece of life here at Turkeysong.  I’m sure I’ll get better at braiding and make prettier braids than I usually do.  I might even braid in some dried flowers or some herb and chilis.  But, I'm not sure I want them to be too pretty. The goal is definitely functionality and not adding a lot (if any) in price to what should be an affordable staple crop.  If I want to make some serious stacks of cash, I can grow a couple beds of cipollini onions.  Those flat little gems sell for 5.00 or 6.00 a pound to people who want to spend their money on gourmet food, which is great.  What better could they spend it on?

these are just a few thoughts I’ve had over some time now.  I woke up at 3:30 AM as I so often do.  I put on my headlamp and did a little hoeing under the interstem apple trees in preparation for fall potato onion planting.  Then I thought I’d use some of my time while waiting to get sleepy again bringing in the onion braids and chili strings that have been curing and drying on the south wall of the lizard house.  I’ve been meaning to do it for a week or so.  The onions cured nicely in the gentle sun we have this time of year (remember I planted late so I harvested late), and only one bulb was lost to rot so far.  Now it’s almost dawn and I have to go back to sleep so I can wake up all perky and replace the head gasket on my car.  And you probably thought I was going to go plough a field with a wooden stick or something like that.  Gotta have a way to get the giant pile of onion braids I’ll have next year down the hill somehow.  They’re not going to hike down there by themselves.  Take my advice and stick to urban homesteading unless you have some other reason to be out in the country other than that it’s pretty and private.  That way you can probably get your onion braids to market without a car.

onion braids curing

Oh yeah, how do you do it!?  It seems to work better for both curing and braiding if the greens are not too green.  I think it’s actually better if they are mostly dry, but I’m still deciding what I can get away with.  If they are very green, they shrink a lot in drying and the braid can become loose or even fall apart.  Dip dried leaves in water briefly to make them more supple.  Form an X with the leaves of two onions.  Lay the leaves of a third onion over the cross formed by the X and wrap it’s leaves once around the cross' intersection to secure the first two onions in place  Then you just start braiding, adding an onion with every lay over.  putting in a piece of twine toward the end can help strengthen the top of the braid.  I usually braid out to the tips and then double the end over and lash it down to form a loop for hanging.  If none of that makes any sense, just do a search for onion braiding.  There are plenty of tutorials out there.  I’m out of onions to do a photo series with this year.

These french onion sellers, known in England as Onion Johnnies, wrap their onions on a core of straw or rushes instead of braiding, but the bulbs are already fully cured out.  Actually, this whole onion johnny phenomenon is really an interesting study.  From what I've gathered (which should be suspect:) they found it cheaper, easier and more profitable to import their onions to England across the channel and sell them there door to door, rather than trying to get them to French population centers.  Apparently the onion Johnnies were quite the phenomenon for a long while, but then slowly stopped coming till there were only a few left. The onions are sold in hanks door to door.  If you look at the older pictures of the Onion Johnnies, the hanks are very nice looking, but pretty plain.  There is currently a revival, but this time it's a little different.  There are festivals and stuff and you'll see a lot of the onion shanks are very dressed up with flowers and grain heads and stuff.  I think that people probably used to buy them mostly for the onions.  Now, it's probably more of an idea and a symbol that people are buying.  It is even alleged that the stereotype of the frenchman in stripped shirt and beret came from the English being familiar with these guys.  Now at the festivals the guys wear the hat and demonstrate spinning up shanks of onions for sale.  They have to sell their frenchness a little.  I like to dress up my booth and I sell ideas like heirlooms and the more aesthetic parts of life here.  It's an interesting thing to think about though, when are we degrading and pimping ourselves and over inflating an image, v.s. presenting an idea and aesthetic that will move people in a positive way while still making fat stacks of cash :O  So here is the idealized version, though still maybe kind of squalid.  I stopped short of finishing the building...

So here is the cleaned up version.  This photo is the onion braid made with clean looking onions, braided carefully with some flowers and stuff.  I moved the broken door mirror.  Hung the old cool antique mirror in a totally useless place, even for a chicken.  Caught the chicken walking by.  Leaned my guitar in a precarious position that isn't even safe.  rehung my onion and chili braids, breaking one of the yellow onion braids and dropping several of them on the ground, which I know have to eat sooner than later because they are bruise, even though I have a lot of other substandard onions already that are in need of eating.  I opened the door so the mosquito net would show instead.  tore the dirty old plastic off the window, then put in a piece of leather. I didn't like the chunk of leather, so I moved it and made sure my 1940's Rife machine replica that was sitting there was visible.  I even went and pulled the vaccum tubes out of my other rife machine replica and put them in this one because they look cool, but in doing so, I broke the plate annode pole off of one of the 866 mercury vapor rectifiers.  but then the  chicken was in the leather window picture, so I photoshopped the rife machine window into the chicken picture.  Then I photoshopped out the orange power cord that usually runs in through the door to power this room.

*variety and growing notes:  Yellow of Parma from baker creek is looking very nice.  It’s a round uniform onion and looks like a good keeper type, though we'll see about that.  Most of the other onions I’ve trialed from baker creek did poorly, and  many have had a tendency toward bifurcation.  bifurcation is when the bulb divides internally into two or more bulbs with a papery sheath between them.  They are harder to process and don't always keep as well as solid bulbs.  The french braiding onion I bought from Baker Creek,  Jaune Paille Des  Vertus, and the German Storage oinion Stuttgarter, both had a high percentage of bifurcated bulbs. I met some folks from Sustainable Seed Company, who are based locally here.  One of them was saying that bifurcation is a huge problem for them when trying to source quality seed.    Seed growers make a lot more money if they plant a crop and just let it all go to seed.  What they should be doing though is getting out in the fields and rigorously rouging out (killing) the “off types”.  If they don’t, the seed quality runs down over a few generations.   Borrettana Cipollini seed from Fedco and sustainable seed company is very nice and uniform, making cute, flat little onions with very little bifurcation.  They look great braided, but I'm not sure how well they keep yet.  I just ate some Borrettana Cipollini slow cooked in some killer turkeysong chicken broth with sage, bay, salt, pepper and dried black trumpets.  All day cooked in the solar oven till the broth was reduced to the rich yellow fat.  All I can say is, oh my fucking (lack of) god.  Okay, I can also say sweet, fine textured, no sharpness, and wish I had some toasted bread to smash them on and a pint of guinness.

For you locals, I've had really good luck starting onions from seed in January to February.  My target date is January 15th, but then through anytime in February seems to work well enough.  I don't think I had a single seedling onion bolt this year, and that lack of seeding out is pretty much the norm when growing from seed.  Seeding is common though when using starts that are grown somewhere else and shipped in, or especially planting those tortured little onion bulbs called sets.  One market grower told me she only grows Candy onions because it's the only variety that doesn't bolt on her; but that's probably because she buys starts instead of starting them herself.  Candy is a delicious onion though.  I plan to start experimenting with some fall planting as well to see how that works for getting an early crop.

potato onion braids

Canning Tomatoes: How I do it and why it works for me.

canned tomato header Tomato season is finally on here at 1800 feet in coastal Northern California.  Having just mentioned canning tomatoes in the Mega Canner post, as well as also having recently been enjoying my few remaining jars of them, it occurred to me that my method of canning tomatoes might be of some use to other people.  Over the years, I gradually devolved toward a very simple tomato canning system that is not too much work and leaves me with a very versatile product.

My mom made tomato sauces and such, but what I really remember was the whole canned tomatoes.  I would sometimes beg a jar of them, open it, and just eat them out of the jar with a fork.  Yum, they were so good!  Home canned tomatoes are so much better than store bought!!!  I don’t care what brand you buy, there is just no comparison, because the commercial tomatoes are always bred for processing rather than flavor, and are harvested too early... just what we should expect from an industrial model.  One day I was thinking about what I wanted to eat.  I thought spaghetti sounded good.  I got the pasta water going, got the pasta cooking, saute’ed some onions and ground meat, then rummaged in the cupboard.  NOOOOO!!!! I was out of home canned tomatoes!  I was already salivating and could taste those yummy sweet tomatoes as they oozed into the spaces between the noodles, topped with slowly melting shreds of Asiago cheese.  But wait, there was a can of storebought tomatoes, that would have to do.  Nope, they were soooooo lame!  Total buzzkill :-/

Since horking down cans of my moms tomatoes at 12, I have sometimes made sauces and paste, but anymore I only can whole peeled tomatoes.  Aside from fond memories, the main reason I do so is versatility.  I don’t have to figure how many cans of sauce I’ll use, or what kind of sauce I want to make, or anything like that.  My whole canned tomatoes can be reduced to small pieces in the jar with a butter knife in a matter of seconds, or tossed in the blender to make pizza sauce, dropped whole into a casserole, or dumped straight into a pot of minestrone.  I can use them in Asian food, Mexican, Italian etc and so on.  There are no skins to get in the way, and the extra juice in the jar tastes amazing with a splash of hot sauce, perfect to sip on as an appetite stimulant while cooking, or as a treat to share with someone.

c'mon, this is the sexiest tomato you've ever seen.

I’m not against other forms of canned tomatoes, but I’m an adventurous cook.  I can’t put Italian spaghetti sauce in my chili, but I can make spaghetti sauce with my whole canned tomatoes when I need to.  Using whole canned tomatoes is more like cooking with fresh ingredients.  They are on the watery side, but I can put them in a pan on high heat and have them reduced to a sauce by the time the rest of the meal is cooked, if not before.  Diced tomatoes, as a reader recently pointed out, are similarly versatile.  I have made diced canned tomatoes, but it just seems like more work than is necessary since whole canned tomatoes are so easily reduced in the jar with a butter knife.  And I do occasionally want the whole tomatoes, though admittedly not often.  The basic method I use could be adapted to make diced canned tomatoes just as well if one wanted to.

There are times when a long cooked thicker sauce is where it’s at.  Long cooking can develop deep rich flavors.  But most of the time I’m after a less tortured, less concentrated flavor from my tomato dishes, and I can get that with whole canned tomatoes.  I’ll admit that it’s less instant and convenient than sauce that is already cooked down and flavored and ready to go out of the jar, but I’ll also wager that sauce made with the same ingredients, cooked down with fresh herbs just before dinner from whole canned tomatoes, will be a cut above a precooked and pre-flavored canned sauce.

So here’s how I do it.  Maybe you can put up a couple of jars this season and see how you like them.

Good sized, dense fleshed, sparsely seeded tomatoes like these are best for canning.  I grow them on purpose, but I'll generally use whatever I have extra of as well.

What tomatoes to use:  First, USE RIPE TOMATOES!  Ripeness makes all the difference, and is your main weapon in superiority over commercially canned tomatoes.  I prefer to use canning tomatoes, but will can any excess slicing types too.  My favorite is probably Orange Banana (available from Fedco), a small yellow canning tomato with a very sweet fruity flavor.  It is not suited to every dish because it has less of a classic tomato flavor, so I grow reds as well.  I haven’t really settled on a red canning tomato yet, but there are lots to choose from out there.  I think Blue Beech is in the lead for flavor so far (also available from Fedco... I'm a big Fedco fan if you can't tell).  It is a large tomato, few seeds, dense, tasty and reasonably productive.  Polish Linguisa produced like mad giving over 50 pounds off one plant in one picking, but the flavor lagged behind blue beech and others.  I’m planning to can some Zapotec this year.  It is a deeply pleated tomato with amazing flavor and seems fairly dense, though it’s a great slicing tomato.  One red canning tomato that is popular is San Marzano.  San Marzano gets a lot of press, but the year I grew it, this popular tomato seemed like a just above average commercial processing type, bred for holding in the field and to withstand lots of handling.  My guess is that it is basically a gourmet industrial processing tomato, but that’s kind of like saying "gourmet non-dairy whipped topping".  I also did not like Speckled Roman as it has too much stringy fibrous stuff in it.  Early Girl makes a pretty decent canned tomato, though it is more watery and less dense than some canning types.   Basically, I’ll can whatever I’ve got at the time, but it’s really worth it to grow one each of a bunch of different processing types and then taste test them after canning.  Large tomatoes process much faster.  Processing 20 pounds of small orange bananas is a lot of work (though it’s worth it!).  (Edit:  I forgot to mention that some tomatoes, notably canning/processing types, have a small stem end so they don't require coring out of the tops like most slicing tomatoes and heirlooms do.  It really is a lot less work to prepare canning tomatoes which peel easily and have those small ends.  Heirlooms, especially the big slicers, often have folds and pleats, cracks and scabby areas that have to be dealt with.  Early Girl has a pretty small stem end, much like a processing type tomato.)

Bigger is better as long as flavor isn't suffering.  This tomato will probably filled an entire pint jar.  Note the huge pile of skins in the background.

Zapotec.  This outstanding tomato is quite meaty.  It's not as meaty as some processing types, like Blue Beech (which has so few seeds that one of Fedco's seed growers calls it Blue Bitch) but it's pretty darn meaty.  It tastes fabulous with a very rich tomatoey flavor.  If it peels Ok, with it's pleatedness, I'm thinking it will make a pretty great dual purpose tomato for market, fresh eating and canning.

I add two other ingredients to almost all of my canned tomatoes- ripe roasted peppers and basil.  It might seem like basil is limiting in that it is not suited to all cuisines, but I have not found that to be the case.  I use only a small amount of fresh leaves stuffed in the top of the jar, and it seems to go fine with everything.  Since I use a small amount, I don’t even really miss it when it’s not there and it should definitely be considered totally optional.  I don’t even have a single basil plant this year, so I won’t be using any.

The pepper is roasted over an open flame, or better yet over hot coals, until blistered and a little charred.  Drop the blistered hot peppers into a paper bag, or wrap them in a towel for a few minutes to sweat and loosen the skins.  Slice them open, de-seed, scrape off most of the skin (a few remnants won’t hurt anyone) and cut into pieces.  I probably put the equivalent of a roughly 2x2 inch square in each jar.

Peppers roasting over charcoal.  These will definitely taste better than gas roasted peppers.

roasting on a gas stovetop works well enough but usually leads to excessive charring as here.  A gas grill would be an improvement.

To prep the tomatoes, bring water to a boil and blanch them for just a minute or two.  All you want to do is loosen the skin.  If over cooked, some of the tomato will come off with the skin, and if under cooked, they will not peel easily.  Ease of peeling varies from variety to variety.  At their best, the tomatoes will just about slip right out of the skin.  I use a large stock pot with a colander insert.  When they are done, the colander is plunged into cold water briefly to halt cooking and cool the tomatoes off enough to peel easily.  Bring the water to a boil between each scalding.

Throw the peeled tomatoes into a big bowl until you have a bunch of them.  I like to line up a dozen or more jars at a time so I can add ingredients systematically without missing any.  Clean your jars, or whatever you do.  I just make sure they are washed clean.  If they are clean off the shelf, I don’t even wash them.  That’s what the sterilizing process is for. I use a lot of pints and some quarts, but it bears keeping in mind that quarts do save on buying lids, which are rather expensive when you add up the season's canning.  Stuff the tomatoes into the jars leaving just a little space at the top since they will sink quite a bit in the canning water bath.   Add the roasted pepper and basil, and for each pint use 1/2 tsp of salt and about 1/16 teaspoon of ascorbic acid.

About the ascorbic acid.  I started using it because some sources claim that tomatoes are not always acidic enough to prevent the formation of botulinum toxins in the jars after canning.  I actually don’t think that’s a problem, but my partner at the time always insisted on it and I didn’t think it hurt anything.  Eventually I decided it tastes better though, and a taste test of commercially canned tomatoes done by COOKS Magazine came to the conclusion that those brands with added acidity (usually citric acid I think) were just better.   It’s good stuff to have around anyway.  You can add it to juice when your sick, and use a wash of ascorbic acid and water for rinsing fruit to keep it from oxidizing, useful for drying and canning.

After the jars are packed, wipe the rims clean and screw on the lids.  I screw my lids on pretty firmly, but not super tight.  Put into warm or cold water, just not so hot as to crack the jars.  The jars should be resting on a grate to keep them off the bottom of the pan, and should be completely covered with water.  Bring the pot to a boil with a lid on it.  As soon as it begins boiling, you can set the timer.  Boil hard for 40 minutes for pints and 50 minutes for quarts.  I don’t remember where I got those numbers, but that’s how I do it.  Allow the kettle to stop boiling and wait about a minute before removing the jars.  If you remove them while too hot, they will boil over.  You may or may not need to snug the lids down as soon as they come out, I usually do.  Allow to air cool, check the seals, remove the rings, rinse the jars, label with the year, and with the variety for future taste testing if applicable, and stow away.  If you have a ton of them to process, check out the Mega Canner post.

Orange Banana, yum.

I’m not convinced that this is the very best way to do tomatoes, but I do know that it is a system that has served very well here with almost limitless versatility and I see little reason to tweak it in any way.  These canned tomatoes have contributed to countless delicious meals here at Turkeysong.  The rough number of canned tomatoes I try to shoot for in a year, assuming two people and occasional guests, is 100 pints.  There are usually some jars left over when the canning season rolls around, but that is good since no one knows what the next year will bring.  I am thinking of putting up some tomato juice this year if I have enough tomatoes because I like drinking the juice off the tomatoes so much.  I can any left over juice that accumulates in the bowl of peeled tomatoes with a little salt and ascorbic acid added, but that only amounts to a quart or two a year.  Probably the easiest way to preserve tomatoes is by freezing them whole.  The skins slip off easily when the frozen tomatoes are run under the tap for a few seconds.  But I usually prefer my canned tomatoes for most uses.  Please tell us about how you preserve tomatoes, in the comments.

Drying tomatoes is pretty easy.  I just find that I don't use that many.  I'd like to, but I haven't caught the dried tomato bug.

Apple Head: from punk to the plunk of falling apples

punk appleOur society has little of use to offer kids when they are coming of age. Whatever the reasons, our lack of any kind of real transition into adulthood is not consistent with traditional cultures.  When I was about 18 and trying to figure myself out I couldn’t see that there was nothing in my human environment that I could use to move toward a life that made any sense to me.  I had become increasingly interested in ancestral skills and learning about nature.  The things I wanted to learn were very obscure and the life path offered to me by convention extremely distasteful.  I had read about Native American youth doing multi-day fasts as part of coming of age trials, the so called vision quest, and decide to go on a four day fast in the woods to help me sort out my path.

crass

I had been very much a social discontent from a young age.  I was raised to ask questions and I latched onto the rejection stance of punk rock.  If there was one message to take home from punk it was that everything was not okay.  This was at a time of false optimism in America.  Ronald Reagan’s head was bobbling around on television telling us everything was great, except that there was an evil empire called Russia that wanted to wipe us out and we might all be blown to bits at any moment by them, or by ourselves, or more likely both.  We walked around thinking any day could be the day the bombs started flying and the world ended.  (BTW, For all we know, that's still the case.)  I wore inappropriate clothing and slogans, went to protests and was just generally making sure people knew things were not alright damnit!  It didn’t take long for me to start realizing that whining was not a very useful tool for social change and that symbols such as clothing, music and language did not take the place of action.  In fact, being whiny and contrary turned out to be less fun than one might imagine!

This is me with Ali and Pete on a rock climbing field trip in high school.  It was GW's birthday (now president's day) and I just thought I should remind everyone that he was a slave owner.  You can find all kinds of apologist crap online trying to excuse him a little because he was good to them niggers, (though accounts vary as to his treatment of his slaves) but it still makes him an asshole first and the president second.

hear-nothing-see-nothing-say-nothing-a

Somewhat earlier when I was even younger, influenced by some of the punk bands I was listening to like Crass, Crucifix and especially the song They (lyrics) by Antisect, and also just because it was logical, I found myself more and more convinced that there was no solution to the worlds ills that made any sense other than changing the way that I actually lived.  Switching my view of problems from a primarily external view to a more internal view gave me a chance at some kind of empowerment rather than wallowing in helplessness at the hands of the Ronald Reagans of the world, or whomever.  In other words, change the things you can change and get your ducks in a row, which is more than enough to stay busy!  This epiphany lead to an interest in self reliance.  At about 16 I traveled across the country with some of my family.  I remember looking in every book store that I could find in various cities for any books on homesteading and related topics.  One store was an anarchist book store.  I was not impressed.  If anarchy was sitting in a stuffy bookstore wearing black clothes and reading philosophy and politics I’d pass.  I came home empty handed.  My sister and I also visited the punk scenes of D.C., Boston, Quebec, Atlanta and Austin that summer and while it was fun, they seemed to consist mostly of a bunch of drunkbag wheelchair butts on the fast track to burning out.

From dehumanization to arms production for the benefit of the nation or it's destruction...  One of my favorite punk bands, Crucifix, like the vast majority of punk bands, mostly piled responsibility for the worlds problems on others.  Easy to do when you are a seemingly powerless kid.  Still, they were mostly right, it's just better to concentrate on the stuff you can actually do something about.  Otherwise, what credibility do we have to complain?

So that sets the stage for my vision quest.

I walked up a small redwood sheltered creek in a desolate State Park that I frequented.  I had my sleeping bag and some supplies.  I hung my pack in a tree, took out my contacts (which meant I couldn’t see shit unless it was right in front of my face, another level of isolation) and with my sleeping bag and a water bottle sat down in a circle of logs and such which I arranged so that I would have definite boundaries.  I drank water from the creek as much as I wanted, but otherwise I stayed put and ate nothing.  This was not a strenuous exercise like many traditional coming of age ordeals are, but for a relatively privileged kid to make a real effort to go through discomfort for personal growth is worth something anyway.  I didn’t know what to expect.  I have never been inclined to be religious, so I wasn't expecting something mystical to happen, but I think I figured a profound epiphany of some kind would be convenient.

It is remarkable how being hungry and having no distractions can focus the mind.  The key word there is HUNGRY, because what grew in my mind the most in those 4 days was a mini food empire.  I thought of every food plant I could, making mental lists over and over so I would remember them.  I thought about how and where I would plant them and how many.  I visualized a farm or homestead dripping with fruit and nuts, crawling with animals and stocked with preserved foods (There was definitely some thought into where to put the skateboard ramp too).  I’m sure I worked out some personal stuff as well, but I don’t recall because it was ultimately food self reliance which was the core of the vision that grew up in me.  Dude, self reliance was where it was at!  I wasn’t content to be livestock and that's just what I felt like being dependent on an industrial food supply.  Nothing could have been more clear.  Food bearing trees played a major part in this mental edifice which was, I realize now, the early stirrings of a life long interest.

All around the country there are groups of fruit enthusiasts who get together periodically to trade fruitwood cuttings and rootstocks and such.  Some people collect cars, guns, ceramic statues of cute animals... we collect fruit and nut varieties.  Although my interest in this area was born largely out of practical goals and a desire to affect my life through action (and still is), I’d be a liar if I said I wasn’t driven also by motives that might be considered less practical.  That's  okay, we all need some passionate interest to get us through the day.  Mine, lately anyway, (ok, one of them) is apples.  We have lots of other fruits here at Turkeysong.  I’ve planted well over 100 fruit and nut trees, vines and shrubs in 6 years and more are on the way.  There are almonds, walnuts, chestnuts, pears, nectarines, peaches, plums, persimmons, cherries (yum), feijoa (A.K.A. pineapple guava pronounced fay jo ah with a soft J), figs loquats, grapes and I’m sure I’m forgetting some... but mostly apples.  I have somewhere around 200 unique varieties of apples growing and more being grafted this year.  Apples!  No dude!, Apples!  I want to grab you and shake you until it sinks in  A...A....A....A...A...A...A...P...L...L...L...L...L...E...S....S...S...S DUDE!

King David

This has basically been written before.  Back when people took their fruit very seriously.  Paragraphs and essays extolling the virtues of the apple bespeckle the literature of the last couple centuries and were, I feel sure, well received.  Now I’m not a religious man to say the least, but it is apparent there is some comfort in the converted being preached to in order to affirm that yes belief X or god X, or whatever, is indeed righteous or to be feared, and so on.  I personally love to read essays on the virtues of the apple and will now try to channel the inspired persons of the past who spoke of apples with the gratitude and reverence due them.  Forgive me any errors or inconsistencies.   The truth occasionally falls casualty to something more interesting.  So without further delay, I present to you some unabashed apple propaganda...

Dear Ladies and Gentlemen, cats, dogs, hogs, cattle and poultry of various descriptions.  raccoons, opossums, bears, mice, deer, packrats, voles and birds of many kinds.  I have not been asked here today at all, let alone to speak on a subject which others before me have eloquently and thoroughly addressed.  Yet I find myself compelled to address our subject nonetheless, for if I plumb the depths of my motives I feel unsure that it is not necessary; that there may not be some persons in the audience who yet remain lost and in need of a light to find the path; that there may not have been something missed which I might point out or remind one of; and more selfishly, I admit that I simply desire to add my humble voice to the throng in order that I shall not have to contain my own malignant enthusiasm.

Apples.  What more virtuous fruit of temperate regions?  I wager there is none!  The apple: possessed of more flavor variations, a longer season, a greater variety of legitimate uses and broader form in shape and color than any other fruit outside of the tropic regions, and possibly including them.  It can be cooked in savory and sweet dishes alike, dried for the winter, drained of it’s saccharine juice, fermented to cider, distilled into brandy, soured into vinegar, boiled into syrup,  cooked down into apple butter, canned as sauce, and of course eaten out of hand.  Other fruits can be treated the same, but not with the versatility of the apple.  During our partnership with the Apple, we have developed its possibilities to a greater degree than any other temperate fruit.  We could make perry from the luscious pear, squeeze the poor plum of its juices for wine, dry the berry and tuck the cherry into a crust of pie; some may even exceed the apple in a sort of sensational deliciousness, but no other fruit matches the apple for its breadth of suitability for various uses, and it is an imminent suitability at that.  Some Apples are tart, some are sweet, some hold their shape when cooked and others fluff into a delicate froth, all to be chosen from for conformation to our tastes and desires.

Just grind and squish.  It seems too easy!

Nor is the apple so cloying as many fruits.  Where the peach the pear the cherry and the grape, can cloy in their rich juicy sweetness, the apple invites eating over a longer season with less tendency to wear out its welcome on the palate.  Large quantities can be consumed, especially if met with at the dining table as well as eaten bite by bite fresh from the hand.  The apple is wholesome food.

Contributing yet more to the welcome which the apple finds with humanity is its breadth of variation in flavor.  Hidden in the genes of Apples are a broader range of flavors than in any other temperate fruit.  Flavors of banana, mango, fennel, almond, strawberry, raspberry, nuts, pineapple, citrus, cherry, rose, vanilla, spices, herbs, pear, wine, “apple”, melon and more can all be found in apples accented with more or less of acidity and sugar.  These flavors, sugars and acids wait to be further mixed together, by breeding and by chance, into infinite combinations to both suit and broaden our tastes.  From the easy edibility of the understated yet harmonious flavor of the Golden Delicious, to the epiphany of the balanced rubinette, to the sensational cherry bubblegum of Sweet 16, to the compelling symphony of flavor in a perfect Golden Russet or the fruit punch flavor of Grenadine, we have them not only in one species of fruit, but with grafting we can have them from just one tree!  Can any other fruit boast this palate of flavors?  I think not.

Newton Pippin

And all of this over a longer season than any other temperate fruit.  Beginning as early as June in some regions, apples can be plucked ready to eat from the tree from early summer through late winter and probably further on.  While the fine flavored Kerry Pippin is a fond memory of August heat, the Granny smith still clings steadfastly to the tree in mid winter accumulating sugar and flavor.  Granny’s fair daughter Lady Williams clings yet longer to the branch being unsuitable for eating until the end of January.  These fruits and more like them show clearly the possibilities inherent in the apple for an increasingly extended season of fruit straight from the tree.  Add to this already long season the outstanding keeping ability of many of our winter apples and we can, with a little planning and good storage, have quality apples for most, if not all, of the year.  Many of our apples can keep through the winter safe in their protective skins.  Some will keep into spring and even until the following harvest.  The breeder is hard at work developing ever later keeping apples which will come out of long storage in the finest condition and who knows what the limit may be.

In our apples we also have an unprecedented range of form and color.  Solid colors in red, yellow and green.  variously striped with pinks, oranges and reds, washed with flushes and blushes, possessed of sublime translucency or impenetrable opacity, unblemished skins smooth and shining, hanging in un-presuming matte or covered in dusty bloom, overspread with russet and speckled with dots large or small.  The King David demands attention in its redness, the Yarlington mill invites examination with it’s watercolor layers of translucency and cracked map of russet, while the intense red flesh of the Grenadine shines pink through a thin skin covered in speckles.  Artists have time and again been moved to capture the beauty of the apple, It’s bending and refracting of light, its depth and its colors.  Just google apple painting if you doubt me.

Ribbed, smooth, round, lopsided, oval, flat, green, red, yellow, speckled, striped and all manner of nifty...

In these varied colors we have apples which can weigh a pound or more, apples the size of large grapes, and everything in between.  They droop from the twig variously in the shapes of cones, pears, ovals as if pulled by gravity, ovals as if to defy gravity, flattened like a doughnut, or merely round.  They are symmetrical or lopsided, ribbed, or blocky.  Long stems or short stems, clinging to branches or hanging at the ends of drooping twigs.  The trees are willowy or stubby and short jointed, a few feet tall to tens of feet tall.  The smallest ones give us dwarfing rootstocks on which to grow miniature trees.  The bark varies nearly as much as the fruit in color and form as does the outline and growing habits of the tree, from a single spire 2 feet in diameter to spreading branches which may even grow downward, instead of horizontal, let alone upward.  They provide us with pleasant shade and deep intriguing orchards that have lured and moved poets, lovers, scientists and children.

Yes, the Apple.  It represents wholesomeness and good things in American culture, a symbolism which is not arbitrary, but which has grown naturally out of it’s virtues.  One could go on cataloging the Apple’s traits and virtues but that could only suggest the possibility of the poetry of the apple, a poetry that we can feel, but which our attempts to express must be mostly inadequate.  We may be better satisfied to hint at the romance of apples rather than to attempt outright description.  Flowery and detailed renditions will likely fail to impress and we had better stick to tracing the subtle, sublime edges-- delicately suggesting the outline of a feeling and leaving the imagination to fill in the rest or to just wonder.  Still, spreading trees hanging with fruit or dressed in spring blossoms,  dappled light, tantalizing memories of juicy crunching flesh, washes of vibrant flavor, juice flowing from presses and scents of all kinds stir the feelings and can move one to communicate with our limited symbols so that others might see the beauty and value we have witnessed. Autumn Days, engraved by the Brothers Dalziel published 1882 by Frederick Walker 1840-1875 The Apple, guided by man’s hand for millennia into ever more varied form and function is at once servant and king, a humble savant, dripping with abundant beauty, inspiration, pleasure and utility in return for so little!  We chop it’s branches and it grows the more.  We throw filth and waste on its roots and it bears forth a miracle of abundance; each dropping fruit bursting with sugar and juice, a miracle in its own beautiful and practical package.


Apples survive in their variety only with our thoughts and our actions.  We either live a culture of meaningful food, or lose it.  Thousands upon thousands of varieties of apples are already lost forever and we lose more every week to the bulldozer, to neglect, to age, or with the passing away of the only person who remembered the name of that old tree by the woodshed, or even cared.  But the bulldozer, the physical neglect, and the fact that we die are not the real enemies of the apple , it is more that we have stopped cohabiting with the apple.  What was once like a spouse, a lover, a child, a sibling, a grandparent, a friend, with which we lived intimately and relied upon, is now reduced to a commodity.  The apple will not thrive without our love and respect, but will instead be reduced to prostitution, it's production banned to the industrial farm, painted in bright colors and put on the shelves where we can buy her in an attempt to find the love we’ve lost.

photo by Peter Howe

The apple has fed us and made our lives better for eons, and it is a tragedy that we have all met with so many poor specimens, and even more so that poor apples have simply become the norm.  If apples do not improve, we are at risk of losing our faith in them, as some already have.  But the truth is that when properly selected, grown and handled, the apple is awesome.  If you think you don’t like apples so much, I don’t blame you given what is usually available for sale, but maybe you haven’t met the right one at the right time.

Photo by RasksoS

An apple renaissance is afoot and promises to make available to us more and much better apples.  Don’t wait for them to come to you.  Seek out new and interesting apples.  Engage in the simple act of talking about them with friends and strangers.  Support the farmer taking a chance on growing small lumpy apples that taste amazing.  If the apples at the store are no good, don’t buy them, but demand better.   Best of all, Improve your life, improve the lives of others, take care of those who come after you, plant an apple tree.

I stoled this picture off the innernets... sorry.

Posted on August 18, 2013 and filed under Food and Drink Making, Food Trees Fruits and Nuts.

The Mega Canner: Every serious canner needs one

Canning season is upon us.  If you ever find yourself having a long day of boiling batch after batch of jars on the stove top, you need a bigger canner! smiley underdog firing up the bark boiler full of shredded tan oak bark for tanning goat skins.

Many years ago in my blacksmithing obsessed days I was often found cruising metal scrap yards for treasures and steel stock.  Every time I’ve moved, my accumulated scrap pile has come with me.  One day I spotted a large stainless pool filter, complete with lid, at my favorite scrap yard.  I knew right away that I wanted if for boiling large batches of oak bark for tanning hides.  I figured it could be useful for other stuff too, so I bought it for a mere 20.00.

It took me many years and quite a few moves with the scrap metal pile in tow to finally get my bark boiler running.  I put a scrounged copper pipe and a gate valve on the bottom outlet and fired it up to boil some bark.  My suspicions that it was awesome were definitely confirmed.  An open fire can be used directly under it which saves a lot of propane, and when cooking is completed, the liquor can be drained off from the bottom.  Using the bark boiler is a huge improvement on boiling batch after batch of shredded bark on the stove top.

The bottom of the Mega Canner.  The elbow fitting is bronze, the pipe is copper and the gate valve is bronze.  The gate valve eventually failed, but i don’t think it had anything to do with inappropriate use.

I had the boiler running for a year or so before it ever occurred to me that I could use it for canning food.  I needed to pasteurize some fermented grape juice in the bottles and they wouldn’t fit into a canning kettle.  So, I busted out the bark boiler. Amazingly, 19 champagne bottles can fit in the bottom layer, with room for another layer above that!  The experiment went well, so the bark boiler donned its second hat, that of Mega Canner.

Pasteurizing grape juice

Tomato canning can be a big production around here.   We shoot for about 100 pints a year and they come off the plants in large batches.  Half the day in the kitchen blanching, peeling and packing into jars and then all those suckers still have to be water-bathed.  Try this scenario on for size (I’m sure a lot of you have) Fit as many jars as you can in the kettle, boil the kettle for 45 minutes or more, turn off, allow to cool somewhat, remove jars, allow the water to cool a bit, add new jars, bring back to a boil, and repeat it all over and over again while dragging your timer around the property trying to get other stuff done.  It’s often hot and the kitchen gets steamed out.  The Mega Canner can fit hours and hours worth of water-bath canning into one firing that doesn’t take much longer than canning one kettle of jars on the stove top. The Mega Canner has room for a helluvalotta jars holmes!  If it can fit 38 champagne bottles, imagine how many quarts or pints it can hold.  I don't know.  I've never come close to filling it up and I'm too lazy to bust out cases of jars to find out.

One days canning.  There are over 50 pints here.  That represents many batches in a stove top canner.

The Mega Canner/Bark Boiler could also be used for distillation with some very slight modification and to boil all manner of large batches of stuff.  It started its life as a pool filter.  Stainless pool filters are fairly common, but most are pretty small in size.  This is the largest one I’ve ever seen, though it seems likely that they are made even larger.  The walls are very thick, much thicker than a pot or a barrel.  It has a perforated grate on the bottom which is mighty handy for both bark boiling and canning.  It does still smell of chlorine a little.  Steel is minutely porous and chlorine has probably bonded with the surface of the metal.  I may at some point sand off a thin layer of metal from the inside to get rid of that.  for now though, no food contacts the water or metal.  There are various grades of stainless steel, and the metal composition of this one is unknown, so it may not even be food grade.  Finally, the drain pipe and plumbing on the bottom are bronze and copper which are not food safe either. There are two drains on the bottom.  One drain is plumbed already and the other has a bronze cap.

It even came with this handy perforated grate!

To use with a fire, I set the legs on 3 bricks or rocks to raise it a little.  This system could use some improvement for efficiencies’ sake. A rocket stove furnace which it could be set over would be pretty ideal.  A rocket stove would be cleaner (complete combustion), faster, and would use much less wood.  That project however will have to wait for a permanent outdoor kitchen to be built.  When its dry out and high fire season, which is almost half the year, a propane burner from an old smoker substitutes for the fire.  The burner is super high output, so you can really crank it up for fast heating.  A piece of aluminum flashing is used as a windscreen with the propane burner, which really helps keep the heat under the pot.

Propane burner and windscreen for dry weather use.  Don't worry, I'm not going to fire it up in that dry grass!

I have seen quite a few other pool filters at scrap yards and such since then.  Most are pretty small, but some are large enough to be useful as canners.  Craigslist has a lot of them, but most of them are not very useful shapes.  A lot of them have lids that are as tall as the bottoms, which is fairly useless for canning.  Some look as though they are made from other materials, and even the stainless ones are often painted, but persistence in hunting pays off and there must be more similar to mine out there.

I think a better option for a lot of people might be a full sized stainless steel beer keg.  The larger size known as a half barrel is 16 x 23 inches, though it has less actual inside working room than that due to the standing rims on the top and bottom.  Cut the top off, have some handles welded on, and you’ve got a good sized food grade stainless cooker that you can also use for scalding turkeys and chickens for plucking, and for who knows what else.  I would add a heavy stainless or aluminum screen or perforated plate for canning as the jars must always stay off of the bottom of the canner.  Stainless drums are fairly common too.  They come in sizes from 15 gallons and up,  A 30 gallon drum with copper/bronze plumbing for a bottom drain and a lid ought to make a fine large boiler that would fit almost any amount of stuff a body desired to boil at one time.  Of course stainless isn't essential if you aren't cooking food or tanbark directly in it, so there must be other items out there of aluminum or steel that could suffice.  The bottom drain is also not essential, just convenient... unless you want to put it on a stove top, then it's actually inconvenient.

not every one cans large amounts of jars at once since that requires large amounts of food to be canned, and I only do so a couple times a year.  But, if you are into homesteading, or are serious about subsistence activities, you probably will sooner or later.  I’ve often had two stove top canning kettles running at one time, and that helps with the time and hassle when processing a lot of jars, but Mega Canner still kicks major butt on that scenario if there are a lot of jars to boil, such as when processing a bumper tomato crop or canning juice.  If anyone wants to take my bark boiling mega canner away, they’ll have to pry it from my cold dead fingers.  If you do a lot of canning, or plan to in the future, put large metal containers on your radar!  That is probably my best canning tip besides don't can stuff you don't eat.

I harvested over 50 pounds from one Polish Linguisa plant in that season.  It isn't the best tasting tomato out of the lot though.  My favorite is the little yellow ones in front, Orange Banana.  They have a sweet fruity flavor.  The reds tend to have more a tomatoey flavor, which is good for some uses, so I grow both.

Posted on July 20, 2013 and filed under Food and Drink Making, Uncategorized.

Marinated Artichoke Hearts From Scratch

artichoke header
artichoke header

I already posted about marinated artichoke hearts briefly in my !ARTICHOKES! post a few years ago, but I thought I would revisit it in a slightly expanded and more visual post.  I did a little surfing to see if I should bother writing this up (as in maybe it has been covered well enough already), and was surprised to find that almost everyone recommends using canned or frozen artichoke hearts!  We live in a society besieged by convenience.  If you have the will and inspiration to make your own artichoke hearts, consider doing it from scratch all the way, and even planting some artichoke plants to have them to can in the future.  It's not that bad to process a pile of artichokes.  Just make sure your knife is the right kind and plenty sharp, put on a movie or a book on tape, or just sit in the shade and let your mind wander.  The more you do this kind of stuff, the better you become at it, and that includes that part of falling into a different rhythm of work where time slips away and is measured against quality of life instead of against money.  I wanted to write a detailed post that walks us visually through the steps.  I hope that this post might attract adequate search engine hits to compete with the average short, un-detailed recipes out there using frozen and canned hearts, but it's difficult to compete with sites like ehow which rank high in the engines even though they are often fairly useless. If you find this article really useful, please leave a comment.  Posts with lots of comments rank higher in search engine results which should make it easier to for others to find in the future. Home canned artichoke hearts from scratch are really good and if you have a lot of artichokes, they are hard to beat as a way to preserve what you can’t eat fresh.  I like artichokes a lot but there were way more artichokes than I could keep up with eating fresh this year, so I canned almost 40 half pints.  Your marinated artichoke hearts will be excellent, better than store bought.

Marinated artichoke hearts from the store are often fibrous and may even contain a few weak spines.  That does not have to be the case.  When you can your own, and you can make the highest quality hearts, picked young and peeled down to only the tender parts.  The artichokes must be picked at the right stage though and processed carefully by hand.  the artichokes sold in stores are very mature having hard stems with the scales and base well developed.  The choke, or hairs, in the center of store artichoke are also well developed.  For marinated hearts, you need to pick them when the choke is still soft and edible.  Picking cues may vary by variety, but I look at several things....

Size:  Size is relative, because the artichokes become smaller as the season progresses, but it is still a good que as long as you keep in mind that each time you pick, the average size will probably be a little smaller than the last time.

Scales:  As the artichoke matures, the scales at the base can open out more rather than laying tightly against the bud.

Stem:  the stem on a less mature choke is still somewhat rubbery.  Bend the stems on several immature and mature specimens to get a feel.  Pick chokes that have still rubbery necks.  They don’t have to be super rubbery, but I find that the stiffer they get, the more likely it is that the choke is too far developed.  This is my best que for when to pick, but I use all three parameters listed above.

this photo shows three artichokes at different stages of maturity.  The on the left is suitable for canning.  Note the level of development of the hairs, or choke, in all three.
this photo shows three artichokes at different stages of maturity. The on the left is suitable for canning. Note the level of development of the hairs, or choke, in all three.

Varieties:  I don’t recommend green globe at all.  It is the most common artichoke variety, but it has always grown poorly for me being disease susceptible, small and unproductive.  If you are canning any number of hearts, you need big, healthy plants that can produce a lot of artichokes.  I grow two varieties.  I like Imperial star, and an unknown variety of a small spiny type that I have grown for many years.  Both are large healthy, vigorous plants that produce lots of buds, 30 and up per plant.  For now, I can recommend the widely available Imperial star with some confidence.

Numbers:  If you want to can a significant amount of artichoke hearts, I’d recommend growing 3 or more of these vigorous types, so you can harvest enough buds at one time to make it worth your effort.   5 plants is working well for me, but I’d prefer a few more and will probably be expanding soon since they are low maintenance.

Paring the buds down:  The following photos illustrate how to prepare the buds.  Use a small sharp knife.

Slip the knife under one of the lowest bud scales so that you are cutting through a few of the lowest scales when you cut the base off.
artichoke 1
artichoke 1
Peel off most of the scales.  There is a knack to snapping them cleanly off downward with a pushing motion.  I can’t describe it well, but ideally you would like to snap the bud scales off without leaving any part of them behind.  The first couple o…
Peel off most of the scales. There is a knack to snapping them cleanly off downward with a pushing motion. I can’t describe it well, but ideally you would like to snap the bud scales off without leaving any part of them behind. The first couple of rows will not usually snap off so clean, but you can trim off any bits of the scale bases that are left behind. Snap off scales until there is very little if any green color showing on the remaining scales. You can pull off a scale and bite it to get an idea of whether you are down to the tender scales. You should be able to bite the scales off easily at least half way up the scale, if not a little more. it may not be super tender, but still easily bitten through with the teeth.
Pare out the tip of the bud with a sharp knife tip.  this step may not be absolutely necessary, but it just takes a few seconds and insure that there will be no spines or fibrous parts left and it wastes hardly anything.
Pare out the tip of the bud with a sharp knife tip. this step may not be absolutely necessary, but it just takes a few seconds and insure that there will be no spines or fibrous parts left and it wastes hardly anything.
I like to cut the hearts into sixths or eighths so that they are already in good bite sized pieces straight out of the jar.  Don’t cut them until you are ready to proceed with adding the vinegar and stuff to the jar, and work quickly to minimize oxi…
I like to cut the hearts into sixths or eighths so that they are already in good bite sized pieces straight out of the jar. Don’t cut them until you are ready to proceed with adding the vinegar and stuff to the jar, and work quickly to minimize oxidation.
Pack the hearts into jars about 1/2 inch from the tops. I like to use 1/2 pint jars. Anything larger is likely to not be used up in one or two meal. Add white wine or rice vinegar to fill about half of the jar. Fill the rest of the jar with water to…

Pack the hearts into jars about 1/2 inch from the tops. I like to use 1/2 pint jars. Anything larger is likely to not be used up in one or two meal. Add white wine or rice vinegar to fill about half of the jar. Fill the rest of the jar with water to about 1/2 inch from the top. sprinkle in some Oregano and add a small piece of bay leaf to each. 1/4 teaspoon of salt, some fresh ground black pepper and a teaspoon or two of olive oil floated on top complete the marinade. I’ve found this simple marinade to be excellent, complementing the subtle flavor of the artichoke hearts rather than overpowering it with heavier herb or garlic flavors.

Wipe the jar rims and place the lids on, screwing them down moderately tight.  Place the jars in cold water, completely covered and bring to a boil.  Once boiling, boil hard for 50 minutes.  50 minutes is longer than they need to cook for canning safety purposes, but they still need to cook that full amount of time to become adequately tender.

Once the time is up.  Turn off the heat for a couple of minutes until boiling completely subsides.  Remove the jars and allow to cool before removing the rings, rinsing the jars and labeling.  If giving the jars away as gifts, don’t be afraid to ask for your jars back.  They are expensive, and most people won’t use them again, which is just wasteful.

Mostly I use my artichoke hearts in salads.  They are also good on pizza, to nibble on with bread, cheese and olives, topping a simple pasta, minced in tapenade or other spreads or just eaten straight out of the jar.  The marinade makes a pretty good salad dressing too.  Making your own marinated artichoke hearts is not only tasty and indicative of good wholesome values, but it will also enrich your life and make you sexier and more popular; so what are you waiting for!

Happy canning, and happy eating!

towerng artichoke hearts

Apple Breeding part 3: From seed to fruit

lady-williams-seeds.jpg

lady williams seeds header In part one I went over some reasons why I think home breeders have a decent chance of producing some good apples. Part two covered pollinating flowers to make intentional crosses of two different parent apples. In this section, I'll discuss growing the seeds into seedlings, and options for growing those out until they fruit. COLLECTING AND STORING SEEDS:  I like to collect the seed when the apple is ripe for eating, but they seem to be mature before that.  I’ve stored the seeds in little plastic baggies in the refrigerator, but they sometimes mold.  Storing the seeds in slightly damp, but not wet, sand would probably be better, or you can just plant them... PLANTING SEEDS:  I’ve had pretty good luck with germination when planting in February after storage in the refrigerator.  At least some apples are supposed to require stratification, which means that they need to undergo so many hours of low temperatures before they will sprout.  I’ve had fresh seeds sprout without chilling, so I think fresh seeds just sprout easier.  My approach in the next years will probably be to store early seeds in the fridge in damp sand, and then plant them with the latest ripening seeds in February.  If planted outdoors, the seeds should chill enough as long as your climate is not subtropical.  If it is subtropical, then you should select seed parents carefully as many apples do not do well in warm climates with no chill.  The Apples and Oranges blog is a good resource for growing apples in low chill areas. It is possible to dry the seeds before sprouting them, but I don't see any reason to do so when they can be kept in refrigeration, or even in the ground over winter. Plant the seeds in pots or flats, or outdoors in the ground, at about 1/2 inch deep.  Don’t allow them to dry out, but don’t over water either!  Over watering can lead to rotten seeds and fungal attacks.  One strategy I sometimes use is to put a growing mix in the pot or flat, followed by 3/8 inch of sand, followed seeds and finally covering the seeds with 1/2 inch of sand.  This method surrounds the seeds with clean aerated sand to sprout in, which minimizes bacterial and fungal attacks, while still providing them with nutritious flat mix just below.  My germination rate has been pretty mediocre, but since it doesn't take long to produce a couple hundred seeds, maybe that's Ok. apple seeds in flat After they grow a few leaves, you can move the seedlings outdoors into the soil, or into bigger pots.

These are on the young side for transplanting.

These seedlings are a little too big for transplanting.  They would have done Ok regardless if I had taken better care of them, or put them into pots instead of in the ground.  Better to transplant before they are crowded and when they only have a few leaves.

GROWING OUT:  Markus Kobelt at Lubera nursery gave me some tips on apple breeding.  He says that growing the seedlings as tall as possible the first year shortens the time to fruiting.  Seedlings are in what is called a juvenile stage.  Growing the seedlings fast and tall pushes them out of the juvenile stage and into sexual maturity more quickly.  My first batch of seedlings were left in flats for too long, and then planted in an out-of-the-way bed where they received poor care, resulting in some pretty stunted plants.  The seeds that I planted straight into the ground in a garden bed did quite a bit better.  Wherever you plant them, take good care of them with regular feeding and water.  Under ideal conditions you might end up with 4 to 5 foot stems.  Check out Markus Kobelt's cool video series on all stages of apple breeding! It is probably best to cull some of the seedlings, but I'm not entirely sure what to look for in culling, so I'm not culling many of mine.  Nigel Deacon, in breeding for red flesh, selects for red pigmentation in the leaves as well as for vigour.  I'd like to talk to a breeding expert about culling.  At this point, I'm kind of cull shy. TO GRAFT OR NOT TO GRAFT?:  Is that the question?  I think a more relevant question is where to graft, because it is better to graft the seedling stems onto something else.  Putting the scions onto a dwarfing rootstock that encourages early fruiting, or onto a mature fruiting age tree will give you fruit sooner than growing the seedlings out until they begin to bear fruit, in some cases much sooner.  If you don’t know how to graft, or don’t have a mature tree to graft on to, you might want to just plant the seedlings and wait.  However, if you don’t know how to graft, now is a great time to learn!  If you come up with the best apple seedling ever, someone has to propagate it by grafting, so it might as well be you.  There are plenty of apple grafting resources on the internet and I’ll probably add my own before too long.

A basket of red fleshed apple seedling scions headed for dwarfing rootstocks.

GRAFTING OPTIONS:  For the average home breeder, grafting onto a mature bearing tree may be the best option.  It requires a lot less room than growing each seedling on it’s own rootstock, way less care, and it’s cheap.  Rootstocks in small quantities will usually cost you $2.50 and up.  Larger quantities, usually 50 or more can get down into the $1.25 and up range, especially if you buy B grade stocks which have crooked stems.  Still, even at $1.25 each it adds up pretty fast, especially after shipping and handling.  Then you need room for all those stocks.  I’m planning to plant mine at 12 inches apart in rows about 6 feet apart.  All that sounds daunting, but there is one good reason to grow the plants on their own stocks and that is disease.  Apples are host to many diseases, but the concern here is with virus.  Seeds don't carry virus from the parent, so the seedlings are virus free.  Virus are transmitted to a scion that is grafted to an infected tree though.  Most of us don’t have trees that we know are virus free, so keeping your seedlings fresh and unburdened by virus is somewhat compelling. The other side of the coin is that most apple varieties are minimally affected by the common Apple Mosaic Virus and there are millions upon millions of infected trees living and bearing fruit.  It is quite possible also that your mature apple tree is not infected anyway.  It is possible to rid a variety of virus by a process of heating, but that process is probably not accessible to the homescale grower (though I'm curious, maybe it's not that hard!).  If having to graft onto individual rootstocks will keep you from experimenting, I'd say don’t let it.  Go ahead and graft them onto whatever you have. ROOTSTOCKS:  Very dwarfing rootstocks that keep trees under 10 feet will also induce fruiting early in the life of the tree.  I’ve mostly used bud-9, and this year some Geneva-11.  Geneva-11 has weak roots, so I’m not sure I like it yet, but the Bud-9 seems nice enough and it’s cheaper. M-9 is probably also a fine choice, though Bud-9 is generally thought to be an improvement on M-9.  Charts and descriptions of the various apple roostocks can be found online.  Just remember that you want one that induces early fruiting and makes for a small tree.  Trees can be planted close together in rows, I don’t think there is a reason to plant them further than 18 inches apart, and I’m probably going to use 12 inches to save space.  A trellis is necessary to support the trees since the dwarfing rootstocks lack adequate roots to anchor the trees in high winds.  Markus Kobelt says to let them grow without pruning to induce early fruiting.  I guess I’m going to follow his advice.  Don’t think of these dwarf rows as permanent.  They are more like shrubs for testing your new varieties.  If you get something good, it can be grafted and reproduced.  The original dwarf test plant is not important.  I have however saved the original seedlings which are planted about 6 inches apart in rows 12 inches apart... man is that going to be a mess in a few years!  I just wanted to save them at least temporarily in case of graft failures, gophers, accidents, etc...  Ideally I'd like to keep them all with enough space for them to grow and fruit later on, but that is not practical considering the resources I'm working with. I've gotten bulk rootstocks from both Copenhaven and Willamette Nursery, and have been happy with both companies.  Again, ask about B grade stocks to save some money.

Shaded nursery bed of seedlings on bud 9 and Geneva 11 dwarfing stocks.  If all goes well these will be ready for permanent planting in rows on a trellis by next winter/spring.  Note that I grafted the scions long.  Not sure that was a good idea yet, but I suppose I'll find out...

GRAFTING ONTO LARGER TREES:  Most grafting onto larger trees is done by a method called top working, wherein large branches are cut off, the cut is split open, and a couple of scions are wedged into the split.  That is a fast way to change a tree to another variety, but it is also crude and likely to introduce rot and disease into the heart of the branch.  Furthermore, it allows for very few varieties to be grafted onto the tree.  In Frame working by contrast, you work onto smaller wood, usually under an inch.  I avoid working into larger wood whenever possible.  If you use frame working, you are keeping the existing frame work of the tree, which has some advantages. I hope to blog about frame working sometime, and I’ll leave most of that discussion till then but, in the meantime, if you are working onto a larger tree, use scions with 8 to 15 buds.  Use cleft grafts if the branch is larger than the scion, and whip and tongue grafts if they are the same and you have a grafting skill level to do so.  I like to paint the longer scions completely with a thin coat of grafting wax to seal and prevent drying.  Other people use parafilm as a wrap to prevent desiccation of the scion.  See the Frankentree post for grafting photos.  On a large tree you can fit upwards of 200 different grafts, although if we follow Markus Kobelt advice to let the scion grow, that could get pretty messy, so leave plenty of room for each variety.  Albert Etter used frameworking to house the 500 or so varieties he collected for testing, as well as to fruit out and test the new varieties he was breeding. About 3 years ago I grafted 4 different open pollinated Wickson apple seedling scions onto various trees of mine.  They have grown great, but have yet to fruit out at all.  This season there is still no sign of blossoms at all on any of them.  So, this is a proposition that takes some time. My new seedlings have now been grafted onto dwarfing Bud-9 rootstocks and are beginning to grow in a nursery bed for planting out into a longer term growing site next winter/spring.  I grafted them rather long as that is my default any more, and it seems to work well as long as the graft is sealed.  Markus Kobelt says to graft the top of the seedling as it is less juvenile than the bottom.  In most cases I grafted most of the seedling stem, but then my seedlings were mostly well under 3 feet.  I also put 4 open pollinated red fleshed seedlings onto some larger trees to grow out for comparison.  I know I said not to use open pollinated seeds, but I just couldn't throw the cute little things in the ditch!  Who knows what's hiding in those genes. The grafted trees will be planted in rows at least 5 feet apart, probably 6' feet on 12" to 18" inch centers and allowed to grow without pruning.  Allowing them to grow without pruning is supposed to bring them out of the juvenile stage, so that's what I'm gonna do.  A trellis is necessary for support as these rootstocks are weak growers with small roots.  I hope for some fruit to examine and taste in about 3 to 5 years, but evaluating any that are decent enough to continue testing will be a much more lengthly proposition.  By that time I will have considerable investment in these plants, but the potential rewards are very exciting for an applehead like me.  Applehead, that may be the title of my next post... I'm also gearing up to make more crosses this season.  The list of interesting varieties is long but most, if not all, will be red flesh crosses.  I haven't made a complete count lately, but I have over 200 varieties on trial that I can use as parents.  I'm just hoping I can curb my enthusiasm enough to keep my time investment low, since that is part of the plan.  A lot of people growing a few seedlings promotes diversity and keeps power in the hands of the people who eat the fruit.  a few people growing a lot of apples has it's advantages to be sure, but to think that we will always be well served by such a system is naive because power is the primary currency of life, and consolidation opens the door for monopolization.  Breeding new apple varieties may not be the most important activity in reclaiming control of our food supply, but if it is a subject of interest to a person, it's one pretty neat way to keep our food closer to home and to live dynamically with a source of our sustenance. If I can come up with one apple that is really worthy of propagation, something that will make people happy, I'll be stoked.  That would probably be the most useful thing the Turkeysong project ever produces.  But the really great part that will make it all worth it, is that I get to name that apple whatever I want!  I've already spent way too much time dreaming up and listing prospective names.  So many names, so few apples... If anyone does come up with a good seedling apple, I just found this website which aims to promote seedling apples!  How cool is that... Seedlingapples on wordpress

Apple Breeding part 2: Doin' it anyway.

applebreeding header steven The awesome Photos of pollinating in this post are by tonia Chi

In part one I laid out some ideas and a little history toward the end of convincing you to try breeding new apples.  Here I present the nitty gritty of pollinating the flowers and in Part 2 I'll cover growing the seeds out.  Neither process is very difficult, nor particularly time consuming.  Later on, grafting of the trees and growing them to fruition may require some skills that most people don't have, but those can be learned elsewhere, or may be covered in future posts here, so don't let that stop you.

SELECTING PARENTS:  You can of course just plant some apple seeds from any apple you like, but the real fun is in selecting two apples that have something awesome about them and assisting them to procreate.  Albert Etter’s success was based on extensive trials using over 500 varieties to find apples with the most promising characteristics to use as parents.  In his own words....

"In selecting apples one has a double index to go by: he selects his mother variety and his "mother-apple" to take the seeds from. The immediate success, of my work may be attributed to the foundation I laid, and my ability to select the individual fruits that will develop superior progeny." 

“I am sending a collection of some of my new varieties of apples... The whole problem is now as simple as breeding up a herd of good dairy cows when one has a good herd to begin with. “

“Some people wonder where it is possible to make any very decided Improvement over existing varieties of apples now in general cultivation. To my notion we have really only begun to improve the apple systematically. I admit I have opportunity to study first hand that which gives me an insight denied to others who think and work along other lines. Comparison is a wonderful means of discerning faint lines. By this simple mental process what seems as opaque as milk reveals lines of similarity undreamed of before."

Something else that interested Etter was taking chances on more primitive apples like crabs, and the red fleshed Surprise apple, to breed in exciting new characteristics.  I would imagine that such a project can take a greater number of generations than working with more refined apples, but in his case it paid off.  Fortunately, we can build on Etter's work.  Wickson, which is probably destined to be Albert's most famous creation, is a case in point.  It is a very small, and incredibly sweet, apple having unique and intense flavor coming from somewhere other than just the standard large varieties.  Though newer apples seem to be diversifying, much of what has been done in breeding so far has been to try to improve on what people already considered to be a good, or archetypal, apple.  We aren't in great need of any more of those!  Apples with intense and diverse flavors, better textures over a greater range of seasons is something we can definitely use.  I would say that instead of crossing apples that are just good, or even really good, cross apples that are really interesting.  Not only will that give us interesting apples, but it just increases the chances that we will come up with something worth growing.  If you come up with the most bubblegum flavoredest apple ever, then we'll all just have to grow it until a better bubblegum flavored apple comes along.  If you're trying to grow a better Golden Delicious or Macintosh style apple, you're probably not going to compete with the many already released by all the advanced breeding programs out there.

My efforts select primarily for flavor and internal color, with keeping ability nudging in as an important third priority, though I'm also interested in better early apples.  All of my crosses so far have been using Albert Etter’s red fleshed apple varieties as one parent, combined with other apples that I think are awesome.

I would encourage you to work only with apples that really inspire you.  If you don't have any, consider collecting some.  At the simplest, just take two awesome apples and rub their stuff together.  It doesn't have to be that simple though.  Some traits are dominant and some recessive.  Dominant traits will express in the offspring even if only one parent carries that gene.  Recessive traits will only express if both parents carry the gene.  It only gets more complicated from there and I've yet to find and assimilate much of that information.  The truth is that  I'm dragging you with me down the path of apple breeding with very little of that knowledge.  The only thing I know at this point is that the red flesh gene is dominant.  So, I cross red fleshed apples in both directions.  I also read something indicating that a columnar habit of the tree is dominant (columnar trees have few if any side branches, having instead single upright trunks).   If anyone out there knows more about dominant and recessive apple traits, post something in the comments, or email me.  I've looked for a simple list, or short treatment of dominant and recessive traits, but have yet to find one.  For more on plant breeding on an amateur scale, including basic genetics, see Carol Deppe's cool book Breed Your Own Vegetable Varieties.  (Carole Deppe is awesome and a huge cut above the average garden writer.  Her book The Resilient Gardener is a must read for homesteader types.)

One thing you can pay attention to is who the parents of apples you like are and consider going back to one of those or using other apples which are the offspring of those same parents.  If the parents are known, that information is not usually difficult to find.  For instance, at least two promising apples here have Northern Spy as a parent.  While I'm likely to use the offspring, I also may end up going back to the source.

(I edited out a section of the original post here misinforming people that patent law extends to pollen.  I'm not totally clear on this, but I don't think it does in the case of vegetatively propagated plants)

A few apples, known as triploids, have sterile pollen.  Although triploids cannot be used as pollen doners, they can be fertilized with pollen from another tree, so look up the apples you want to work with and if one is a sterile triploid, use it as the seed parent and not as the pollen parent.  I can't find a full list of triploids anywhere, but if you google the name of the apple with the word triploid, you'll probably find out if it's a triploid easily enough... that's what I do anyway.  Triploids are uncommon, but some popular and excellent apples are included in the group, such as: Orleans Reinette, Roxbury Russet, Ashmead’s Kernel, Suntan, Belle de Boskoop, Arkansas Black, Baldwin, Bramley’s Seedling, , Gravenstein, Holstein, Jonagold, Jupiter, Lady, McIntosh, Reinette du Canada, Rhode Island Greening, Ribston Pippin, Spigold, Stayman Winesap, Suntan and King of Tompkin's County.  I've had some trouble pollinating triploids and getting their seeds to grow, but will continue trying.

NIGEL DEACON:  I first learned how to pollinate apples from Nigel Deacon in the U.K.  Who is also attempting to breed red fleshed apples.  He cuts off the calyx with a special pair of scissors removing the pollen bearing anthers in one snip.  Nigel’s method is very fast, but the apples grown after pollinating are sometimes slightly deformed due to the missing calyx.  I prefer to remove the petals and anthers carefully with fingers and scissors.  My method is slower, but leaves the apple to grow normally.  I’m not sure one way or the other is really better, but I tend to subscribe to the idea that healthy plants make the best seed doners. Genetic coding is one factor in what a plant turns out like, but it is not set in stone and good genes are better expressed in healthy plants from healthy parents, so I err on the side of caution, even though if I had to guess I'd say it's probably not very relevant.

Nigel's special emasculating scissors.  Read about nigels methods on his extensive website.

BALLOON STAGE:  Apple blossoms are pollinated when they are in what is called the balloon stage.  At this stage, the female parts of the flower in the unopened petals are already receptive to pollen, but insects can’t reach them to pollinate.  At the same time, the Anthers, or boy parts, on which the pollen is produced, have not made any pollen yet, so the flower cannot have self pollinated either.  If you open the virginal flower, you can pollinate it manually and remove all the anthers before they bear pollen, thus assuring that it is your chosen parent which fertilizes the flower.  The balloon stage is when the flowers are blown up like a balloon and look like they will open in the next day or so.  Look at a few clusters of flowers.  If some are open and others are not, the best ones to open and pollinate are the ones with the biggest balloons.  You can often pollinate over a couple of weeks, but it is best to pollinate earlier than to wait till later when there are only a few blossoms left.

Balloon stage.

COLLECTING POLLEN:  Pollen must be collected a day or two before pollinating so that the anthers have time to dry and release the pollen.  Open some flowers of the variety that you want to collect pollen from by carefully pinching away the petals.  The pollen is made by the Anthers, which grow around the edge of the flower on little stalks.  The 5 delicate center stalks are the female parts, which you can ignore for now unless you are pollinating the same flower that you gather pollen from.  In fact, it is easier to just clip them off with the anthers when you are gathering pollen than it is to try avoiding them.  The anthers will not have any pollen on them yet, but they will finish making pollen as they dry.  Trim off the anthers into a small container with a sharp pointed pair of small scissors.  Nigel Deacon uses a hair comb to comb them off.  The anthers produce a small amount of pollen only.  You don’t need a lot to do just a few pollinations, but collect anthers from at least 6 to 10 flowers or so.  Allow the anthers to dry in a warm room until the pollen powders out.  Nigel says the pollen can be stored for up to 3 years if kept very dessicated, but I haven’t tried that yet.

collecting pollen.  The anthers are snipped off and allowed to dry in a small jar.

POLLINATING:  The best time to pollinate is on a warm sunny day in mid morning to early afternoon, but just do it whenever you can make time.  To pollinate a flower, pinch off any in the cluster that are open and any that are small leaving just 2 or 3 large balloon stage buds.

Carefully pinch or trim away the petals of the remaining flower buds.

    Carefully pinch away the flower petals.

With sharp pointed scissors, trim away the anthers around the outside edge of the flower, leaving the 5 center female "pistles" untouched.  There are 5 five pistles coming out of the center of the flower and each one communicates to what will be one of the five seed cells in the mature apple.  If any of these is damaged, use a different flower if you can.  You may still get some seeds, but the tree is more likely to reject a partially fertilized apple.

Carefully trim away all the Anthers along the outside edge of the rim, leaving the five "girl parts" in the center.

Once all the anthers are removed, apply some pollen to the female parts.  Use a piece of grass blade, a fine tiny paint brush, a glass rod, or even the tip of a finger.  There is a slightly sticky tip on the pistle called the Stigma.  Pollen will stick to the stigma easily.

Pollen on grass blade ready to do it.

Pollinating the Stigma. Very little pollen is required, and no foreplay.

You can see when the flower is well pollinated, because the stigma will have pollen stuck to it, but your odds will probably increase if you visit the flower again for a second pollinating the next day.  I don't usually do so and seem to do Ok, although it is not uncommon to find only a few seeds in an apple.  Triploids can be troublesome, so it might be well to visit them again.  I've had poor luck with pollinating Suntan, a triploid, and even poorer luck growing out the few seeds I've managed to get from it.

Pollen on stigma

BTW:  I have a TERRIBLE time remembering the names of all these flower parts for some reason and am constantly looking them up again.  It doesn't really matter though, just remember: girl parts in the middle need pollinating and boy parts on the outside need removing.

BAGGING V.S. NOT BAGGING:  To be as sure as possible that the flowers you've chosen to pollinate are not pollinated with undesirable pollen by bees and other insects, you would have to bag the blossoms, or cage the tree.  I choose not to.  My rationale is that since the petals are removed, there is little to draw insects to the flower.  Also, by that time I've already pollinated the blossom and the stigma should be crusted with pollen of my choosing.  At worst a few of the seeds in the apple might receive some random pollen, but it seems unlikely, therefore I choose not to bother bagging because it would just increase the effort spent for a small degree of insurance.

LABELING:  Always label!  tie a marker around the flower cluster so you can identify it later, because all the other apples will look just the same.  Only the genetic information in the seeds is different, while the fruit will look the same as the other fruit on the tree.  I use neon colored plastic strips so they are easy to find later.  Be sure to write what the crosses are on the tag with permanent marker.  When the apples get to be about half grown, I actually write on the apple with a permanent marker so that if it is knocked off  by birds or wind, I can identify that it is an apple which I pollinated, and which cross it is.  The convention for writing crosses is Seed Parent X Pollen Parent.

A Newton Pippin pollinated with Albert Etter's Grenadine®

The next post will be on growing out the seedlings, and someday I'll write about something besides apples again!  promise...