On September 18th I got to taste a few apples, including a new seedling apple. Some were over the hill and some were not yet ripe, but here is the report.
SKINNER’S SEEDLING: I have some doubt about the identification of this apple, just because it was not very good and reports in the old literature are glowing. Mine also have a lot of red stripping and the descriptions don’t really indicate that as much as they emphasize the yellow background with light striping or just a blush on the sunny side. The birds hit them pretty hard in spite of my covering them with footsox. Birds like large fruit, just like a lot of people do. I’ve been waiting for this variety to bear fruit for a long time. It was grown from a seed of Newtown Pippin brought to California via Wagon by Judge Henry Chapman Skinner in 1849. It is one of only two seedlings that survived out of 13 seeds and was planted on the banks of Coyote Creek in San Jose California. Out of only two seedlings that were allowed to grow, he considered both worth keeping, and this one became somewhat famous, at least in California, where it was even planted by some commercial orchardists.
Funny thing, I used to live right near the site of the original tree when I was just starting my first few years in school. We lived in a crappy, stuccoed, pink duplex. My parents managed to raise three kids on a low income while my mom rode her bike to nursing school. Across the street was a large walnut orchard, and the valley, once a great agricultural area with deep, fertile soil, was still dotted here and there with orchards and fields with solitary large old two story farmhouses defiantly standing their ground. By now, even more of that outstanding agricultural land has been paved over with cheap tract housing. Judge Skinners place was probably quite large and is now all dense housing. We used to explore and catch crawdads in the same Coyote Creek that Skinner’s Seedling was planted along, only about 15 blocks from where we lived. At that time, the creek was full of old tires, shopping carts, trash of all kinds and huge numbers of what are still to this day the largest crawdads I’ve ever caught. We used to go there with some neighborhood kids that sniffed glue on a regular basis. They seemed like about the dumbest people I ever met at the time and probably were lol. As dirty, rough and probably dangerous as that city environment was, we kids still wandered and played as we pleased. I think a lot of parents don’t give their kids that same kind of free reign these days. I think Judge skinner would be shocked and saddened at the defiled state of that once beautiful, prime farm land, though he was unknowingly paving the way for that eventuality.
This apple was very highly regarded. Check out the following quotes:
"Santa Clara King: Fruit large to very large; form, oblate, conic, slightly mixed; color rich lemon yellow, faintly striped with bright red; flesh, yellowish white, very tender, juicy, sprightly, mild subacid; quality best. Season, September and October. This is the best very large apple we have seen. Said to be a good grower and productive."
“It is one of our best summer apples. The color is a light yellow, quality good and sells well. The tree is a good grower and almost wholly resists blight.”
“form, oblate, conical; size, large; color, light green, blushed: flesh. texture fine, tender, juicy ; color, white ; flavor, subacid : quality, very good to best: use, dessert, kitchen, market: season. August.”
“The Skinner seedling as it is popularly known by thousands of consumers, or Skinner's pippin as it was named by the Horticultural Society, is one of the meritorious products of the Santa Clara valley, as well as having the"distinction of originating here. Its popularity increases as it becomes more widely known, for it undoubtedly suits the taste of more people during its season than any other apple grown in California. Ripening as it does during the warm, sunny weather of the first week in August. it must be picked at the right time and carefully protected from the weather in order to preserve its delicate flavor which evaporates and passes away rapidly when exposed to sun and wind. Its history is quite interesting and is about as follows.On March 29, 1849, Henry Chapman Skinner left Milwaukee, Wis., and crossed the plains to California, taking with him some Newtown pippin apples. On the long trip across the plains most of the apples decayed, but one was saved, which contained thirteen seeds, a lucky number in this instance. The seeds were carefully saved. Judge Skinner settled in San Jose in April. 1850, at what is now known as the Sweigert place, corner of Fifteenth and Julian streets. In the fall he planted thirteen apple seeds. Seven of them grew, but were all discarded but two. One of these proved to be a sour apple of good quality, and the other was Skinner's seedling. The tree grew thriftily, as is its nature, and in September, 1857, the first fruits, thirty-two in number were exhibited at the annual fair of the Santa Clara Valley Agricultural Society. The last record of the original tree was in 1878. It was then still standing at the back of the place near the Coyote creek, and in full bearing.”
“Skinner's Seedling is but little known in this country, but is destined to be the greatest money maker of any other apple grown in this section ripening as it does ahead of the Gravenstein. The tree is of a very hardy stock and a sure cropper. The apples are large, well formed, of splendid flavor and unusual shipping qualities. The color is of a clear, transparent, yellowish green, with a slight blush where it is kissed by the sun. Theo. Heiss, who lives northwest of Browns Valley, has a dozen or so of old trees of the above variety which bore a heavy crop of splendid apples this year and sold for a handsome price in Vallejo and was preferred by those who had used them to the Gravenstein or any other apple. The wood of the limbs is very tough and can hardly be broken. [This statement is rather surprising to us as we have long considered the wood of Skinner's Seedling as exceedingly brittle, especially- the wood of the spur which is very apt to come off with the fruit. Are we mistaken in that matter? —Editor.]”
Notes for the horticultural society meeting in November 1887 indicate that Skinner’s Seedling was so named instead of the name Santa Clara County King. E.J. Wickson, author of California Fruits apparently disagreed with adding seedling to apple names, which I tend to agree with. It was agreed to hereafter call the apple known both as Skinner's Seedling " and the "Santa Clara County King" by this former name….. but Mr. Coates and Mr. Wickson both protested against tacking the word seedling after names. Mr. Wickson urged that this practice was condemned by the American Pomological Society. Mr. Coates praised the practice of Mr. Hatch, which is to find original and characteristic names for new varieties.”
My own samples, if they are indeed Skinner’s Seedling, seemed to ripen about the right time, but I got them late and they had gone soft. The ones I tasted earlier were not very promising either, but I may have missed a magic window. It sure does sound promising in the old literature though.
GRAVENSTEIN: It’s hard for me to ever get this apple past the birds. It’s pretty good eating at it’s best, but it’s most suited to cooking. The flavor I can’t really describe, but it’s good and somewhat unique. This year I discovered the earlier Viking, which bears surprising similarities, but seems perhaps more intriguing and more complex in flavor, if more thin and acidic. There is a similarity between the flavors of the two apples somehow. I don’t believe there is any Gravenstein in Viking’s genes, but they seem like siblings in everything from appearance to leaning toward acid and the style of flavor.
MOTHER: Mother is very good this year. It has a rich flavor, fruity, on a background of “red apple”. In the best ones there is what I usually refer to as a fruit candy flavor, because my reference point growing up was not flavorful apples, but artificially flavored fruit candy from the corner store. That’s kind of sad, but I know most people are probably in the same boat these days. Mother is worth growing and has a long reputation as an exceptional early apple. Overall mother get’s two thumbs up for productivity, beauty and flavor this year.
SUNRISE This year Sunrise lived up to it’s usual reputation, being mild, sweet, unoffensive, easy to eat, pleasant, but perhaps a little boring. I think they are still a week or more away from being at their best though and I have hopes that they will become a little richer and sweeter if hung longer in the sun. I grafted a branch out in a sunny spot some years ago and it’s really just starting to bear well, so I’m hoping to taste more good specimens over the coming weeks.
ST. EDMUND’S PIPPIN (aka st. edmund’s russet): Early in the season, this apple tasted thin and acidic. By now it is soft and insipid. It is the most pear-like apple I think I’ve ever had. It has the grainy texture of an under ripe pear, pear flavor and pear-like russet skin. The flesh is very dry and the fruit is very light in weight. Overall it is a disappointment here and will probably be grafted over. Originally it seemed to hold promise as a good early russet, but it’s also not as early as I was hoping. I will probably graft it over to an earlier apple like.
HOLLOW LOG: An old southern apple. Looking at the description in Lee Calouns book Old Southern Apple, it may be mislabeled, since neither the season or the description match. It is not quite ripe yet, but seems somewhat promising. It is hard and dense. I think another one to three weeks for this one to ripen.
WICKSON SEEDLING #3 2011: In 2011, I planted open pollinated seeds of Wickson from a box of apples given to me by some friends after I helped them lay concrete block for a root cellar. I think by then I was already partially inspired by Albert Etter, early 20th century apple breeder who bred the Wickson apple. I remember thinking that this apple was so good that it had to produce a certain percentage of good apples from seed. In fact, it was hard to imagine the seeds producing bad apples. I was aware of the common assertion that you can’t grow apples from seed, but, when it comes to information, there is not much I take at face value. out of the seeds I planted, I ended up grafting 4 or 5 of them onto already established trees, and 3 of those lived and fruited. This is the final one of those seedlings to fruit, the others being the seedling that I named BITE ME! and a tiny flavorless, acid-less green crab the size of a large marble.

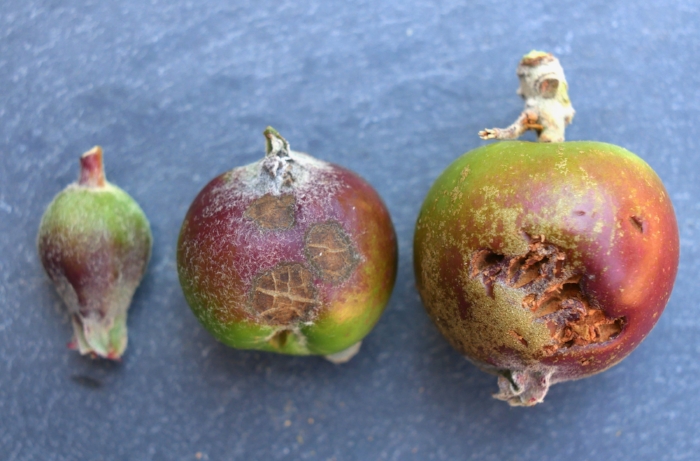
Open pollinated Wickson seedling #3, 2011
This seedling fruited last year, but it wasn’t that exciting. There was nothing wrong with it, it was just unremarkable. This year it seems much more promising. There is definitely some of the unique flavor type possessed by Wickson, which is also found in Wickson relatives and other crabs. Though still subtle, but I’m hoping that flavor will develop more as the apples ripen further over the next one to three weeks. Some of them have watercore, but that is not uncommon in young trees, especially in arid conditions like mine. Many varieties will outgrow it eventually. Overall, the best specimens this year so far, which are still not quite ripe, compete well with the best apples that I tasted in this session, and are certainly above the average apple in my large collection. I will go out on a limb and say it is not going to be as good as Bite Me!, the first apple to bloom out of the this group of Wickson seedlings, but it looks promising. Sometimes trees have to fruit a few times to come into their best quality. That seems to go for not just new seedlings and new grafted trees, but possibly even for branches grafted onto established trees. I’m not sure why that would be. It’s just a casual observation.
This apple is rather dense and firm fleshed, unlike Bite Me! which has a more open, juicy and easy to eat texture. It also has thicker skin. The resemblance to Wickson is apparent, though it is somewhere in size between Bite Me and that apple. It is not tiny, but it is small. As long as the quality is there, size is not that important. A mediocre small apple is much less interesting however, so it better shape up. I have quite a few apples on the branch this year. Hopefully I’ll get some good representative fruits in the coming weeks, and you’ll probably hear more about it before the season is over.
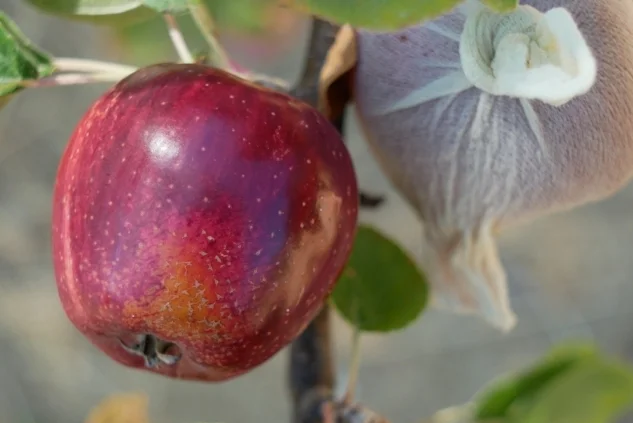
Even though the fruits are covered with foot sox for protection, they are still a gorgeous deep red color. Uncovered spots that get more light are even darker in color. The conic shape is reminiscent of wickson, but it averages quite a bit larger.